

 Reply With Quote
nanocom_rightangle.jpg
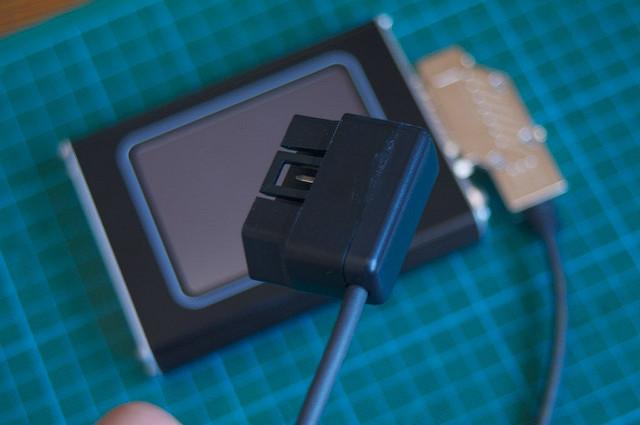
Bit of a dodgy pic but this gives you an idea of how the right angle db15 backshell lines up with the nanocom evo.

 YarnMaster
I've managed to find sources for connectors that may be of interest to those who find the Nanocom supplied cables a bit awkward for in-car instrument usage.
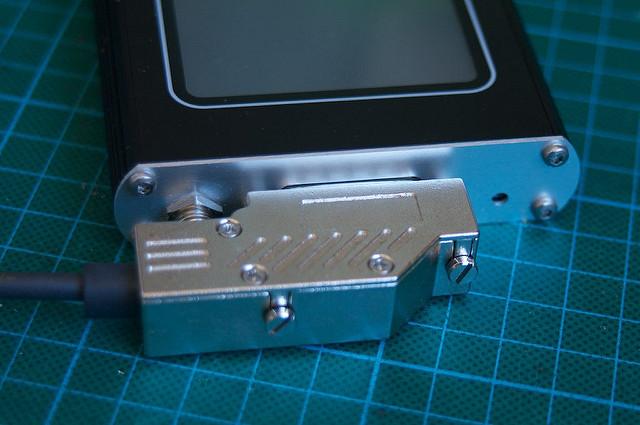
The first is a low profile 90º db15 backshell.
backshell.JPG
These are stocked by RS Components/Allied Electronics. The RS part number is 2509191199. They are $7.96+gst each with a minimum order of 2.
The second is a low profile 90º OBD-II plug. These are sold by Fes-Auto in the US and work out at about $20AU shipped for one. I don't have the connector with me but they have a tiny footprint compared with the standard item. The cable can exit either left or right of the plug, and this makes it easy to route the cable in a way that doesn't encroach on the footwell.
OBD-II connector
To give you an idea this is a pic from the vendors website showing the connector as part of a cable assembly.
DashHawk_Cable_1_400.jpg
hope this is of use to someone.
cheers
Paul
YarnMaster
nanocom_rightangle.jpg
Bit of a dodgy pic but this gives you an idea of how the right angle db15 backshell lines up with the nanocom evo.
Master
SubscriberGreat bit of detective work Paul. I've been wondering about finding a solution to mounting my Nanocom in a way that doesn't impede in driving.
Dave
TRS Chip ,D2a I/c, Silcone Hoses, EMS2, 2" Lift, BFG KM2s, QT Diff Guards, 4X4 DE Guard, Shadow Bar. VRS Winch, LR Light Guards, .50 CDL, Provent 200, Slickrock Disconnects, Rovadrive Sump, G4 Roof Rails, D2a SLABS ECU, APT Sliders.DBA Rotors. ABS Ext.
YarnMaster
Paul, pm attachment didn't appear to work. Hopefully pic attached this time.
D4 MY16 TDV6 - Cambo towing magic, Traxide Batteries, X Lifter, GAP ID Tool, Snorkel, Mitch Hitch, Clearview Mirrors, F&R Dashcams, CB
RRC MY95 LSE Vogue Softdash "Bessie" with MY99 TD5 and 4HP24 transplants
SADLY SOLD MY04 D2a TD5 auto and MY10 D4 2.7 both with lots of goodies
YarnMaster
They look like the ones
I was going to use the one I bought with the Nanocom One I owned at the time, but made the very silly mistake of following the wiring pairs listed on the Nanocom FAQ without double checking against the patch cable I'd bought. The One uses an RJ45/network connector rather than DB15 and of course the cable I had used different pairs. Hence the rather hacked at appearance of the backshellThat is moot given I now have the Evo....
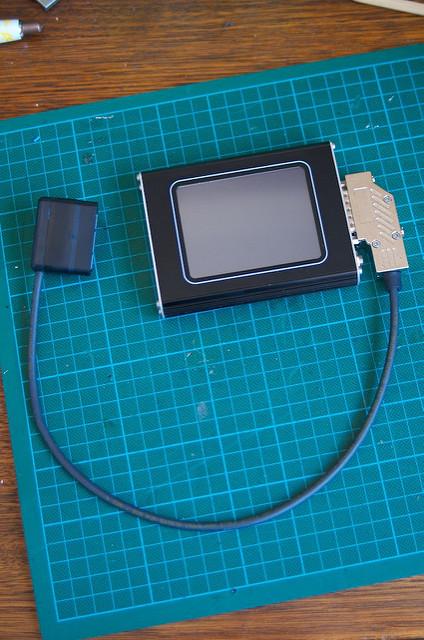
This is how the assembled connector sits in a D2 using a more flexible cable than supplied:
BBS have gone overkill on the EVO connector cable which is a "good thing" for something that is designed to be repeatedly unplugged. I'd use a lighter, more flexible cable for instrument panel usage. You should be able to route it up beside the centre console without too much drama.
cheers
Paul
YarnMaster
I finally finished putting together a short cable with the r-a connectors, and some jaycar sensor wire. The length is per gavinwibrow's request as he is mounting his Nanocom in front of the D2 coin tray, which seems to be a reasonably good place to house the Evo.
Wizard
SubscriberOfftrack, can we please have the part numbers for the various parts, and a wiring diagram...?
Thanks
Regards, Will
Stornoway Grey '09 D3 TDV6 SE, 2015 TERRITORY Engine at 348k
LLAMS, FYRLYTS, OL D4 Bar
Safari Snorkel, D4 hitch, ARB CKMA12
Wizard
Hmm Paul
You may have an after hours job soldering cables if you are not careful
That looks a pretty neat job
Steve
Last edited by Rok_Dr; 15th January 2013 at 07:53 PM. Reason: Typo
YarnMaster
I've got mine on order - Paul has done a brilliant job! Cheers
D4 MY16 TDV6 - Cambo towing magic, Traxide Batteries, X Lifter, GAP ID Tool, Snorkel, Mitch Hitch, Clearview Mirrors, F&R Dashcams, CB
RRC MY95 LSE Vogue Softdash "Bessie" with MY99 TD5 and 4HP24 transplants
SADLY SOLD MY04 D2a TD5 auto and MY10 D4 2.7 both with lots of goodies
YarnMaster
See the first post in this thread.Originally Posted by winaje

The plug for the nanocom is a basic db15 solder pin job that can be picked up from Jaycar. The wire I used is 4-core sensor wire, although I'd probably use mini "star quad" microphone cable like the mogami w2893 if I was going to buy cable again.
http://www.mogamicable.com/category/...crophone/quad/
The star quad is design to repeated movement and flexing as a microphone cable, so should be sturdy enough for a short instrument cable.
OBD -> DB15
4 -> 8 - Black
5 -> 15 - Brown
7 -> 4 K-line - White
16 -> 14 Power - Blue
The colours refer to the cores in the wire I used. Black/Brown are ground wires and are connected on the OBD plug PCB, so it doesn't mater which way round you hook those up.
The linked OBD plug has a very weirdly laid out PCB board, so the wire layout don't match the pins. I basically id'd the correct pins then traced back to the position on the pcb I need to hook the wire up to.
cheers
Paul
 Posting Permissions
| Search AULRO.com ONLY! |
Search All the Web! |
|---|
|
AULRO.com Copyright 2001 - 2025 Independently Owned and Operated by Dave Blears Computing - DavecandoIT - AULRO.com LAND ROVER and its logo are the registered trademarks of Land Rover. Land Rover is not affiliated with AULRO.com. |
|
")
")

Bookmarks