Page 7 of 7 FirstFirst ... 567
Results 61 to 70 of 70

Thread: AMK Compressor and "Normal Height Only" fault, and fix!

  1. #61
    Join Date
    Aug 2015
    Location
    Coolamon, NSW
    Posts
    783
    Total Downloaded
    0
    Quote Originally Posted by LRD414 View Post
    Justin, did you remove the flap piece behind the taillight to improve access to remove/refit the filter?

    I'd like to get the flap assembly out to have a good look and clean.

    Cheers,
    Scott
    Scott,
    No I did not remove the flaps, although I will be pulling it out to check how much dust has accumulated on the other side of them and to clean it out.
    After seeing how much the flaps on just one side move when a door or the tailgate is shut, I would not like to seal up that side either, as I bet the increased effort to shut a door would encourage slamming, which I don't want to subject the catches to.
    - Justin
    Selling soon - MY10 D4 3.0 TDV6 SE with E-Diff & LLAMS, 265/65R18 Maxxis Razr A/T
    Moved into MY12 L322 4.4 TDV8 Autobiography
    VK2HFJ

  2. #62
    Join Date
    Aug 2015
    Location
    Coolamon, NSW
    Posts
    783
    Total Downloaded
    0
    As promised, here is the story of getting my car off the bump stops without a compressor that worked at all.

    I was stopped at a set of traffic lights when suddenly the car dropped to the bump stops with a new error code - "air inlet component failure" and a compressor that stopped sucking air completely on it's inlet pipe - so my trick of using my tyre compressor as a precharger to help the worn out AMK would no longer work.

    I don't have photos of when it happened, so use your imagination a little.

    First, make sure you select the correct line out of the compressor


    It will finish like this on the resivoir valve block


    It is a 6mm pipe, so I cut it with a pair of conduit cutters so it would be a nice clean square cut, and attached a high pressure joiner into position on the valve block end of the cut pipe.


    Now, using some spare 6mm air line, and this blow gun nozzle (it screws into my inflation gun on the Max Air 3 - came as part of a very cheap Bunnings blow nozzle set)


    I used a heat gun to soften the pipe enough to slide the hose a fair way up, so that it could hold the 150psi that my compressor cuts out at.

    To put less stress on the compressor, the car was jacked up above standard height back and then front - if out in the bush, you can do 1 corner at a time if needed, using the OE jack.

    Then using my IID Tool BT and the app on my phone, I had the car started, then went into Service/Test -> RLM Suspension -> Test Valves.

    I then used this function to "Adjust Rear" until weight was taken off the jack, then jacked the front and did the same. The front needs higher pressure due to the extra weight, so my compressor was on it's pressure limit (150 psi), but the height according the my IID Tool live values is right on "Normal Height".

    Afterwards, all I had to do was set the suspension to "Build Mode" (also removed the 20A fuse for good measure) and remove my 6mm pipe attached to my tyre compressor and attach it back onto the line out of the compressor.
    - Justin
    Selling soon - MY10 D4 3.0 TDV6 SE with E-Diff & LLAMS, 265/65R18 Maxxis Razr A/T
    Moved into MY12 L322 4.4 TDV8 Autobiography
    VK2HFJ

  3. #63
    Join Date
    Aug 2015
    Location
    Coolamon, NSW
    Posts
    783
    Total Downloaded
    0
    So my new compressor arrived today - it is the one supplied by Britpart, but is a proper AMK unit. The mounting bracket is quite robust compared to the one on the D4 - so I think I will change the bracket to the new one when I do the swap.
    In regards to duty cycle - this new unit has a 400 second (6 minutes 40 seconds) maximum run time - twice that of the top spec (200 seconds) AMK list on their website, which means that the D4 should not ever exceed this time limit.

    I ordered it from the UK as the same part in Australia from a local Britpart reseller was quoted at $1155 inc GST + postage, and this one came in under $750 delivered, and took 6 days.
    - Justin
    Selling soon - MY10 D4 3.0 TDV6 SE with E-Diff & LLAMS, 265/65R18 Maxxis Razr A/T
    Moved into MY12 L322 4.4 TDV8 Autobiography
    VK2HFJ

  4. #64
    Join Date
    Aug 2015
    Location
    Coolamon, NSW
    Posts
    783
    Total Downloaded
    0
    So, if anyone orders the same compressor I did, I found that the mounting holes are not tapped - so you will need to tap an M6 x 1.0 thread in the 3 points that are used before you can attach it to the mounting bracket.

    All going well, I will have the new silencer and compressor installed Saturday morning so I can move onto the LCA bushes next.
    - Justin
    Selling soon - MY10 D4 3.0 TDV6 SE with E-Diff & LLAMS, 265/65R18 Maxxis Razr A/T
    Moved into MY12 L322 4.4 TDV8 Autobiography
    VK2HFJ

  5. #65
    LRD414's Avatar
    LRD414 is offline Super Moderator Subscriber
    Join Date
    Oct 2014
    Location
    Brisbane
    Posts
    3,737
    Total Downloaded
    0
    Quote Originally Posted by Grentarc View Post
    All going well, I will have the new silencer and compressor installed Saturday morning so I can move onto the LCA bushes next.
    Justin, have you seen the other thread mentioning to "slot the top mount of the three mounts to aid installation" ?
    I'm guessing this is related to the three points you've had to tap but perhaps is referring to the "L" bracket that mounts to the chassis.
    Not clear to me so any photos etc appreciated (which will probably be painful when you're in the middle of the job!)

    Also, for the bushes have you got a press like Tombies?

    Cheers,
    Scott
    D4 TDV6 MY14 with Llams, Tuffant Wheels, Traxide DBS, APT sliders & protection plates, Prospeed Winch Mount w/ Carbon 12K, Mitch Hitch & Drifta Drawers
    Link to my D4 Build Thread
    D3 2005 V8 Petrol
    Ex '77 RRC 2 door. Long gone but not forgotten.

  6. #66
    Join Date
    Aug 2015
    Location
    Coolamon, NSW
    Posts
    783
    Total Downloaded
    0
    Quote Originally Posted by LRD414 View Post
    Justin, have you seen the other thread mentioning to "slot the top mount of the three mounts to aid installation" ?
    I'm guessing this is related to the three points you've had to tap but perhaps is referring to the "L" bracket that mounts to the chassis.
    Not clear to me so any photos etc appreciated (which will probably be painful when you're in the middle of the job!)

    Also, for the bushes have you got a press like Tombies?

    Cheers,
    Scott
    The slotting of the top hole is a Hitachi thing I think, as I can remove and replace my AMK compressor in under 10 minutes (less than 5 minutes each way). With the AMK, if you just undo the 3 compressor spring mounts/bolts and leave the mounting bracket attached to the chassis, the compressor will slide out towards the rear wheel quite easily.

    The points I had to tap are the threads on the actual compressor so that the 3 T30 bolts have a thread to screw into

    I will take some photos tonight of my new compressor on the bracket that came with it so you can get an idea of what's what without all the dirt and hard to see angles.

    For my LCA bushes I will be ordering a generic press set that people in the UK have had great success with, and at about $150 or so, I will give it a go.
    - Justin
    Selling soon - MY10 D4 3.0 TDV6 SE with E-Diff & LLAMS, 265/65R18 Maxxis Razr A/T
    Moved into MY12 L322 4.4 TDV8 Autobiography
    VK2HFJ

  7. #67
    Join Date
    Aug 2015
    Location
    Coolamon, NSW
    Posts
    783
    Total Downloaded
    0
    These are the 3 chassis bolt holes, as you can see, in not easy to reach places, especially the top one.


    Here are the ones I remove ( T30 torx)

    - Justin
    Selling soon - MY10 D4 3.0 TDV6 SE with E-Diff & LLAMS, 265/65R18 Maxxis Razr A/T
    Moved into MY12 L322 4.4 TDV8 Autobiography
    VK2HFJ

  8. #68
    Join Date
    Aug 2015
    Location
    Coolamon, NSW
    Posts
    783
    Total Downloaded
    0
    So the compressor and silencer have been replaced - the silencer is a little tricky to fit, but can be done.
    This is why mine needed doing - I had hooked up my tyre compressor to where the EAS inlet filter is, completely forgetting the silencer is between the filter and compressor. My compressor has a 150psi cutout, so hooked it up, turned it on and let it hit its cutout. About 10 seconds later I hear a massive explosion under the car and plastic shrapnel went everywhere.


    Here are the old and new compressors side by side


    And here is the scoring on the bore of the old compressor
    - Justin
    Selling soon - MY10 D4 3.0 TDV6 SE with E-Diff & LLAMS, 265/65R18 Maxxis Razr A/T
    Moved into MY12 L322 4.4 TDV8 Autobiography
    VK2HFJ

  9. #69
    Join Date
    Sep 2010
    Location
    Sydney
    Posts
    35
    Total Downloaded
    0

    Location of Suspension compressor air filter if third row air con is fitted please?

    Does anyone know where the air filter for the suspension compressor is fitted if air con for the third row is fitted - On our D4 MY2011 the LH rear space is mostly filled with air con components and we cant see the air filter in this area - thanks for any pointers on where to look cheers


    Quote Originally Posted by Grentarc View Post
    The dryer is after the compressor, so there is no need to change it's design (yet?)

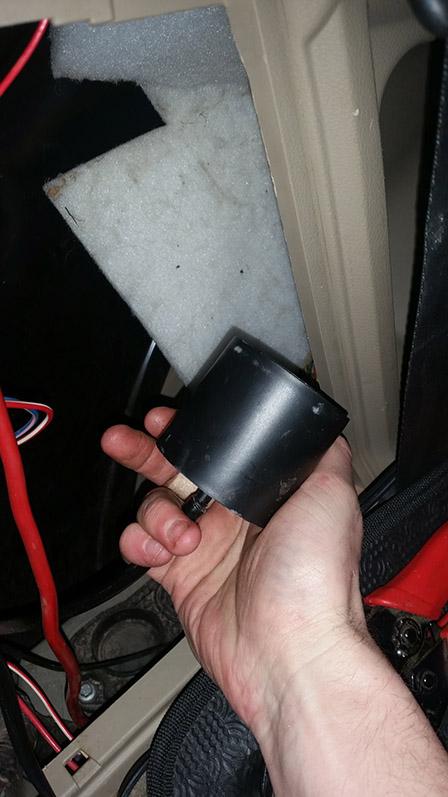
    This is the filter that is in the cavity behind the LH plastic cover in the rear. The filter is clipped into the body at about tail light height.


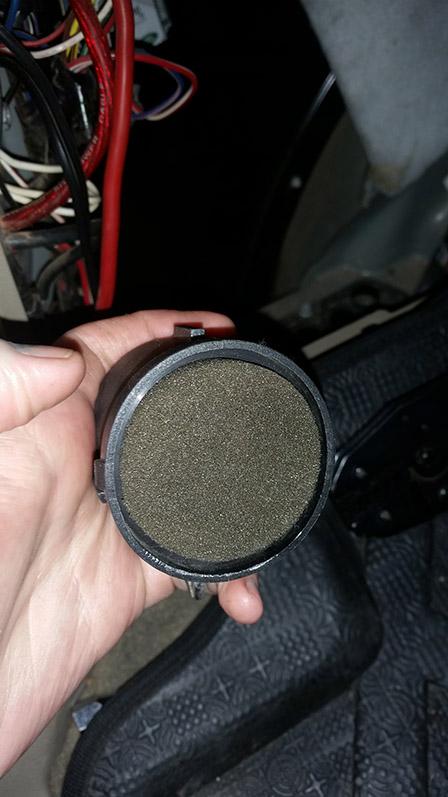
    If you open it up (the outside "cap" just pulls off) , the first layer is sponge - you can see with mine that the sponge doesn't fully seal up against the inside walls


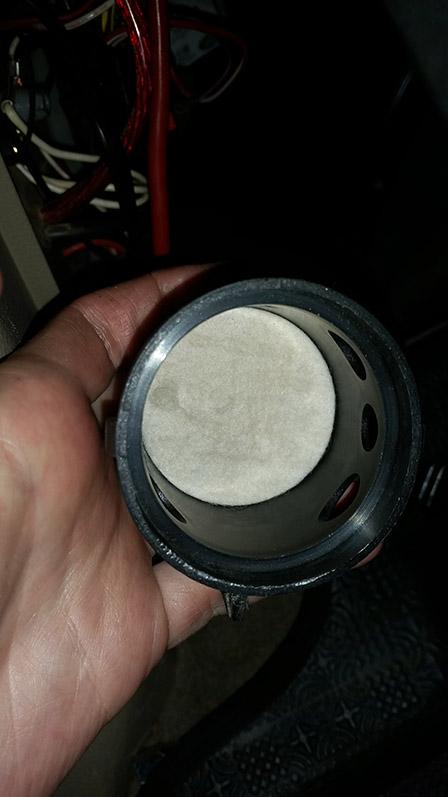
    The next (and final) layer is a thich felt pad - it too isn't a tight fit - not loose, but this is air we are talking about, so it will go down the sides, and carry a fair bit of dirt with it


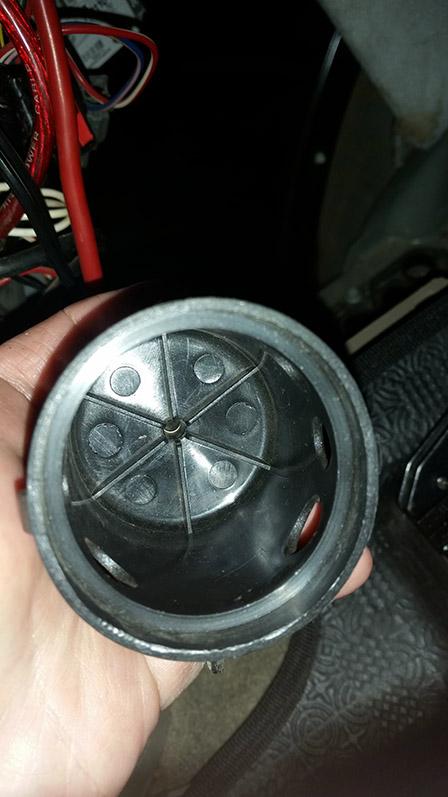
    In the bottom, you can see the ribs that are in place to give an even flow and to stop the felt from blocking the hole


    After a bit of thought and discussion my father (Graeme) and I had the thought to change it to a paper filter, and just make sure it is changed like an engine air filter.


    Edit - I got a response from AMK today that they have passed on my request to their Automotive Department, and if they do not get in touch, send another email to HQ

  10. #70
    Join Date
    Jan 1970
    Location
    NSW SW Slopes
    Posts
    12,033
    Total Downloaded
    0
    The (small) filter is basically out of sight up against the inside of the pillar clipped onto the pillar probably 2/3rd the way up to the window level. Reach in and feel around or use a mirror.
    MY21.5 L405 D350 Vogue SE with 19s. Produce LLAMS for LR/RR, Jeep GC/Dodge Ram
    VK2HFG and APRS W1 digi, RTK base station using LoRa

Page 7 of 7 FirstFirst ... 567

Bookmarks

Bookmarks

Posting Permissions

  • You may not post new threads
  • You may not post replies
  • You may not post attachments
  • You may not edit your posts
  •  
Search AULRO.com ONLY!
Search All the Web!