|
|||||||
| Projects and Tutorials Documented Projects and Tutorials |
![]() |
|
|
Thread Tools | Display Modes |
|
|||
|
Expedition Home-build - AU to IE
After lurking around the forums for quite a while now, and asking for help now and again, I figure it's time for me to put my current project on the internet - and that is, to build a Defender that will get me home. Not a big deal you might say, but when home is Ireland, it makes things interesting. When the route home takes you from outback Australia to the South American rainforests to the Alaskan tundra, 'interesting' begins to become an understatement.
For those that don't know me, I've spent the last two and a half years travelling overland to here from Ireland through 34 countries - an amazing experience - and now that I have been here for a bit, it's time for me to start making my way back home. My Defender is my pride and joy here, and now that it's served me so well as a work vehicle, it's time to start kitting it out to first travel around Oz, and then make the trip back home. And as with everything, there are a couple of factors to consider.
Now the fun begins ![]() 
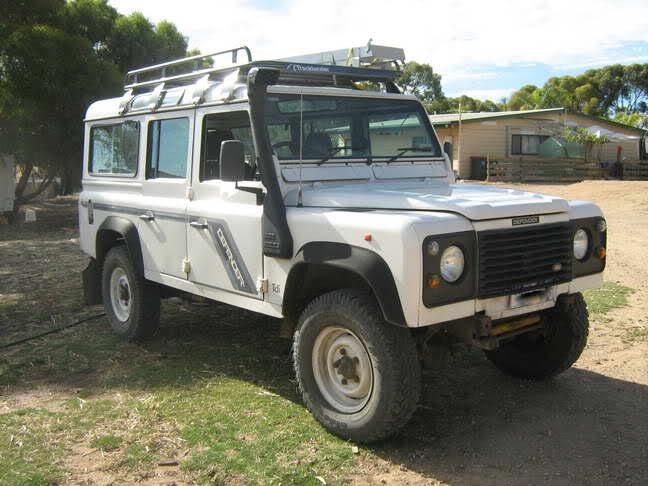
Almost forgot - my pride and joy:
|
| The Following 15 Users Say Thank You to mike_ie For This Useful Post: | ||
boger (25th July 2010), cameraguy (16th March 2010), chunk (19th May 2010), Disco44 (23rd December 2009), Disco_owner (23rd January 2010), lardy (9th October 2010), miky (23rd December 2009), Offender90 (14th January 2010), schmierer LR at singleton (20th December 2009), Sideroad (28th January 2010), Sleepy (18th January 2010), stooge (21st December 2009), subasurf (25th February 2010), tas130 (22nd December 2009), Treads (28th December 2009) | ||
| The Following User Says Thank You to justinc For This Useful Post: | ||
mike_ie (20th December 2009) | ||
|
||||
|
hey, its done and dusted, hand full of jerries couple of boxes of food, swag and some maps and with a quick stop to a tyre shop and via MR auto to grab the usual spares and best of luck to ya.
If you wind up near enough to where Im at Im happy to lay on spanners for ya.
__________________
Dave "In a Landrover the other vehicle is your crumple zone." Fozzy, 2.25D SIII Ex DCA Ute The midlife crisis car Some D1 For spelling call Rogets, for mechanicing call me.
|
|
|||
|
Step 1: Stripping Out The Interior
To build, one must first destroy, or something like that. And the first step for me is to take out as much as the old lining as I can and fix it up, for a few reasons. As you can see from the photos, the roof lining is seriously sagging from front to back, and resembles a cave-in in spots. And while this isn’t a problem that will keep me off the road, it looks bad, and is a pain in the @rse when it sags low enough to catch stuff on (including my head) now and again. The more practical reasons for stripping it out is so that I can check for any structural problems, I’ll be able to see where I can anchor additions such as storage space and a roof console, can run wiring for additional interior lighting, and while I am at it, will try to insulate for sound and temperature. The soon-to-be-removed sagging roof lining: ![]() First step: Remove all of the crap from the back of your Defender – this is as clean as my car has been in a year ![]() ![]() The next step is to take off the fixtures such as grab handles and mirror, then the plastic panels the line the side walls of the defender, as they fit over the three roof panels. There seems to be a bit of an order to these, which I found out through trial and error. First ones to come out are the rear panels, which sit either side of the rear door. ![]() I originally lifted the little plastic covers to find rivets, and was almost about to drill them out, before I realised that they simply held retaining clips to the panel, and didn’t actually fix the panel to the body of the Landy. To remove the panel, catch it from underneath on the back door side, and lift it out. The clips on the door side *should* release fairly easily. ![]() The clips in question. Do not lose these as I have no idea where you’d get replacements If they do become loose during removal, give them a squeeze with a set of pliers and they’re ready for use again. ![]() Next, the side panels. These are held in place by three screws and plates at the bottom of each panel. The plates that they screw into are held by pressure under the lip of the body, so that when you do loosen them, the plate drops back into the channel behind and can be a bit fiddly to get out. ![]() Before removing the panel, the rear seatbelts have to be unbolted from the anchor point inside each side door, and the belt head fed through the hole in the panel. The bolt is insulated from the aluminium tub by a plastic washer, which, in my case, had disintegrated, and signs of corrosion were obvious. ![]() ![]() Finally the strip above each door can be lifted out. The headliner is also removed in a particular order. The middle panel overlaps both the front and rear panel, so this must go first. To remove, either lever out the plastic studs with a screwdriver, or simply break them off (replacements are easily obtainable). Me, I kept mine, because I’m cheap like that Once all of the studs are removed, the panel should come out with a little maneuvering, and in my case, swearing. Apologies for the lack of pics - I'm working on my own, and hard to wield a camera and roof liner at the same time. Next, the front headliner can be removed. You’ll first need to make sure that the sunvisors and rear view mirror have been unscrewed, as they also keep the headliner in place. After that it’s a repeat of the previous panel - get the plastic studs out using your preferred method – mine involved getting my fingers in between the headliner and the roof and levering it downwards. Before you pull the panel out too far however, disconnect the wires for the interior light at the back of the liner, and then remove. Last but not least, the rear panel. First remove the small panel above the rear door – also held in place by plastic studs – then remove the roof panel, taking care as before with the interior light. One stripped Defender, complete with copious amounts of red dust: ![]() And one hose-down later: ![]() The roof panels, now removed. I stripped back one of them and you can see where the backing foam has simply disintegrated to the point where it brushes off at a touch – any wonder it was peeling away from the hard backing!! ![]() ![]() I was going to just chuck it out, but seeing as I have nothing to lose, I’m going to try to bond the now foamless headliner back over the liner shell and see how it turns out. Should that fail, I think it’s time for some marine carpet to be pulled out of retirement..... |
| The Following 4 Users Say Thank You to mike_ie For This Useful Post: | ||
boger (25th July 2010), Bushman83 (18th March 2010), Chucaro (17th February 2010), schmierer LR at singleton (3rd August 2010) | ||
| Please support our Advertisers |
|
|||
|
Guys, thank you both for the offers. I may very well take you both up on them in the near future. And yeah, despite the swearing and late nights that go with this build, I am enjoying the planning of it immensely. It's the trip of a lifetime and a big factor is that I don't want to reach my old man's age, and regret not doing this. I hope that makes sense.
|
|
||||
|
Excellent plan. Will be one hell of a drive.
Is it a 300TDI or a 200TDI? I dn't know much about 200's but the 300's should have a new timing belt every 80,000Kms so would be a good idea to replace it before you go, if you don't know when it was last done. The other thing that seems to catch people out on long overland trips is wheel bearings. Might be worth whacking in some new ones or at least checking out the condition of the existing ones. For tyres, I'd say go the Michelin XZY. Favourite tyre of overlanding Landie expeditions. See of you can get a set of 'take-offs' from a 130 where the owner has 'upgraded' to alloys or fatter tyres. They are expensive new, but I have seen sets of 5 advertised for around $1000 with minimal KMs on them. Will be watching this thread with interest. Cheers David |
|
||||
|
Best of luck with your trip, your right, its a trip that many dream of but only a few do!
So, after watching MacGyver, you should be able to construct a PTO winch and bar from a few paper clips, a rubber band and some zip ties
|
|
||||
|
Quote:
![]() Good idea about the Michelins, also getting them ON 130 HD rims would be a really good upgrade. JC |
![]() |
| Thread Tools | |
| Display Modes | |
|
|