Results 1 to 6 of 6

Thread: Petrol series starter motor refurbishment

  1. #1
    Join Date
    Jun 2008
    Location
    Morpeth NSW
    Posts
    782
    Total Downloaded
    0

    Petrol series starter motor refurbishment

    Hello everyone,

    My starter motor has been slowly dying for some time now, last night was the first time I had to resort to the hand crank.

    It sometimes refuses to turn, and other times turns slowly and then builds up it's revs to a normal amount.

    I have pulled it out and apart. The brushes are noticeably worn, which I will replace. But also, There are smatterings of rust on the armature and the 4 metal plates in the housing.


    Do I need to do more than just replace the brushes, or will the starter battle on with the rust?

    Cheers,

    Sam

  2. #2
    JDNSW's Avatar
    JDNSW is offline RoverLord Silver Subscriber
    Join Date
    Jan 1970
    Location
    Central West NSW
    Posts
    29,511
    Total Downloaded
    0
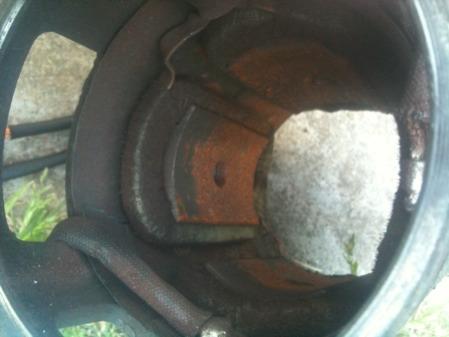
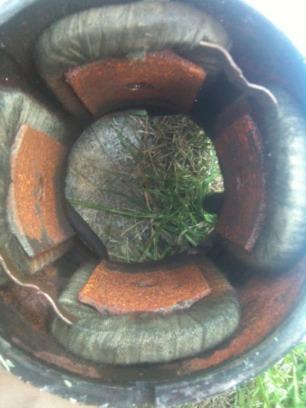
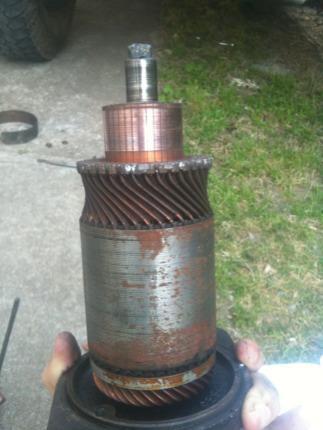
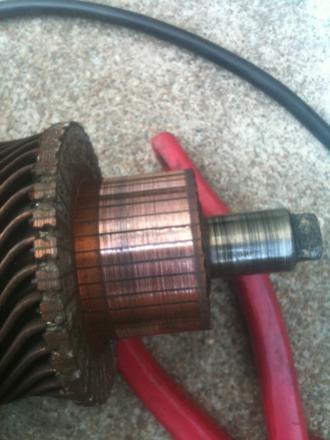
    The rust suggests that the starter may have been "poling", in other words, the bushes are worn sufficiently that the armature is sometimes touching the poles. When this happens, it causes a great deal of friction, and will quickly burn out the windings if you keep trying to start even though it is not turning very well. It should be quite easy to tell if this is happening, the armature should spin easily with little friction without brushes (hold it so the weight of the armature is in the direction it would have been pushed by the load on the pinion). Bushes should be available, and perhaps worth replacing anyway seeing you have it apart. I would clean off the rust and give it a thin coat of varnish.

    John
    John

    JDNSW
    1986 110 County 3.9 diesel
    1970 2a 109 2.25 petrol

  3. #3
    Join Date
    Aug 2006
    Location
    Melbourn(ish)
    Posts
    26,495
    Total Downloaded
    0
    after reassembling without the brushes and test spinning it to check the bearings (check the radial run out + axial float)

    de rust it very carefully with wet and dry (try not to get the windings wet) then paint the majority of it with a light clear varnish) in areas where sparks get thrown paint the body with liquid electrical tape. do the same for the un-insulated parts of the windings and the brush pack OR strip the brush pack and fit it with heatshrink. rework the brush pack and lubricate the side of the brushes with a very fine smear of carbon greaseensure that the springs and brushes are parallel to each other, perpendicular to the commutator and parallel to the axis of the armature.

    then while thats all drying...

    mount the armature in a drill or a vice and spin it very slowly while you clean the body and the commutator with wet and dry (1800 grit for the commutator) then with a very fine needle file clean out the gaps between the individual contacts on the commutator.

    With that done...

    install the armature into the body and then install the brush pack, to install this I cheat abit and use a plastic screw top from a 4l bottle with the center cut out of it to space the bushes out past the commutator
    Dave

    "In a Landrover the other vehicle is your crumple zone."

    For spelling call Rogets, for mechanicing call me.

    Fozzy, 2.25D SIII Ex DCA Ute
    Tdi autoManual d1 (gave it to the Mupion)
    Archaeoptersix 1990 6x6 dual cab(This things staying)


    If you've benefited from one or more of my posts please remember, your taxes paid for my skill sets, I'm just trying to make sure you get your monies worth.
    If you think you're in front on the deal, pay it forwards.

  4. #4
    Join Date
    Jun 2008
    Location
    Morpeth NSW
    Posts
    782
    Total Downloaded
    0
    Many thanks John and Dave, and please bear with me here.

    What part are you referring to as "windings"?

    Should I be insulating the inside of the housing (yoke in the manual) with light varnish/liquid electrical tape (looks like good stuff!)?

    Also, referring to the 'brush pack' do you mean the brushes and their leads?

    Cheers,

    terminology-troubled Sam

  5. #5
    JDNSW's Avatar
    JDNSW is offline RoverLord Silver Subscriber
    Join Date
    Jan 1970
    Location
    Central West NSW
    Posts
    29,511
    Total Downloaded
    0
    Quote Originally Posted by series3 View Post
    Many thanks John and Dave, and please bear with me here.

    What part are you referring to as "windings"? The copper wire wound round the lumps of iron in both the stator (the body) and the armature (the bit that turns).

    Should I be insulating the inside of the housing (yoke in the manual) with light varnish/liquid electrical tape (looks like good stuff!)? Yes - the poles should only have a very thin layer of varnish, as they run very close to each other.

    Also, referring to the 'brush pack' do you mean the brushes and their leads? Yes

    Cheers,

    terminology-troubled Sam

    Strictly speaking, wet and dry is not suitable for this purpose as the abrasive used on it is conductive - if accumulated between the segments of the commutator it will encourage sparking. Not a serious problem with starters, more so with generators, as they are in continuous operation. Glasspaper is a better abrasive to use, in the absence of a lathe to skim the commutator.

    John
    John

    JDNSW
    1986 110 County 3.9 diesel
    1970 2a 109 2.25 petrol

  6. #6
    Join Date
    Aug 2006
    Location
    Melbourn(ish)
    Posts
    26,495
    Total Downloaded
    0
    yep, go on the glass paper if you can get it however judicious use of an air duster will sort out the main body if you cant...

    I forgot to mention that you MUST clean off the spaces between the segments. I use a hard plastic scribe and an eraser for this job. you have to be exceptionally carefull with the application of the carbon grease to the brushes if you get it onto the commutator segments it WILL short out.

    once you get the housing clean of rust you need to keep it that way I usually paint the formers (the bits inside the windings that are wrapped in insualtion fabric) with the varnish and then very carefully get the area around the copper of the windings (the bridges in the second photo and the insulated wires going to what appears to be a solder blob in the first with the liquid electrrical tape.

    as JDNSW has pointed out the application of the varnish must be VERY thin and even if it snags on the armature at all it will make a mess of things if it gets mauled by the spinny bits.
    Dave

    "In a Landrover the other vehicle is your crumple zone."

    For spelling call Rogets, for mechanicing call me.

    Fozzy, 2.25D SIII Ex DCA Ute
    Tdi autoManual d1 (gave it to the Mupion)
    Archaeoptersix 1990 6x6 dual cab(This things staying)


    If you've benefited from one or more of my posts please remember, your taxes paid for my skill sets, I'm just trying to make sure you get your monies worth.
    If you think you're in front on the deal, pay it forwards.

Bookmarks

Bookmarks

Posting Permissions

  • You may not post new threads
  • You may not post replies
  • You may not post attachments
  • You may not edit your posts
  •  
Search AULRO.com ONLY!
Search All the Web!