Page 1 of 2 12 LastLast
Results 1 to 10 of 14

Thread: TD5 head assembly...... Pt 1

  1. #1
    Join Date
    Sep 2007
    Location
    Gold Coast
    Posts
    6,078
    Total Downloaded
    0

    TD5 head assembly...... Pt 1

    Well following on from the, 'am I about to have a headgasket problem' How to remove a TD5 head, and how to take apart a TD5 head, here is how to put it back together again... at least most of it. Will add to the end of this when I do the last bit:

    So firstly take the newly sorted cylinder head


    Place filter into appeture on head (this filter is to be found by the machine shop when working on head, and then given back to me)


    place O'ring to hold it in position


    Place in pedestals for injector clamps


    place in pedestals for cam shaft roller rockers:


    When they are all in it should look like this:


    Now position the roller rockers in between the pedestal and the top of the valve:


    When they are all in, it should look like this:


    Next find all injector o'rings and copper washers:


    Remove O'ring


    Remove copper washer: (bit tricky)


    Fit new o'ring and copper washer:


    Insert injector into head


    Position injector clamp


    Tighten down (be warned when these are tight they protrude out the base of the head hence the blocks of wood)


    Do the same for all 5


    Fit water house outlet (forget this gasket so used gasket silicone - will change if necessary)


    Next get some new engine oil, and a new paint brush:


    paint engine oil onto faces that cam runs on, and also onto all the valve rockkers and so on:


    Place in cam shaft - position as per removal (I also painted the cam with oil)


    Now get top section of head assy and oil as lower section:


    Now you need to create the agsket between the upper and lower sections:


    Land Rover say use a roller over teh entire face, but I didnt have one, so had to make do with my finger:


    Position it on dowels and put bolts in:


    Tighten down from the centre out, gently working around in a pattern to 24ft/lb's


    Again watch for the fact that the valve now protrude.

    This is as far as I have got so far. Will update this with the last couple of stages (lifting eyes, and rocker shaft maybe tommorow)

    Rgds
    Pete

  2. #2
    Join Date
    Sep 2007
    Location
    Gold Coast
    Posts
    6,078
    Total Downloaded
    0
    Right, so carrying on with this:

    Firstly fit bung in rear face of head assembly:


    Here is the rocker shaft that operates the injectors.


    Put it in place:


    Apply new engine oil:


    Position bolts:


    Place in camshaft locking bolt


    Tighten then down evenly and gently. (You could back off all the adjustment screws here but I didnt. I will check the injector bump clearances when the head is refitted) Also make sure here that the adjusters mate up with the injectors correctly


    Tighten down. Once done it will look like this:


    Now take gasket for fuel block


    Position block and bolt in place:


    Fit rear lifting eye:


    Fit front lifting eye:


    Last job on the head is to remove and replace the exhasut manifold studs but thats pretty straightforward so I wont get pictures of that!

    Next up is to clean the engine block, pop to the Dealer and get the dowels, and soem manifold studs, and then start to put it back on!

    Loving the head bolt torque instructions........

  3. #3
    Join Date
    Aug 2006
    Location
    Kingston, Tassie, OZ.
    Posts
    13,728
    Total Downloaded
    0
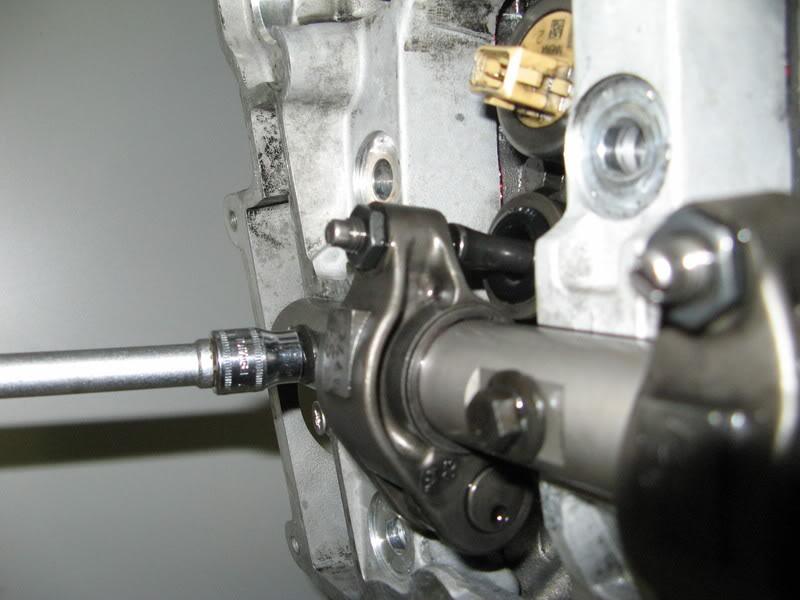
    As regards the head bolt tensioning instructions Pete, With a Tdi you can get away with marking the headbolts, (45Nm, 2 steps of 60deg can be achieved by marking the points of the headbolts,60 x 6 = 360) but you will need a torque angle gauge to do it accurately with the Td5 I feel.

    I CAN send you mine express post if you need to borrow it, but someone closer should surely have one they can lend you?

    You can easily make one too, a 360deg plastic protractor, a piece of steel wire as a pointer, and you are there.

    JC
    The Isuzu 110. Solid and as dependable as a rock, coming soon with auto box😊
    The Range Rover L322 4.4.TTDV8 ....probably won't bother with the remap..😈

  4. #4
    Join Date
    Dec 2006
    Location
    NSW , Pennant Hills
    Posts
    3,477
    Total Downloaded
    0
    Pete ;

    that's a great post and write up mate, nice work.


    urm...HAHN superdry is good stuff...

  5. #5
    Join Date
    Sep 2007
    Location
    Gold Coast
    Posts
    6,078
    Total Downloaded
    0
    Hi Justin,

    Thanks for the offer thats very kind.

    Instructions are saying

    48lb/ft + 90 deg + 180 deg +45 deg.

    Do you not think I can do that with my big snap on knuckle bar, and marking the socket? (obviously doing teh 48lb/ft with a torque wrench)

    They all seem relativeley easy angles to work with.

    Rgds
    Pete

  6. #6
    Join Date
    Sep 2007
    Location
    Gold Coast
    Posts
    6,078
    Total Downloaded
    0
    Quote Originally Posted by Disco_owner View Post
    Pete ;

    that's a great post and write up mate, nice work.

    urm...HAHN superdry is good stuff...
    Lol, thanks. So true!! I did have some Tooheys White stag but its not as nice! the Hahn is the beer of choice for assisting with a head rebuild!!

  7. #7
    Join Date
    Aug 2006
    Location
    Kingston, Tassie, OZ.
    Posts
    13,728
    Total Downloaded
    0
    Quote Originally Posted by Psimpson7 View Post
    Hi Justin,

    Thanks for the offer thats very kind.

    Instructions are saying

    48lb/ft + 90 deg + 180 deg +45 deg.

    Do you not think I can do that with my big snap on knuckle bar, and marking the socket? (obviously doing teh 48lb/ft with a torque wrench)

    They all seem relativeley easy angles to work with.

    Rgds
    Pete
    No worries, you can do it by guestimating/ marking etc, I guess if you are confident and have a good eye then it is actually easier than using the torque angle gauge. It is even easier to have a spotter, as one person swings on the bar, the other watches the markings. When you get up to the 45deg stage you will need some good upper body strength if you are using only a standard breaker bar. Before I bought my latest one, 24" long, I had a 3 foot pipe on my standard length bar, and enlisted the help of an assistant to watch the markings as I casually walked round with the pipe!

    Anyway, don't forget to oil under the bolt heads and threads lightly.

    You're doing well!

    Fun isn't it?

    JC
    The Isuzu 110. Solid and as dependable as a rock, coming soon with auto box😊
    The Range Rover L322 4.4.TTDV8 ....probably won't bother with the remap..😈

  8. #8
    Join Date
    Sep 2007
    Location
    Gold Coast
    Posts
    6,078
    Total Downloaded
    0
    Thanks Justin,

    Yeah its pretty good actually. Certainly very glad I attempted it. Its actually fairly easy. (so far!)

    My breaker bar is a 24" one too so hopefully I should be ok.

    Yep, oiling the threads and under the heads is on my list.

    Reckon, all being well, I may have the head back on tommorow.

    I may leave the inlet manifold off until its on so its a bit lighter and more manouverable during fitting.

    Will grab the dowels, studs, and some antifreze from LR tommorow and carry on. Next job is a big clean of the block.

  9. #9
    Join Date
    Aug 2006
    Location
    Melbourn(ish)
    Posts
    26,495
    Total Downloaded
    0
    great work... I dont use a torque angle gauge I use a paint pen and a scribe.

    Paint mark the head where the bolt will go in and then do the bolt up to nominated torque. paint the side of your socket with the paint pen then scribe a line in. Now scribe a line through the paint on the block to match up with line on the socket when you sit the socket on the bolt head.

    From here theres a couple of ways of aligning the end of turn. 1. use a ruler off of the bolt head itself the factets and flats will give you 60,30 and if your carefull enough 15 degree seperations. OR

    with the mark in the block paint use a protractor measure off the turn needed and then mark the paint on the body again.

    My favorite is as follows its a little more work to setup but IMHO its the most accurate way of doing it.

    Mark out on a piece of ally a center pop with radius lines at the angles you need to hit hinging off the center pop. Grab a hole saw that cuts a hole that will just fit into the clearance space for the head bolt and drill out your marked ally then punch the "washer" out of the hole saw.

    Now you can either lathe the center out Or cut it out with another hole saw but you need to enlarge the center hole so that it will just sit over the shoulder of the bolt. remake the marks on the new washer you have just finished making and after the initial torquing put the washer on, put the marked socket on, cross mark the washers start line onto the block incase it shifts (a touch of bluetack usually stops it) and then you have an at the bolt angle torque gauge.

    it takes me about 20 minutes to make one up using 3mm ally plate.
    Dave

    "In a Landrover the other vehicle is your crumple zone."

    For spelling call Rogets, for mechanicing call me.

    Fozzy, 2.25D SIII Ex DCA Ute
    Tdi autoManual d1 (gave it to the Mupion)
    Archaeoptersix 1990 6x6 dual cab(This things staying)


    If you've benefited from one or more of my posts please remember, your taxes paid for my skill sets, I'm just trying to make sure you get your monies worth.
    If you think you're in front on the deal, pay it forwards.

  10. #10
    Join Date
    Sep 2007
    Location
    Gold Coast
    Posts
    6,078
    Total Downloaded
    0
    Thanks Dave good idea!

Page 1 of 2 12 LastLast

Bookmarks

Bookmarks

Posting Permissions

  • You may not post new threads
  • You may not post replies
  • You may not post attachments
  • You may not edit your posts
  •  
Search AULRO.com ONLY!
Search All the Web!