Page 16 of 69 FirstFirst ... 614151617182666 ... LastLast
Results 151 to 160 of 684

Thread: Stuee's 101 Rebuild

  1. #151
    Join Date
    Jan 1970
    Location
    Perth
    Posts
    1,180
    Total Downloaded
    0
    Thanks guys and gals. Looks like it is a hole () lot of nothing.

    With the floor plate on top I will have a look at the bits I have to see why that gap is there. Might just be landrovers control

    Edit** Just posted the same time as you Garry. Looking again it appears there is a small piece that I dont seem to have handy. The picture below shows it circled in red and it may be located by the hole in question. I've put the green line in to make sure I am interpreting the pictures correctly, I take it this is the end of the floor plates up hard against the nose cone.


    Edit2* Looking at Rons pic from the higher angle it looks as though it might be a little 90deg bracket and may not sit below the floor plate. I shall sift though all the little bits to see what I can find.
    Last edited by stuee; 10th April 2012 at 08:59 PM. Reason: spelling

  2. #152
    Join Date
    Jan 1970
    Location
    Perth
    Posts
    1,180
    Total Downloaded
    0
    Well found the little brackets. And seeing Garry's third picture its a little more obvious how the two parts go together.

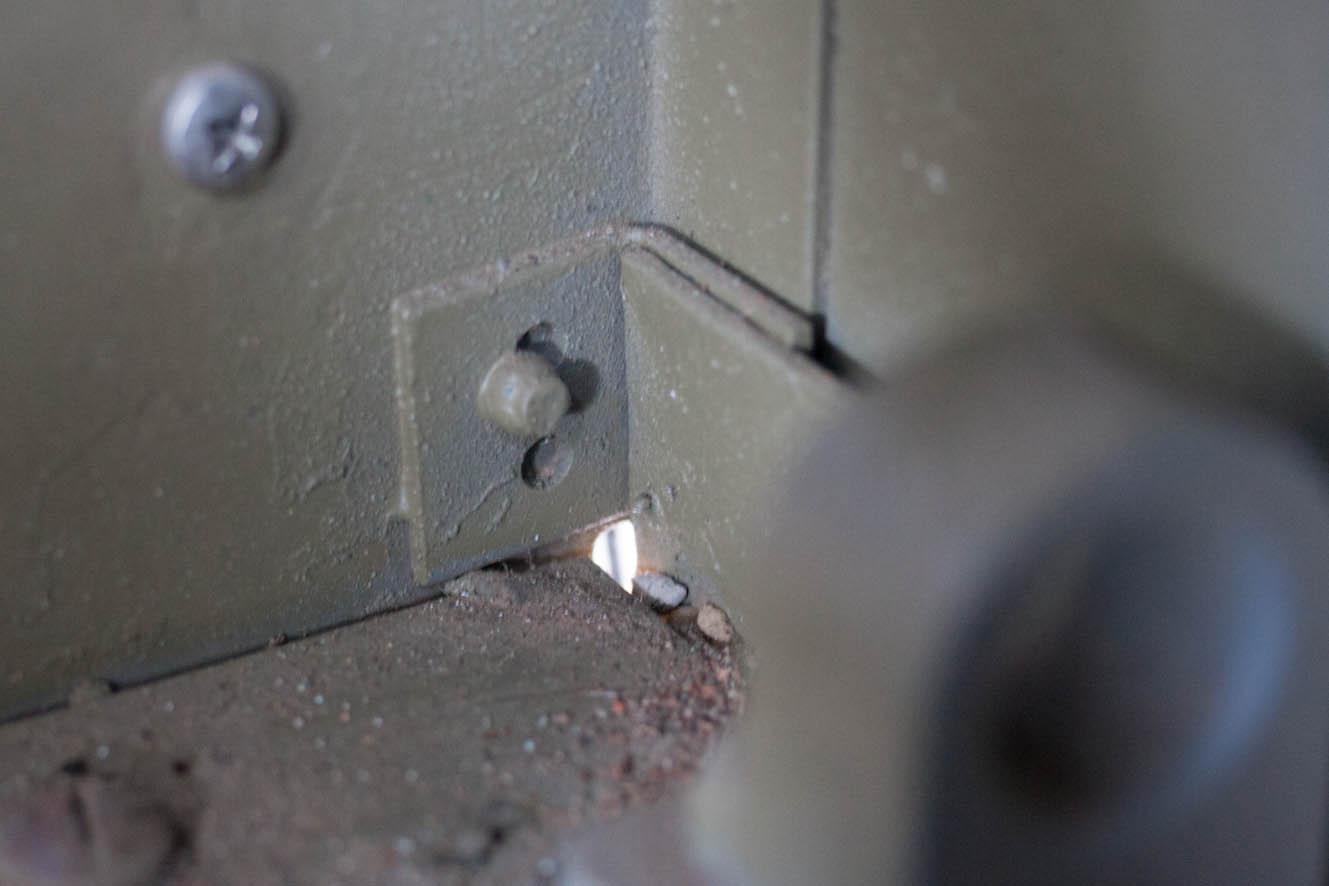
    This pic shows the little bracket, the wholes line up, it just needs to slot in behind the piece of metal on the nose cone - will be a tight squeeze with my new seam sealer tape.


    This pic shows how the engine tunnel piece looks like it should slot under the nose cone section piecing it all together much better but one of Gary's pics shows it shouldn't be this way, and that would also pull some of the holes out of alignment. That same pic of Garry's also shows the bottom of the 90deg bracket through the hole.

  3. #153
    Join Date
    Jan 1970
    Location
    Canberra
    Posts
    18,616
    Total Downloaded
    0
    With everything in place I cannot see what shape it is under the floor panel etc. I cannot find it as a separate item in the parts manual so I assume it is considered part of the tunnel panel and as can be seen is pop riveted from inside the tunnel.

    I suspect this little plate ties the corner all together.

    Garry
    REMLR 243

    2007 Range Rover Sport TDV6
    1977 FC 101
    1976 Jaguar XJ12C
    1973 Haflinger AP700
    1971 Jaguar V12 E-Type Series 3 Roadster
    1957 Series 1 88"
    1957 Series 1 88" Station Wagon

  4. #154
    Join Date
    May 2009
    Location
    Cornubia
    Posts
    131
    Total Downloaded
    0
    A 101 jigsaw that you did not pull apart is a serious challenge. I bet you know the parts manual really well.

    Following is a closeup of mine. The hole was originally plugged with a bit of filler, as Garry said good to drain the water. I will cover the floor with something one day and that should cover the hole enough for cold weather.
    The lump that is out of focus to the bottom left is the internal helicopter lift point.

    If you want any more pics let me know, I already have around 1600 shots of mine and other 101's on disc. Generally I will have much higher resolutions shots than are on the web.

    Cheers, Peter

  5. #155
    Join Date
    Jan 1970
    Location
    Perth
    Posts
    1,180
    Total Downloaded
    0
    Quote Originally Posted by garrycol View Post
    I suspect this little plate ties the corner all together.

    Garry
    It would appear that this is the case. It must reinforce the corner and help it all hold together.

    Thanks for that shot Peter, it shows the bracket quite clearly in position, its good to see the factory didn't get the rivet hole placement right everyone else's brackets too

    I was considering filling the hole up with seam filler, but if its useful for draining water I may leave it and just plug it with apiece of rubber.

    Your right about it being a challenge Peter. I thankfully have one side of the cab part assembled (the passenger seat base) which should help me get a lot of it back together but I have been getting to know the parts manual and repair manuals quite intimately.

  6. #156
    Join Date
    Jan 1970
    Location
    Perth
    Posts
    1,180
    Total Downloaded
    0
    Now have the nose cone and tunnel riveted together.

    Bunnings cheapo assorted screw/bolt pack used to help fix two parts together and line up the holes before fixing together with rivets:


    Nuts and bolts in use:


    All fixed together:


    Its really motivating seeing some body parts back together. Over the next couple of weekends I will get the disassembled seatbox back together, the only challenge in that is stripping off the bitumen under-sealer thats still on some parts. Going to try and get hold of some dry-ice. Supposedly that will harden it it will simply crack off. Alternatively, I will apply some gentle heat and scrap it off, just a lot messier.

  7. #157
    Join Date
    Nov 2009
    Location
    Western Victoria
    Posts
    14,101
    Total Downloaded
    0
    Is it my imagination or are you missing holes for the lights on the RHS?

  8. #158
    Join Date
    Jan 1970
    Location
    Perth
    Posts
    1,180
    Total Downloaded
    0
    Quote Originally Posted by Mick_Marsh View Post
    Is it my imagination or are you missing holes for the lights on the RHS?
    The holes are definitely there (I just popped out to check ). Its the aluminium behind the holes making it look like they are absent. The high res photo is a bit clearer.

  9. #159
    Join Date
    Jan 1970
    Location
    Canberra
    Posts
    18,616
    Total Downloaded
    0
    Stuee - I just had to replace the speedo cable in my 101 - what should be a simple job turned into nightmare (and brought back bad memories when I was getting mine back on the road) because of the mess that lives behind the dash. Basically wiring comes from the two (i think) main looms behind the dash and secures directly to the various gauges and lights on the dash - an off course all this wiring is very short.

    Modern cars have the dash wiring as a printed circuit board with plugs that connect it to the loom - when it needs to come out you just unplug it and the dash comes out complete with it own wiring.

    When you do your wiring up in the dash I suggest you do all the wiring to a plug that will then plug into a new plug on the end of the main wiring loom. One at either end would probably suffice. This will makes this much easier for you when later you have to pull the dash out to replace bulbs etc.

    As it is now for me - whenever I need to get behind my dash, wires often come off making whatever I am doing more complex.

    Something you might want to consider when you get to it.

    PS also consider relocating the engine coil etc away from the area just above the front left chassis rail - in deeper water crossings it gets splashed from inside the tunnel and the water hits the front diff and shoots straight up between the gap between the radiator and engine (this issue killed my 101 on a trip and resulted in it getting tilt trayed 180km back home).

    I am looking at moving my coil and electronic ignition module up in the battery box to keep dry and putting a rubber shield along the bottom of the radiator and in front of the dizzy.

    Cheers

    Garry
    REMLR 243

    2007 Range Rover Sport TDV6
    1977 FC 101
    1976 Jaguar XJ12C
    1973 Haflinger AP700
    1971 Jaguar V12 E-Type Series 3 Roadster
    1957 Series 1 88"
    1957 Series 1 88" Station Wagon

  10. #160
    Join Date
    Jan 1970
    Location
    Perth
    Posts
    1,180
    Total Downloaded
    0
    Getting home at 7pm the last few nights means nothing is getting done. I did take a picture of the dash and its wiring loom for everyone to have a look at after Garry's post. Basically a lot of it will be getting stripped back and blade fuses and more modern relays will be used. I have been looking at some of the generic wiring looms available, but in reality a lot of the wiring is still in good nick and just needs to be cleaned up and put in new sheathing. Id also like to get the gauges sent away to get reco'd but I may leave them as is for now as money isn't endless unfortunately.


Page 16 of 69 FirstFirst ... 614151617182666 ... LastLast

Bookmarks

Bookmarks

Posting Permissions

  • You may not post new threads
  • You may not post replies
  • You may not post attachments
  • You may not edit your posts
  •  
Search AULRO.com ONLY!
Search All the Web!