

 Reply With Quote
Didn't get a huge amount done today. Slept most of the afternoon as I'm still recovering from a chest infection. The following was the only progress I made:
Pretty much a whole bottle of loctite to fit the studs.


 Master
Flaring tools are worth having there's around 30 pipe flares required on a 101 anyways (brake and clutch from master to cylinders) so it's worthwhile, and its a handy facility to have on hand.
The Detroit is and easy fit, I managed it within Garry's timescale, which included and hour or so removing a halfshaft after a bolt sheared, an interesting situation eventually resolved with a 4 foot crow bar an a 5 ton bottle jack.
The resulting bang when it finally let go was pretty impressive, as was the distance the halfshaft travelled, out of the axle and about a foot across the floor.
Wizard
SubscriberDidn't get a huge amount done today. Slept most of the afternoon as I'm still recovering from a chest infection. The following was the only progress I made:
Pretty much a whole bottle of loctite to fit the studs.
LordRover
SupporterDo you appreciate that the fluid reservoir that you have is not standard and maybe not actually be legal on a dual circuit system where individual reservoirs are required.Originally Posted by stuee

The 101 has two individual reservoirs, one of which (the rear brakes) has a separate internal clutch reservoir.
Garry
REMLR 243
2007 Range Rover Sport TDV6
1977 FC 101
1976 Jaguar XJ12C
1973 Haflinger AP700
1971 Jaguar V12 E-Type Series 3 Roadster
1957 Series 1 88"
1957 Series 1 88" Station Wagon
Wizard
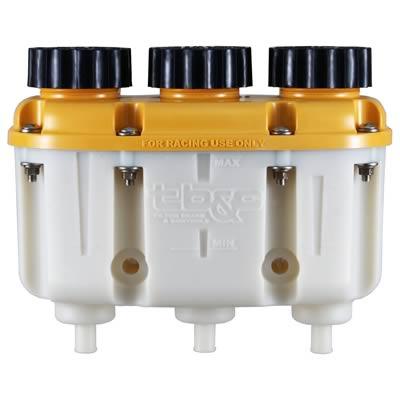
SubscriberYeh realise its not standard. Didn't realise it may be illegal. Internally its separated into different sections, the center outlet is separated by the outer two by a half height cylinder sort of thing so not all three outlets can drain at once.
The genuine items cost a fortune and I'm not a fan of some of the alternatives I've seen so far so considering keeping this for the time being.
I quite like the look of these though:
Except is says "For racing use only"
http://www.summitracing.com/parts/til-72-576
http://www.summitracing.com/parts/til-72-577
YarnMaster
SubscriberLike that reservoir! Why would it not be legal.... You'll just have to race everywhere!!!
Super Moderator & CA manager
SubscriberA file would soon have that wording removed on the side of that reservoir...
If you need to contact me please email homestarrunnerau@gmail.com - thanks - Gav.
Wizard
SubscriberBe a shame to scratch such a nice looking piece of kit. Maybe a simple dymo label over the top of it with front, rear and clutch for when it goes over pits, then pull it back off again
Again not a great deal done today. I moved a council planted tree on our verge about 1.5m so we can still fit a car on the verge. Then thought while I'm all grubby Ill give the front diff the final clean. Did that and got it looking quite nice then put the cover on and filled it with oil. Forgot to get pics before I put the cover on though.
Then I packed the front hub bearings with grease, fitted the seal. Haven't adjusted the preload with my shiny new dial gauge. Will get to that next weekend.
Also have to think about how I am gong to modify the calipers to fit. I don't have a die grinder and its a bit much for the dremel. Could use the grinder but not sure if the sparks may pit other parts of the caliper. A die grinder would have been useful a few times now and probably on a few occasions to come still but would be at least $150-200 outlay for die grinder and burr piece it seems. Might see if I can mark them up and get someone in the workshop at work do it for me.
YarnMaster
A large rat tail file will work on the calipers and plently of elbow grease.
You don't need a dial guage.........when I was doing it I was just checking disc run out just for the hell of it.
Adjust wheel bearings as you would for a normal light truck by feeling the slight preload when doing up the bearing nut........spin the hub around afew times and recheck.
Wizard
SubscriberElbow grease is often missing from my tool kit
Having never put a hub back together I'm not sure what the 'feel' should be so I figure by using dial gauge this time round I'll get a 'feel' for what it should be.
I'm pretty happy with how its going so far though
edit* was just thinking then. Having seen your pics and having a look myself I could quit easily get the bulk of the material off with a hacksaw and neaten up with a file or the dremmel.
YarnMaster
Do not use a dial guage to adjust wheel bearings.
Adjust as follows.
Find a suitable spanner........a very large shifter will fit onto a 101s hub nut.
Tighten the nut up not too hard but enough so you can really feel the excessive drag on the wheel bearing when you turn the hub by hand.
This over tightening will ensure the cups and bearings are settled in hard.
Back off the nut and then slowly do it up again, take the play out of the bearings and then you add a slight preload, which you should be able to feel if you turn the hub.
If the hub spins freely with no resistance.....not enough.
if hub is hard to turn .....too much.
You want a nice easy turn with just a slight drag.
Many people have different opinions on how to adjust wheel bearings and how to do it.
It is some thing which mechanics just get to learn the feel for.
The dial guage is something you use to check the disc for run out if the disc faces on the back of the hub are not true........you do not need this .
 Posting Permissions
| Search AULRO.com ONLY! |
Search All the Web! |
|---|
|
|
|


")
Bookmarks