Page 3 of 5 FirstFirst 12345 LastLast
Results 21 to 30 of 41

Thread: Top Ten Puma self-servicing and on-road repairs to know.

  1. #21
    Join Date
    Feb 2011
    Location
    Richmond, NSW
    Posts
    867
    Total Downloaded
    0
    Marvellous stuff, thanks folks, keep it coming.

    I think what I might do is have a chat with the LR specialists that I use to service the car and ask them if they'd be kind enough to spend a couple of hours walking me through a few of the key procedures, showing me tips and tricks...and also the solutions for some of these things that go wrong - bearings, shafts, belt replacement etc

    The sort of confidence I'd get from having someone show me step by step what to do in given situations would be invaluable.

    Got to be worth a case of beer, right?

  2. #22
    Join Date
    Jul 2010
    Location
    Terrigal sometimes, but mostly everywhere else
    Posts
    257
    Total Downloaded
    0
    Quote Originally Posted by The Cone of Silence View Post
    Marvellous stuff, thanks folks, keep it coming.

    I think what I might do is have a chat with the LR specialists that I use to service the car and ask them if they'd be kind enough to spend a couple of hours walking me through a few of the key procedures, showing me tips and tricks...and also the solutions for some of these things that go wrong - bearings, shafts, belt replacement etc

    The sort of confidence I'd get from having someone show me step by step what to do in given situations would be invaluable.

    Got to be worth a case of beer, right?
    Be prepared to pay out $120 per hour for the lesson.
    1991 2 door Disco (current)
    2012 Puma ute
    2007 D3
    1976 2 door RR
    1977 2 door RR
    1972 FORD XY 4X4
    + 70 other vehicles and trucks

  3. #23
    Join Date
    Feb 2011
    Location
    Richmond, NSW
    Posts
    867
    Total Downloaded
    0
    Quote Originally Posted by gasman View Post
    Be prepared to pay out $120 per hour for the lesson.
    Yeah I figured the going rate would apply...particularly given all the stupid questions I shall inevitably hurl in their direction!

  4. #24
    Join Date
    Jan 2013
    Location
    ACT
    Posts
    577
    Total Downloaded
    0
    If you listen and it sinks in... then in my opinion it is money well spent

    Cheers,
    Nige

  5. #25
    Join Date
    May 2008
    Location
    Horsley Park, Sydney
    Posts
    2,939
    Total Downloaded
    0
    Quote Originally Posted by The Cone of Silence View Post
    2008 Puma 110 Wagon ('Monty').

    I'm planning a solo trip later this year, probably across Simpson Desert for a couple of weeks from Sydney and back again.

    I've been having a look through the multitude of threads on spares, repairs and servicing tasks and it's a bit daunting trying to figure out which are the priority jobs I need to learn how to do and the spares I need to take (and obviously learn how to fit). I have plenty of time and would like to spend it learning how to fix my vehicle if something breaks!

    Aside from the really obvious bits like brake pads, oil and filter change and air filter change, what would be in your top ten (or more) for a solo trip like the Simpson in August/ September?

    Diff oil change?
    Clutch replacement?
    Brake/ Clutch master/ slave cylinder replacements?
    Suspension repairs?

    I'm very keen to hear of those learned through experience with all models, not just the Puma.

    Bobby
    Where in Sydney are you. We can give you a few tips to get started, not that I am a mechanic, but I know a little about Land Rovers and have a Puma.

    Always got time for a chat.

    Send us a PM

  6. #26
    Join Date
    Jul 2011
    Location
    Yarrawonga, Vic
    Posts
    6,568
    Total Downloaded
    0
    I't took two years prepping our Td5 110 for the trip we are now on, which could be anything from 12 mths to 2 years, we are also towing a off road Van.

    Altho Puma is a different kettle of fish you might pick up a hint from my Blog
    Going Bush

    Also re the Wheel bearing comment. I didn't mention on my blog
    The Td5 had the same oneshot single nut & spacer as the Puma, IMO this is a really bad setup for extended touring, and a mistake by LR.

    I converted to the earlier setup, remove spacer, use 2 nuts and a locktab , and now run the bearings in oil instead of grease. there is lots in the forum about how to do.

    I called into Graeme Coopers whilst we were staying in Sydney and also got my intermediate shaft sleeved, ( for longevity) and got them to check over the vehicle for anything I'd missed , this picked up soft engine mounts which I got replaced. Def worth getting an independant assesmant once you think your all good to go. ( & not just from any mechanic)

    I carry a nanocom, hoses , thermostat, water pump, serpentine belt, 1 of each uni joint, 1 wheel bearing set & 4 hub seals, crank sensor , temp sensor, Throttle pot, a few other odds & ends, van and car have the same wheels /tyres, 2 spares the same and if all goes pear shaped a satellite phone.

    so far have not missed a beat !

  7. #27
    Join Date
    Jun 2009
    Location
    Tangambalanga
    Posts
    7,558
    Total Downloaded
    0

    Question

    Quote Originally Posted by Bundalene View Post
    We do a lot of remote traveling.

    The 4 main things we find which cause problems are: Tyres, wheel bearings tail shaft unis air filter elements and fuel filters.

    Tyres.

    Carry a second spare if possible or know how to repair a flat. 90% of the time you can get away with plugs which don't require taking the wheel off the rim, we usually spot a deflating tyre and fix it before it goes down. If you have to remove the tyre for any reason such as a faulty valve stem, you will need specialist equipment, due to the spiral safety catch on the Boost Alloys.

    Wheel bearings are usually an easy fix at the side of the road, as long as you pick up the problem early. If you drive with a crook bearing, you can weld the inner of the race onto the hub making the job quite difficult. We carry a set of bearings, spacers locking tab and hub nuts - not very expensive.

    Tail shaft unis. If these fail, they can be replaced on the side of the road, or just remove the tail shaft, lock the center diff and get it fixed at the next repairer. Again, spot the problem early - usually a vibration. To check, chock the wheels, take the car out of gear and hand brake off and move the tail shaft - the unis should be tight. These require greasing regularly, especially after prolonged rain of fording. Greasing of the Puma unis is quite difficult and get this done at a workshop on a hoist or become familiar with other methods.

    Air cleaner check and tap out every few days in dusty areas. Removing and replacing the Puma ait filter is not as straight forward as it should be

    Fuel filter - be aware of how to drain the water trap, collect this in a jar and if there is a lot of water, change the filter. This again is not straight forward. I find it easiest to bleed the fuel system by removing the supply line in the engine bay and pressurising the tank through the breather and collecting the diesel in a jar.


    I will think of more


    Erich
    Hi Erich,
    Digging up an old thread here I know, but would you have a bit more info on how you bleed/bled the fuel system. I've been through the Rave CD, but it doesn't seem to be very clear on which particular hose to remove at the engine.
    I've seen the "boat fuel priming squeeze tool" they use, and should be easy to make one if I need to.
    Also wondering if you filled the filter before replacing?

    Cheers, Marcus

  8. #28
    Join Date
    Oct 2011
    Location
    Burra NSW
    Posts
    933
    Total Downloaded
    0
    Another thing to remember on the pumas,(ford engine), when I last did googs track, I was having problems with a check engine light, thought it was dirty fuel so changed filter, as this has been an issue with me before. ended up taking a punt and going to a little ford dealership, where not only did their diagnostic equipment tell us which sensor was buggered but they had one in stock to suit. Talking with the mechanics they said they hadn't had a close look at the puma engines until then but there was a lot of common parts and components. A good thing to remember given every country town has a ford dealership..

  9. #29
    Join Date
    Aug 2011
    Location
    Stanwell Park, NSW
    Posts
    1,667
    Total Downloaded
    666.1 KB
    Quote Originally Posted by Loubrey View Post
    Lots of threads on changing a fuel filter... You cannot just change the fuel filter on Pumas and one batch of dirty fuel (even paint flakes from Jerries) and you won't be going anywhere.

    You need to suck/ pump the fuel through with a specific "device" which you can buy for around $60 in Australia or around $25 plus p&p off e-bay.

    DRAPER EXPERT 43986 DIESEL PRIMING PUMP FOR FUEL LINES FILTERS & PUMPS | eBay

    Cheers,

    Lou
    I have a fuel master (I think it is called that) fuel filter which has a priming pump part of the assembly. More expensive than the above but for the extra money you get a clear bulb and water trap drain. In my build post it shows up in one of the photos.

    MLD

  10. #30
    Join Date
    May 2008
    Location
    Horsley Park, Sydney
    Posts
    2,939
    Total Downloaded
    0
    Quote Originally Posted by Chops View Post


    Hi Erich,
    Digging up an old thread here I know, but would you have a bit more info on how you bleed/bled the fuel system. I've been through the Rave CD, but it doesn't seem to be very clear on which particular hose to remove at the engine.
    I've seen the "boat fuel priming squeeze tool" they use, and should be easy to make one if I need to.
    Also wondering if you filled the filter before replacing?

    Cheers, Marcus

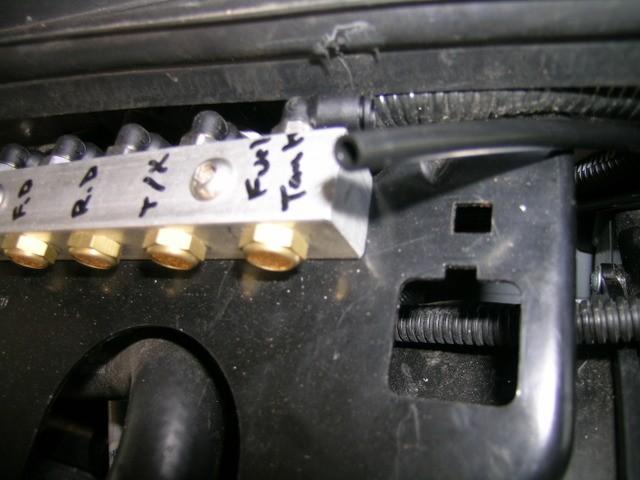
    Hi, I installed a breather block in the engine bay with breathers from the transfer, both diffs and the fuel tank.

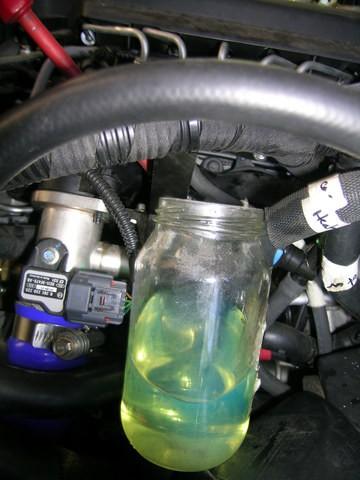
    When changing the fuel filter I fill the filter with fuel before screwing back on. This doesn't always work for me, in which case I undo the supply line to the engine and put a jar under this. I then add VERY slight pressure to the breather line and the aerated fuel starts to flow into the jar. Once the fuel is clear, replace the line.


    Erich

Page 3 of 5 FirstFirst 12345 LastLast

Bookmarks

Bookmarks

Posting Permissions

  • You may not post new threads
  • You may not post replies
  • You may not post attachments
  • You may not edit your posts
  •  
Search AULRO.com ONLY!
Search All the Web!