-
20th February 2016, 09:38 PM
#21
G'day Paul,
I have an auxiliary light switch which I believe would be the same as the switch pictured in your diagrams with the No.2 inside the headlight and beam icon. I am wanting to install this switch as an auxiliary driving light switch in my 2011 Defender 110 Double cab.
As it's a double cab, the rear window washer switch position is redundant although the current blank switch does have a loom connected to the blue switch connector that would usually run the rear window washer. I would like to position the auxiliary driving light switch in that position and (hopefully) utilise the existing wires and pins from the existing blue connector switch for the "panel illumination" function as well as run other wires to the driving light relay and main beam supply.
Would you have any diagrams that would help me identify the wires from the rear window washer switch connector (blue) for the panel illumination function and how they should be connected to the black auxiliary light (black) connector, as well as, how the relay wire and the main beam supply wire should also be connected to the (black) connector?
I hope that made sense.
Cheers,
Rohan.
-
20th February 2016, 10:31 PM
#22
The Defender spotlight switch - YUG000540LNF -
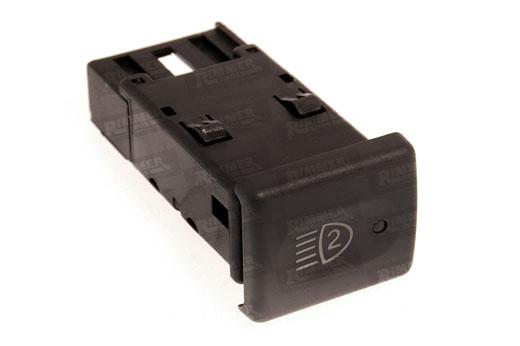
This switch is a latching earth-switching switch, which uses the Black 5-way switch connector, and should be wired as follows -

The Black switch connector should be wired, as follows -
Pin 1 - From the earth side of the Relay (Pin 85)
Pin 2 - Dash Illumination
Pin 3 - Not Used
Pin 4 - Earth
Pin 5 - Live from Accessory side of Relay (Pin 87), for 'tell-tale' orange LED
You can use the dash illumination and earth wires from the rear washer's Blue switch connector.
The dash illumination is on a Red/Orange wire in Pin 5
The earth is on a Black wire in Pin 2
This is the wiring diagram for the rear wash/wipe on a 2007 -2011 Defender -

This is how to release the terminals from a switch connector.
Use a small screwdriver to open the hinged terminal lock, 1st side -

And on the 2nd side -

Hinged terminal lock opened -

Use a safety pin to lift the terminal retaining tab above the wire's terminal -

At the same time as lifting the terminal retaining tab, pull gently on the wire -

Terminal released from connector housing -

Empty connector, showing the terminal retaining tabs at the top of the terminal cavities -

Paul.
1989 Arles Blue 2.5TD 110 Hardtop
1999 Epsom Green Discovery II 4.0 V8i 'XS'

.
-
20th February 2016, 11:40 PM
#23
Thank you so much Paul. You have saved me a heap of time and that means I will have the job done tomorrow.
Thanks a million,
Rohan.
 Posting Permissions
- You may not post new threads
- You may not post replies
- You may not post attachments
- You may not edit your posts
-
Forum Rules
Search AULRO.com ONLY!
|
Search All the Web!
|


 Reply With Quote
Bookmarks