

 Reply With Quote
good tip!
did you put the screw back in?

 Wizard
Hi all,
I just replaced the front brake disks today and thought I share a couple of tips.
- presure wash the wheels 1/2 hour before starting
- after removing the calipers, brake pads and frame (sorry forgot what the other part is called), spin the disc until you see the thread of the retaining screw at the back
- spray rust eaz, mono lube ect at the exposed thread and the center ring where the disk sits on the hub
- Go for a cup of tea
When you get back if the retaining screw is jiggered it will still come out quicker than with no lube, and if the disk is fused to the hub it will make it easier.
I wish I had realised that the retaining screw thread was exposed on the other side before I drilled out the screw. It would have saved me some time.
I had both issues one on each wheel. My other tip is if the disk will not shift spray lubricant in the retaining screw hole as this will penetrate behind the disk.
All in all an easy job that would cost $300 + at the mechanics.
The MOD Father
good tip!
did you put the screw back in?
"How long since you've visited The Good Oil?"
'93 V8 Rossi
'97 to '07. sold.
'01 V8 D2
'06 to 10. written off.
'03 4.6 V8 HSE D2a with Tornado ECM
'10 to '21
'16.5 RRS SDV8
'21 to Infinity and Beyond!
1988 Isuzu Bus. V10 15L NA Diesel
Home is where you park it..
[IMG][/IMG]
Wizard
I got new screws just in case as I had heard that they can be problematic.
I cleaned all the lube off with metho before copper greasing and re-asembling.
As far as I can make out all the screw does is hold the disk in place if all the other brake parts are removed.
It was a much less fussy job than on my old D1
The MOD Father
Yep, after the struggle to get that phillips head out, I threw the replacement away--
the D2 disc replacement is a doddle--
funny how the D1 pad replacement is much simpler though!!
"How long since you've visited The Good Oil?"
'93 V8 Rossi
'97 to '07. sold.
'01 V8 D2
'06 to 10. written off.
'03 4.6 V8 HSE D2a with Tornado ECM
'10 to '21
'16.5 RRS SDV8
'21 to Infinity and Beyond!
1988 Isuzu Bus. V10 15L NA Diesel
Home is where you park it..
[IMG]
Wizard
If all else fails and you have resigned to drilling them out, before you do place your screw driver in the head of the screw and belt it hard on the end with a hammer, as if you were trying to push the screw through the hole. 9 times out of ten this works. Worked for me on the OTT, ha the rhymes.
Master
SupporterReplaced the screws in mine with hex head type and put a dab of anti-sieze on and has been easy to remove the last couple of times.
_________________________
1996 D1 V8 - gone
2002 D2 Td5 ES- gone but still running elsewhere
2013 D4 SDV6 HSE - gone
2023 Defender 110SE D300
2 tips...
Firstly.. Using an impact driver tighten the screw before attempting to loosen it..
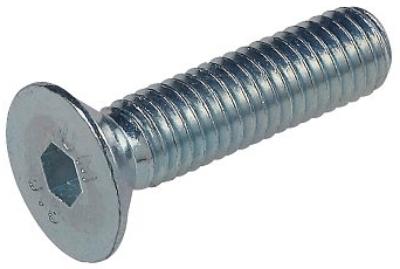
Secondly... Replace with a Counter sunk Cap bolt... And Anti-sieze
AT RESTEven those elcheapo impact drivers are worth their weight in gold on those screws, pop out easyOriginally Posted by Tombie

Fossicker
I agree with using the impact driver - go straight to it, don't bother with a screw driver you'll probably only damage the screw. I think you need a PH4 size head yes?
Master
SubscriberAgreed impact driver makes it easy and no need to change the screw.
 Posting Permissions
| Search AULRO.com ONLY! |
Search All the Web! |
|---|
|
|
|


Bookmarks