Page 7 of 8 FirstFirst ... 5678 LastLast
Results 61 to 70 of 75

Thread: Project Roverkill D2a

  1. #61
    Join Date
    Mar 2013
    Location
    bunbury
    Posts
    137
    Total Downloaded
    0
    Quote Originally Posted by cjc_td5 View Post
    A great beach and great shots. We spent a day looking around on that beach in April.
    We struck some very very soft sand over on the eastern side of Bremer Bay near Gordon Inlet. The only time I have got our D4 bogged.
    Have fun.
    Thanks mate

    Yeah i was warned by a few locals that the softness of the sand can be unpredictable at certain areas. The further i headed along the beach past the inlet, the softer it got!

  2. #62
    Join Date
    Mar 2013
    Location
    bunbury
    Posts
    137
    Total Downloaded
    0
    A little bit of work has been completed on the vehicle in the past few months. I was able to get it very bogged up in Harvey whilst on a camping trip:


    The front ball joints were worn so they got replaced, what a bugger of a job. Upon removal of the hub carrier assembly it was interesting to see how much play the bottom drivers ball joint had, a tad alarming. Whilst i was there, the front axle seals and front pinion seal were replaced.


    The front bar got some love. I filled the areas around where the front hoop was welded to the elbows as well as a few divets in the bar caused by the welding process. The bar received another thick coat of flat black enamel.


    On went a "Great White" 18 inch light bar. These things are bright!


    Whilst i was in the painting mood, the sliders were stripped and painted with a good quality epoxy primer and then several coats of Dulux enamel flat black. All those 4wding trips and boot scuffs had taken their toll on the paint. My thinking with this is that its super easy to touch up scratches and marks along the way, just whip the dulux spray can out and go to town!


  3. #63
    Join Date
    Jan 1970
    Location
    Free Again Thanks Dan
    Posts
    10,148
    Total Downloaded
    0
    Looking good

  4. #64
    Join Date
    Mar 2013
    Location
    bunbury
    Posts
    137
    Total Downloaded
    0
    Quote Originally Posted by rangieman View Post
    Looking good

    Thanks Mate

  5. #65
    Join Date
    Sep 2018
    Location
    Magill
    Posts
    3
    Total Downloaded
    0
    "I pressed up some aluminum sheet metal and fixed a table for the rear door. It has two strong magnets at the top to secure it in the upright position. I have already used this thing a million times, its a great addition for camping and lunch stops etc."

    I am in the process of doing something similar to my back door... I see you used the original holes for securing the sheet to the door. I was just wondering what you secured it with and what additional work you may have had to do to the door?

    Great feed too!!

  6. #66
    Join Date
    Mar 2013
    Location
    bunbury
    Posts
    137
    Total Downloaded
    0
    Quote Originally Posted by igaitcho View Post
    "I pressed up some aluminum sheet metal and fixed a table for the rear door. It has two strong magnets at the top to secure it in the upright position. I have already used this thing a million times, its a great addition for camping and lunch stops etc."

    I am in the process of doing something similar to my back door... I see you used the original holes for securing the sheet to the door. I was just wondering what you secured it with and what additional work you may have had to do to the door?

    Great feed too!!
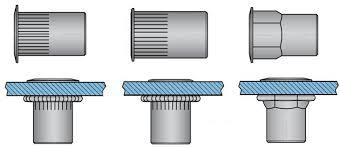
    Hi Mate thanks a lot. I drilled the original holes out a few mm to accept a "rivnut". they can also be called a nutsert. It requires the correct tool though. rivnuts are very handy i would recommend tooling up.

  7. #67
    Join Date
    Sep 2018
    Location
    Magill
    Posts
    3
    Total Downloaded
    0
    I considered using some aviation rivnuts my old man had sitting around but to install them i needed access to both sides of the panel. I shall do a bit of research on newer ones etc. I was going to try using the Xmas tree plastic fittings but thought they might be a bit weak. Thanks again

  8. #68
    Join Date
    Mar 2013
    Location
    bunbury
    Posts
    137
    Total Downloaded
    0
    Quote Originally Posted by igaitcho View Post
    I considered using some aviation rivnuts my old man had sitting around but to install them i needed access to both sides of the panel. I shall do a bit of research on newer ones etc. I was going to try using the Xmas tree plastic fittings but thought they might be a bit weak. Thanks again

    Yes the ones i am talking about can go into a blind hole, thats why i really love the things.


  9. #69
    Join Date
    Sep 2010
    Location
    Branxton NSW
    Posts
    581
    Total Downloaded
    0

    Thumbs up

    That Swing Away Carrier looks interesting, tell me more!

  10. #70
    Join Date
    Mar 2013
    Location
    bunbury
    Posts
    137
    Total Downloaded
    0
    Quote Originally Posted by CU55TM Disco View Post
    That Swing Away Carrier looks interesting, tell me more!


    I suppose you are talking about the convoluted way that the above arrangement has been built. There are two swing away arms on the rear, left and right. The right has an arm that connects to the rear door so that it swings with the door, the arm is rubber insulated to the right arm to deal with body/chassis relative movement.

    the right arm has a rubber stopper that sits behind that 6mm head (1 of two in above photo).

    Behind the other hex head bolt lies another rubber stopper that sandwiches the right arm to the bar when latched.

    The over-centre latch pulls the left arm nice and tight, binding the whole assembly together.

    Basically, it was done so that it only requires the user to pull away the left swing away.


    There are a few things i would do differently if i made one again. Its quite a heavy assembly because of the thickness of the steel used, some areas need beefing up as well.... I also have plans on redoing the left swing away to carry a small LPG bottle as well as a 20l jerry. I would also like to change the rear lights to something more aesthetically pleasing.

Page 7 of 8 FirstFirst ... 5678 LastLast

Bookmarks

Bookmarks

Posting Permissions

  • You may not post new threads
  • You may not post replies
  • You may not post attachments
  • You may not edit your posts
  •  
Search AULRO.com ONLY!
Search All the Web!