Page 8 of 10 FirstFirst ... 678910 LastLast
Results 71 to 80 of 96

Thread: Digger's next Series 1, 80" 1950.

  1. #71
    Join Date
    Feb 2008
    Posts
    375
    Total Downloaded
    0

    Thank You Digger

    Thanks mate
    you will have to come shopping in my shed
    Kc and I found 2 80" speedo's in a drum last weekend, while cleaning up
    do have a straight panic bar in 60 odd year old galv
    Ute cab etc etc etc etc etc etc etc etc not forgetting nuts, bolts, screws.
    I could not think of a better way to spend all that night allowance you are getting
    you may have to retire early just to finish this one!!!
    see you Easter
    cheers
    Ian

  2. #72
    Join Date
    Sep 2007
    Location
    RIVERLAND, SOUTH AUSTRALIA
    Posts
    6,740
    Total Downloaded
    0
    Afrer much soaking oil in, tonight removed all 4 rims, one brought studs out on 3 of the 5 nuts

    All 4 are off now anyhow, most look reasonable and a sand blast and paint look like they'll see them right.

    All 4 are circle stamped 4/49 (I noticed on my 52 that there is no circle just straight numbers 10/51)

    Couple questions..
    1) chassis number is: 06103608, this is before the supposed cut off of marking these numbers with R or L prefix.... why is it this one has neither?

    2) On the engine mount where the number is situated it is prefixed by much smaller stamped numbers I believe read 1404 - I assume this is a factory number -I recall hearing something about it but cannot recall what.

    3) Will the tub on an actual 49 fit this chassis direct? (I assume it will I cannot see any direct differences.)

    4) What centre mirror would be the go?

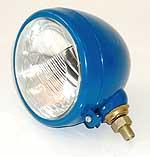
    5) The headlights can be replaced with TRACTA lights?? or was it with Massey Ferg lights? Parts numbers or names please?

    Cheers folks..
    (REMLR 235/MVCA 9) 80" -'49.(RUST), -'50 & '52. (53-parts) 88" -57 s1, -'63 -s2a -GS x 2-"Horrie"-112-769, "Vet"-112-429(-Vietnam-PRE 1ATF '65) ('66, s2a-as UN CIVPOL), Hans '73- s3 109" '56 s1 x2 77- s3 van (gone)& '12- 110

  3. #73
    Join Date
    Feb 2007
    Location
    Yass NSW
    Posts
    5,599
    Total Downloaded
    0
    Repro Massey Ferguson lights are available here : Bare Co - MF Select Electrical

    Regards,
    Tote
    Go home, your igloo is on fire....
    2014 Chile Red L494 RRS Autobiography Supercharged
    MY2016 Aintree Green Defender 130 Cab Chassis
    1957 Series 1 107 ute - In pieces
    1974 F250 Highboy - Very rusty project

    Assorted Falcons and Jeeps.....

  4. #74
    Join Date
    Jan 1970
    Location
    under a rock, next to a tree, at Broadmarsh
    Posts
    6,738
    Total Downloaded
    0
    Quote Originally Posted by Tote View Post
    Repro Massey Ferguson lights are available here : Bare Co - MF Select Electrical
    X2

    Ref; Bare Co - MF - Base Mount High / Low Beam Headlamp


    B1435
    BASE MOUNT HIGH/LOW BEAM HEADLAMP 12 VOLT
    *CAN BE CONVERTED TO Q.HALOGEN BY ORDERING B1581 Q.H. BULB
    .

  5. #75
    Join Date
    Sep 2007
    Location
    RIVERLAND, SOUTH AUSTRALIA
    Posts
    6,740
    Total Downloaded
    0
    OK, surely there's a way I can wire the motor to see if I can get it to start?

    The existing wiring is pretty average and there are no colours left in it which makes it hard to tell which one should do what!!

    But I am impatient and would like to spin it over if it will, so imagine you have the motor sitting there wireless (with spark leads etc fitted)

    a) what goes from where to where, (I'll need a step by step!! )


    Appreciate anything that will help..

    Out of curiosity, In the original set of leads on the car, each spark lead had a button "inline" (see photos) with end of spark lead attached to opposite holes which Im lead to believe is an old flathead V8 owner trick

    It's a bit like getting an awkward oiled up two stroke to fire, remove the plug lead and hold it about 1/4" from the plug and 90% of the time it will fire due to the magneto having to provide more oomph to jump the gap.

    The 'button trick' as I understand it places the button on plug leads has the same effect, it actually made a false gap in the cable, again the spark was intensified and gave a better start especially with an oily plug... I have since heard that a clear piece of plastic tube used to do the same thing..

    What this means about the motor I don't know??
    (bad compression?)
    (REMLR 235/MVCA 9) 80" -'49.(RUST), -'50 & '52. (53-parts) 88" -57 s1, -'63 -s2a -GS x 2-"Horrie"-112-769, "Vet"-112-429(-Vietnam-PRE 1ATF '65) ('66, s2a-as UN CIVPOL), Hans '73- s3 109" '56 s1 x2 77- s3 van (gone)& '12- 110

  6. #76
    Join Date
    Dec 2006
    Location
    Narrogin WA
    Posts
    3,092
    Total Downloaded
    0
    Quote Originally Posted by digger View Post
    OK, surely there's a way I can wire the motor to see if I can get it to start?

    The existing wiring is pretty average and there are no colours left in it which makes it hard to tell which one should do what!!

    But I am impatient and would like to spin it over if it will, so imagine you have the motor sitting there wireless (with spark leads etc fitted)

    a) what goes from where to where, (I'll need a step by step!! )

    Assuming you have positive earth, a good battery; a fuel supply and a starter that works.

    A bit tricky without drawing a diagram but this is what I did:
    1. Make up test leads out of any coloured wire you have in your collection and connect crocodile clips to each end.
    2. Connect one clip to the battery live terminal and the other end to the coil negative terminal - I may be wrong about the coil negative, but it will work whichever one you connect to. If you have the original coil connect to the one that says SW.
    3. The coil has now been energised and will get cooked if you leave it connected for too long. Remove the distributor cap and flick the points open with an insulated screwdriver; you should see a small spark at the points.
    4. Crank the engine to see if it will fire using the starter button.
    5. If nothing happens remove a spark plug and check for spark at the plug.

    You should squirt some oil down the bores and not run it for too long, because the lubrication system may not be at its best,

    Cheers Charlie

  7. #77
    JDNSW's Avatar
    JDNSW is offline RoverLord Silver Subscriber
    Join Date
    Jan 1970
    Location
    Central West NSW
    Posts
    29,515
    Total Downloaded
    0
    As chazza says, but you will also have to supply fuel. Probably best to assume the fuel system does not work until you check the pump and the contents of the tank, and provide a gravity feed system to the carby.

    If there are additional spark gaps provided in each plug lead, it is a fair guess that the rings are not in top shape.

    John
    John

    JDNSW
    1986 110 County 3.9 diesel
    1970 2a 109 2.25 petrol

  8. #78
    Join Date
    Jan 1970
    Location
    under a rock, next to a tree, at Broadmarsh
    Posts
    6,738
    Total Downloaded
    0
    Quote Originally Posted by digger View Post
    OK, surely there's a way I can wire the motor to see if I can get it to start?
    Go straight from the battery to the wiring side of the coil, but disconnect the wiring loom first from the back of the start switch, wires on the generator and the wire going to the coil and by doing that there is no chance of power getting back to any shorts in the old wiring.

    The existing wiring is pretty average and there are no colours left in it which makes it hard to tell which one should do what!!
    As you find what the wire is for paint the end of the insulation with the colour for that wire, for example the wire for the choke switch to the choke warning light is a white sheath and with a blue trace. Another way is to use coloured marker rings that are used on the legs of Canaries or Budgies.

    ----- Out of curiosity, In the original set of leads on the car, each spark lead had a button "inline" (see photos) with end of spark lead attached to opposite holes which I'm lead to believe is an old flathead V8 owner trick

    It's a bit like getting an awkward oiled up two stroke to fire, remove the plug lead and hold it about 1/4" from the plug and 90% of the time it will fire due to the magneto having to provide more oomph to jump the gap.

    The 'button trick' as I understand it places the button on plug leads has the same effect, it actually made a false gap in the cable, again the spark was intensified and gave a better start especially with an oily plug... I have since heard that a clear piece of plastic tube used to do the same thing..

    What this means about the motor I don't know??
    (bad compression?)
    So many of those motors were unnecessarily scraped because they were using oil and blowing smoke, mainly from stuck rings and bad inlet valve stem seals.

    First replace the seals around the inlet valves, because of the design of the engine, the oil collects around those inlet valve stems causing it to find it's way past the old hard seals to be drawn into the cylinder. I would then give the engine a couple of quick oil changes with some good quality oil and see then after a couple of long runs if the oil usage becomes less.

    You can get a bit of an idea of the amount of use the engine has done by looking for any signs of wear, in places like the 'V' in the water pump pulley and the nipples on the clutch and brake pedal ( they will be well worn if the Land Rover has been driven a lot ).

    .

  9. #79
    Join Date
    Jan 1970
    Location
    under a rock, next to a tree, at Broadmarsh
    Posts
    6,738
    Total Downloaded
    0
    To not have to worry about the SU fuel pump for the time being, use a tin and hose to feed petrol direct down into the carby.
    .

  10. #80
    Join Date
    Jan 1970
    Location
    under a rock, next to a tree, at Broadmarsh
    Posts
    6,738
    Total Downloaded
    0
    Chazza's point about the oil is good. I would be checking the condition of the sump out first, best way is to drop the old oil cold and only if the old oil is flowing freely, put a new lot of fresh in.

    I once had a old diesel David Brown tractor that had the residue in the sump set solid , I dropped the sump and then cleared the rubbish out of the sump, pickup and the oil pump. Had I tried to turn that engine over before I checked everything, the drive to the oil pump would have been busted.
    .

Page 8 of 10 FirstFirst ... 678910 LastLast

Bookmarks

Bookmarks

Posting Permissions

  • You may not post new threads
  • You may not post replies
  • You may not post attachments
  • You may not edit your posts
  •  
Search AULRO.com ONLY!
Search All the Web!