Page 15 of 18 FirstFirst ... 51314151617 ... LastLast
Results 141 to 150 of 180

Thread: Project 'Bob' (formerly Bobette)

  1. #141
    Join Date
    Jan 2014
    Location
    Melton, VIC
    Posts
    151
    Total Downloaded
    0
    See I have come up with a better solution now, the 'park the wife's mini in front of it' security solution, that way they will have to move/ram it in order to get the Landy out, thus drawing attention to themselves!

    Not sure the wife is entirely impressed by the thought of her car being used as a roadblock though.

  2. #142
    Join Date
    Jan 2014
    Location
    Melton, VIC
    Posts
    151
    Total Downloaded
    0
    More progress made Monday, tested the alternator to find it was putting out a measly 3 volts and the dash bulbs had gotten squished in my toolbox so took a trip to the local small electronics store who not only had bulbs but a friend at a garage specialising in auto electrics. Trip up the road later and I had a shiny new alternator and a quote for an air conditioning system, the latter is unlikely to happen in the next few months though so stuck on the back burner for now.

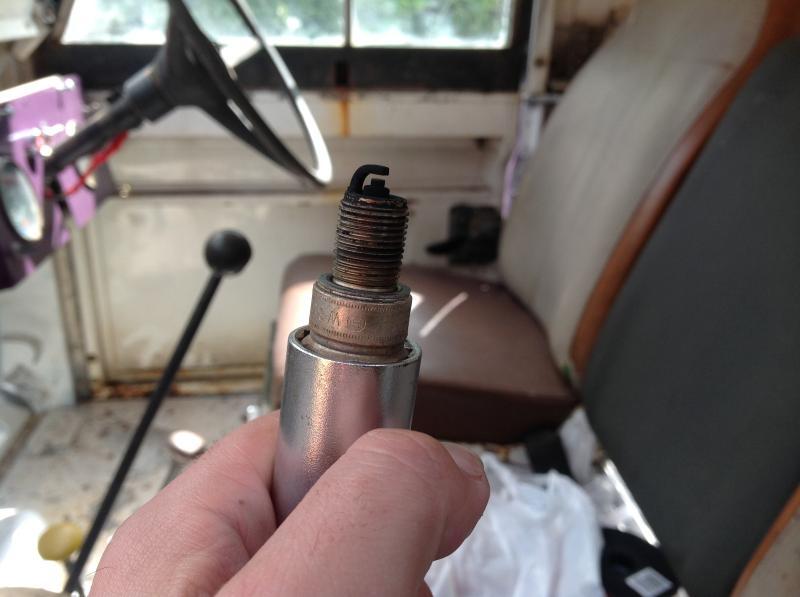
    Fitted the alternator and refitted the now painted bonnet, still need to fit the latches and something to stop the damn thing from sliding off sideways as I now have to repaint a section of the passenger wing. Whilst out I also had picked up a set of spark plugs as she didn't seem to be starting particularly well, the black crap covering the old plugs was probably chief reason for this and she seems to start a bit better, however to my untrained ear something doesn't sound entirely right with the engine at idle. Might have to take a video to get a second opinion, best description I can give is that it sounds intermittent at idle rather than a consistent chugging noise...

    Anyways to the pictures!
    old alternator:


    And shiny new one:


    New one fitted:


    And finally the business end of one of the old plugs, I probably could have got away with just cleaning them but laziness got the better of me:


  3. #143
    Join Date
    Aug 2012
    Location
    Adelaide
    Posts
    2,757
    Total Downloaded
    0
    For the amount you're spending on the getting the rig up to speed, don't you think a new set of plugs is worth while! It was one of the first things I did with my 186.

    Plus it's just good fun bolting new parts into the engine bay! That nice shiny new alternator.... I've been having some fun with that at the moment on my 200tdi, but have run out of some key parts

    I am loving those LED parkers! I'm just jealous that you got yours going first That purple is really growing on me... maybe I should start painting again! No I don't think I'm that keen, but it is looking really good.

  4. #144
    Join Date
    Jan 2014
    Location
    Melton, VIC
    Posts
    151
    Total Downloaded
    0
    The missing picture from the other day of the bonnet on. Sadly it had rained since fitting and taking the pic which has left the whole thing looking rather grubby, oh and the cat has taken to dancing on the front end it would seem from all the paw prints.


    Still, getting there slowly

  5. #145
    Join Date
    Jan 2014
    Location
    Melton, VIC
    Posts
    151
    Total Downloaded
    0
    And yet more progress, but a few questions.

    Still, progress first, removed and cleaned up all the brake discs and brakes, driver front was jammed on, driver rear full of oil, absolutely smothered in it to be precise.. Passenger sides all appear to be fine. Fitted the new shocks, the old rear were so rusted that I had to cut them off at the axle end. To make things more interesting there was not enough space to fit the grinder in there so I had to use a hacksaw to get them off which was rather time consuming to say the least. Worth it though.

    Whilst she was up on blocks I popped to pick up some replacement u bolts for the rear axle and fitted them, also got lock nuts for them as they had normal ones fitted from the shop, pretty sure the suspension is finished now.

    Finished wiring he front lights, now have high and low beams working, fitted new bulbs in the dashboard, though the passenger side is noticeably dimmer and I am not entirely sure why, maybe just the resistance from the wiring, going to try swapping the bulbs tomorrow see if that has anything to do with things.

    Finally, fitted a new rubber strip along the front panel for the bonnet to sit on.


    U bolts new/old:


    New fitted:


    Old shock hacked off:


    New fitted:


    Bonnet pre strip:


    Bonnet after strip:


  6. #146
    Join Date
    Jan 2014
    Location
    Melton, VIC
    Posts
    151
    Total Downloaded
    0
    And now the issues

    There was quite a bit of oil in the brake drum and I have no idea where it could have come from, my first thought was that perhaps it had come from the drive shaft maybe but I am not sure where to look in that regard. Also the driver shoes had what looked like wire brush bristles all over them, was wondering if anyone might know if there is a cause for this other than maybe someone shaving a brush in there.


    Also, headlights, one dimmer than the other... Possible causes?


    Back to brakes, I put fluid in the reservoir and did some pumping but diddly squat happened, tried loosening a bleed nipple but nada, eventually just removed it entirely but it still feels as though the pedal is connected to air. It's a new brake master and everything appears to be in working order that end but it's not drawing any fluid from the reservoir.

    Finally for tonight, the accelerator pedal is virtually unusable for me, possibly due to my extremely long legs, because I can't get my foot at any angle in order to touch the pedal and the floor at the same time, I am thinking it has something to do with the shape of the pedal itself, I forgot to take a picture but it kinda looks like a bent flat bar crudely bolted to the shaft thing, is this in any way normal or is it someone's drunken solution to a missing pedal?

    Any answers would be highly appreciated as I am probably a bit out of my depth with this build lol.

  7. #147
    JDNSW's Avatar
    JDNSW is online now RoverLord Silver Subscriber
    Join Date
    Jan 1970
    Location
    Central West NSW
    Posts
    29,512
    Total Downloaded
    0
    Perhaps some help.

    Brakes.

    The 'bristles' are probably made up of oil and brake dust.

    Oil is from a leaking hub seal. See workshop manual, but not a large or difficult job, except that you almost certainly have four to do. The surface on the stub axle that the seals run on should be checked, may need replacing.

    New master cylinder not pumping - has to be adjustment of the pushrod. This needs to allow the piston to come right back, otherwise the fluid will not get into the cylinder. When initially bleeding the brakes, remember that you can bleed from any join in the plumbing.

    Accelerator. The acceleratoir pedal is formed from a piece of steel strip clamping onto the shaft. The position of this is adjustable by loosening the clamp bolt. (or the clamp bolt on the lever arm on the other end of the shaft) The accelerator stop is also adjustable.

    John
    John

    JDNSW
    1986 110 County 3.9 diesel
    1970 2a 109 2.25 petrol

  8. #148
    Join Date
    Dec 2006
    Location
    Narrogin WA
    Posts
    3,092
    Total Downloaded
    0
    For the headlight problem:
    1. Find the black earth wire from the dull lamp and locate where it is connected to the body or chassis and remove the connector. Clean the contact until it is bright; coat with vaseline and reinstall. This includes removing paint; all rust; etc. Whilst you are about it, clean every earth connection on the car, as many electrical problems are caused by poor earths.

    2. Check that the high beam wiring is connected the right way around on the dull lamp.

    3. Check the globe - as you have already suggested.

    If you are still unimpressed with the lighting, install relays and heavier gauge cable, including the earth wire, between the relays and the globes. Correct coloured PVC wire is available from Autosparks; have a look at their table of how big the original wire was and order the next size up. The closer the relays are to the lamps the better.

    I have done this conversion to my Alpine, which has essentially the same crappo wiring that Rovers have, and the improvement is so good I never used the better globes I bought as well

    Cheers Charlie

  9. #149
    Join Date
    Jan 2014
    Location
    Melton, VIC
    Posts
    151
    Total Downloaded
    0
    Thanks guys for the help guys, So one problem solved at least, the dim headlight was down to a faulty bulb though I did clean up the earth terminals too. The wiring is all new though done by me so likely not expert lol.

    Are the hub seals easy enough to get hold of? Or is it going to be another order from the uk part

    As far as the accelerator goes I might end up manufacturing something because there does not appear to be any way of adjusting it to fit my freakish feet

  10. #150
    Join Date
    Feb 2014
    Location
    Sydney
    Posts
    1,073
    Total Downloaded
    0
    The hub seals John wrote about are available in Oz as are the hub seal
    Phil B

    Custodian of:
    1974 S3 swb wagon (sold)
    1978 S3 swb canvas
    48 749 '88 4x4 Perentie
    1985 County with 4BD1T

Page 15 of 18 FirstFirst ... 51314151617 ... LastLast

Bookmarks

Bookmarks

Posting Permissions

  • You may not post new threads
  • You may not post replies
  • You may not post attachments
  • You may not edit your posts
  •  
Search AULRO.com ONLY!
Search All the Web!