Page 3 of 14 FirstFirst 1234513 ... LastLast
Results 21 to 30 of 133

Thread: Ernest.

  1. #21
    Join Date
    Aug 2006
    Location
    Gold Coast QLD
    Posts
    1,747
    Total Downloaded
    0
    Ended up finding a new one out of MR Auto's, Thx Warren. He also sent down some tie rod ends and a speedo sensor for my son's D1. I also ended up collecting a 3000 psi pressure cleaner on Sunday, I removed the front guards, radiator support panel and radiator and gave it all a blast last night. Looks like it'll be a fun packed Saturday rebuilding the front end.
    1964, S2a SWB "Ralph"
    1977, S3 SWB "Smeg" (Gone)
    1996 D1 300tdi auto (Gone)
    1973 Rangie Classic (Gone)
    2012, 110 (Series 12) Puma "The Tardis"
    1962 109" Tray Back "Ernie"
    1998 D1 300tdi (Dizzy)
    2017 Kawasaki Versys 1000

    You must now cut down the tallest tree in the forest... With... A HERRING!!!!!

  2. #22
    Join Date
    Aug 2006
    Location
    Gold Coast QLD
    Posts
    1,747
    Total Downloaded
    0
    We managed to get most of the front end rebuilt on Saturday, thx to Harry and Scanfor for the help. A few little problems encountered along the way were sorted out without much hassle. Sunday, Scanfor and I finished off the brakes and axle flanges, fitted some temporary tyres to the front and it fired up to move it from the drive nicely. Next is to remove the tray and wheels and attack the chassis with a little sand blaster I bought, patch up a hole on the under side of the front cross member and start to repaint the chassis.
    1964, S2a SWB "Ralph"
    1977, S3 SWB "Smeg" (Gone)
    1996 D1 300tdi auto (Gone)
    1973 Rangie Classic (Gone)
    2012, 110 (Series 12) Puma "The Tardis"
    1962 109" Tray Back "Ernie"
    1998 D1 300tdi (Dizzy)
    2017 Kawasaki Versys 1000

    You must now cut down the tallest tree in the forest... With... A HERRING!!!!!

  3. #23
    Join Date
    Aug 2006
    Location
    Gold Coast QLD
    Posts
    1,747
    Total Downloaded
    0
    I had a lot of fun getting the front bumper bar bolts out on Saturday, the heads of the bolts sheared off and I couldn't pull them out from the bottom due to the length and lack of room to manoeuvre them out. I ended up having to get the gas axe out and cut them out after drilling down from the top with a 3/16 then 10mm bit to shorten them. Got the bar off to find the front face of the chassis bulging with rust. Cut the face off and the inside was caked with dirt, right back to the crush tube for the bar, cleaned it all out and the crush tubes were Ted's brother, so I cut them out as well as the sides back the the front of the spring hangers and the base of the chassis. I am now in the process of manufacturing new front dumb irons to stitch in hopefully this weekend. I will have to refit the crush tubes as well. I Managed to strip all the ancillaries from the engine, clean it up and give it a coat of paint, then refit the alternator, dizzy,coil etc. Put the exhaust manifold into a molasses bath to give it a clean up on Friday night, I'll pull it out tonight and pressure clean it and see how it comes up. I am looking at rebuilding the 2.25ltr motor I have a home and taking the 202ci out, The motor was reconditioned 4 years ago, but it'll do for now to move it around. I had a look online Sunday, I couldn't believe how much recon Holden motors go for nowadays!!
    Attached Images Attached Images
    1964, S2a SWB "Ralph"
    1977, S3 SWB "Smeg" (Gone)
    1996 D1 300tdi auto (Gone)
    1973 Rangie Classic (Gone)
    2012, 110 (Series 12) Puma "The Tardis"
    1962 109" Tray Back "Ernie"
    1998 D1 300tdi (Dizzy)
    2017 Kawasaki Versys 1000

    You must now cut down the tallest tree in the forest... With... A HERRING!!!!!

  4. #24
    Join Date
    Aug 2006
    Location
    Gold Coast QLD
    Posts
    1,747
    Total Downloaded
    0
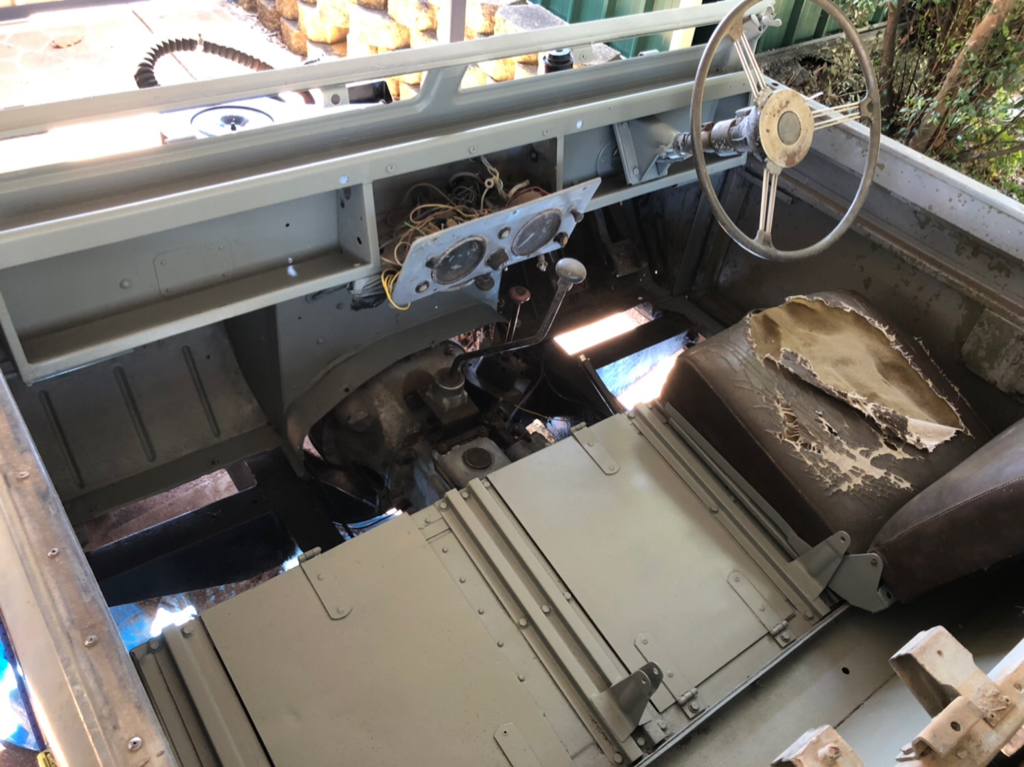
    A bit more progress yesterday, bought a sandblaster from that hardware chain thats monopolised the market and hit the dash. Quite impressed with it. Gave it a coat of etch and colour and its looking good. Now for the floor and dash panels.
    1964, S2a SWB "Ralph"
    1977, S3 SWB "Smeg" (Gone)
    1996 D1 300tdi auto (Gone)
    1973 Rangie Classic (Gone)
    2012, 110 (Series 12) Puma "The Tardis"
    1962 109" Tray Back "Ernie"
    1998 D1 300tdi (Dizzy)
    2017 Kawasaki Versys 1000

    You must now cut down the tallest tree in the forest... With... A HERRING!!!!!

  5. #25
    Join Date
    Jun 2013
    Location
    Universe A
    Posts
    2,082
    Total Downloaded
    0
    Is that a hole in your firewall straight under the instrument cluster?

    Someone cut a hole in mine there to get to the head, not my style at all.

  6. #26
    Join Date
    Aug 2006
    Location
    Gold Coast QLD
    Posts
    1,747
    Total Downloaded
    0
    Quote Originally Posted by shack View Post
    Is that a hole in your firewall straight under the instrument cluster?

    Someone cut a hole in mine there to get to the head, not my style at all.
    No mate, only grommits to bring oil pressure line and a few other wires into the cab.
    Cheers Ian
    1964, S2a SWB "Ralph"
    1977, S3 SWB "Smeg" (Gone)
    1996 D1 300tdi auto (Gone)
    1973 Rangie Classic (Gone)
    2012, 110 (Series 12) Puma "The Tardis"
    1962 109" Tray Back "Ernie"
    1998 D1 300tdi (Dizzy)
    2017 Kawasaki Versys 1000

    You must now cut down the tallest tree in the forest... With... A HERRING!!!!!

  7. #27
    Join Date
    Jan 1970
    Location
    Irymple, Victoria, Australia
    Posts
    2,900
    Total Downloaded
    0
    Quote Originally Posted by shack View Post
    Is that a hole in your firewall straight under the instrument cluster?

    Someone cut a hole in mine there to get to the head, not my style at all.
    Seen it done on few so that the welsh plug at the rear could be accessed without removing the donk.
    Some have been done in a rather neat fashion, others by a butcher with a cold chisel.

    Have to agree with you, it's not my thing either.

    Cheers, Mick.
    1974 S3 88 Holden 186.
    1971 S2A 88
    1971 S2A 109 6 cyl. tray back.
    1964 S2A 88 "Starfire Four" engine!
    1972 S3 88 x 2
    1959 S2 88 ARN 111-014
    1959 S2 88 ARN 111-556
    1988 Perentie 110 FFR ARN 48-728 steering now KLR PAS!
    REMLR 88
    1969 BSA Bantam B175

  8. #28
    Join Date
    Jun 2013
    Location
    Universe A
    Posts
    2,082
    Total Downloaded
    0
    Quote Originally Posted by mick88 View Post
    Seen it done on few so that the welsh plug at the rear could be accessed without removing the donk.
    Some have been done in a rather neat fashion, others by a butcher with a cold chisel.

    Have to agree with you, it's not my thing either.

    Cheers, Mick.
    Well they started out well...

    Drilled 4 holes, but then they didn't line them up square, then they used an angle grinder, but must have decided they didn't really need to cut the whole way, tried to bend it out the way...ooops no go, then cut the rest of the way and got it, so all wonky and bent in a few different places,

    Success..

  9. #29
    Join Date
    Aug 2006
    Location
    Gold Coast QLD
    Posts
    1,747
    Total Downloaded
    0
    Hi All

    Scanfor and I hooked in on the weekend, we had a hell of a time replacing the rear drivers shockie. we couldn't spin a spanner on the bottom mount, so we cut through the bottom pin with a grinder. The top bolt snapped off and we had to heat the crud out of it, whilst driving it through with a drift and a 4 pound lump hammer, only for it to stop and inch from the inside from dropping out. We had to cut it off at the face of the chassis and then incrementally drill it out from the inside under the tray. Fun huh?. All of the other 3 shocks came off without any real issues. We also managed to braze up some little holes in the drivers side floor pan, sand back and give them a coat of paint along with the pedal arms and fitted new pedal pads. Last night I picked up some 6mm x 1mm strips of aluminium 800 long and slid the up the guts of the door gasket material I got from the UK, bent the gasket to the door frame shape and glued them on with adhesive. I got the door pivot hinges changed over, the top one was deformed quite badly. I had to loosen all the bolts and re hang the door with the new pins fitted. Also finally got the new seats in which I think look great. I think the next thing to do is remove the tray and clean and paint the rear of the chassis and fit the truck cab and roof.
    I am still in two minds on whether to re-do the outside or just leave the inside looking flash and have the original patina on the outside. Any ideas?
    Cheers Ian
    Attached Images Attached Images
    1964, S2a SWB "Ralph"
    1977, S3 SWB "Smeg" (Gone)
    1996 D1 300tdi auto (Gone)
    1973 Rangie Classic (Gone)
    2012, 110 (Series 12) Puma "The Tardis"
    1962 109" Tray Back "Ernie"
    1998 D1 300tdi (Dizzy)
    2017 Kawasaki Versys 1000

    You must now cut down the tallest tree in the forest... With... A HERRING!!!!!

  10. #30
    Join Date
    Apr 2011
    Location
    Wandong,Victoria,Australia
    Posts
    3,280
    Total Downloaded
    0
    Hi Mate,

    It's a tough call re painting the outside or leaving the Patina. Some will say "leave the Patina, it's only original once". Others will say "it's your vehicle, do what you want".

    Myself - seeing how you have done such a great job on the inside, I say paint the outside as well. It will look fantastic!

    Cheers,
    Grey Ghost
    54 Series 1 86
    61 Series 2 109 - Club Rego
    76 2 Door Range Rover
    78 101 Forward Control - Club Rego
    88 Perentie FFR - Club Rego
    90 4 Door Range Rover - Club Rego
    93 Discovery 1 200 Tdi - Club Rego
    98 Freelander 1 - Full Rego
    22 Defedner 90 - Full rego

Page 3 of 14 FirstFirst 1234513 ... LastLast

Tags for this Thread

Bookmarks

Bookmarks

Posting Permissions

  • You may not post new threads
  • You may not post replies
  • You may not post attachments
  • You may not edit your posts
  •  
Search AULRO.com ONLY!
Search All the Web!