

 Reply With Quote
See who chimes in,but for me i would be sending a PM to Dave,Blknight.aus,on here,he knows these inside out,and should give you some helpfull pointers.

 Wizard
Guys...
Of recent days I've noticed that the coolant level in the reservoir has increased to the point that its forcing its way out a little bit at the moment. The Engine running temps are still the same, no signs of oil in the coolant and visa versa with no signs of coolant in the oil. The Defender runs fine and does not get hot at this point...
From what I've checked and can see, the coolant system checks out ok (from my limited knowledge)
The engine was rebuilt some 39,000kms ago and it seemed at the time that it still had it's original head. (odometer just clicked over 400,000kms) At the time the head still looked ok and has been for the past 39k kms but now I'm concerned that either the head has a crack in it (has never been overheated) or a possible Head Gasket.
My question is - is there a way to tell if my issue is head or head gasket related? As far as I can tell there is no mixing of engine oil and coolant and as I mentioned before the car runs fine and does not get hot (at this point in time).
I'm assuming if I keep driving it there's a fair chance of making it worst and doing more damage?
After some guidance from those guys with experience...
cheers and thanks in advance...
Swaggie
See who chimes in,but for me i would be sending a PM to Dave,Blknight.aus,on here,he knows these inside out,and should give you some helpfull pointers.
YarnMaster
SupporterAre you filling the tank right up or just to the halfway level.
I leave mine at halfway and it rises when hot and back again when cold.
If I fill it over that then it does overflow untill it finds its own level.
Wizard
There's an internal marker in the reservoir that I fill to which is about half full. After driving it yesterday and leaving it all day today, when I got home I tried to remove the cap and there was still pressure there wanting to push out coolant.Originally Posted by 123rover50

I'm in the process to remove the head to see what the problem could possibly be...
RoverLord
best bet for home testing (and this is iffy) is to get the engine warmed up, remove the AC pump, run the engine again then pull the glow plugs and do a leakdown check with the fill plug in the thermostat housing removed IF you're lucky you'll get bubbles in the coolant there...
however.. Its a moot point If its the head gasket you have to pull the head.
IF you remove the head its best practice to crack and pressure test it while its off.
IF its the head, you have to remove the head and then you have to replace the head gasket.
If its bolt stretch letting the head lift a little you need to replace the head bolts, which means you have to replace the head gasket which means (refer to point 1).
Ive seen this a few times now and generally its the gasket on an older engine having just start to let go. when you clean down the combustion chambers as part of prep for doing the gasket if you notice a significant difference in the surface finish of the chamber compared to the others send it off for fluxing or other crack/porosity checking.
Also rans are crack in the cylinder wall.
Dont forget your P gasket, waterpump, its gasket, and all the core plugs while you;re in there. A radiator flush and heater core flush is probably a good idea as well, Might as well check the vacutator just before you descale and de rust the coolant transfer piper for the heater....
thermostat opening test and its gaskets too. Best to get that in place and done before you put the head back on....
Oh, the block drain and if you have it a new o ring for the radiator drain.
Dave
"In a Landrover the other vehicle is your crumple zone."
For spelling call Rogets, for mechanicing call me.
Fozzy, 2.25D SIII Ex DCA Ute
TdiautoManual d1 (gave it to the Mupion)
Archaeoptersix 1990 6x6 dual cab(This things staying)
If you've benefited from one or more of my posts please remember, your taxes paid for my skill sets, I'm just trying to make sure you get your monies worth.
If you think you're in front on the deal, pay it forwards.
Wizard
Well... Here's a bit more of the unfolding story...
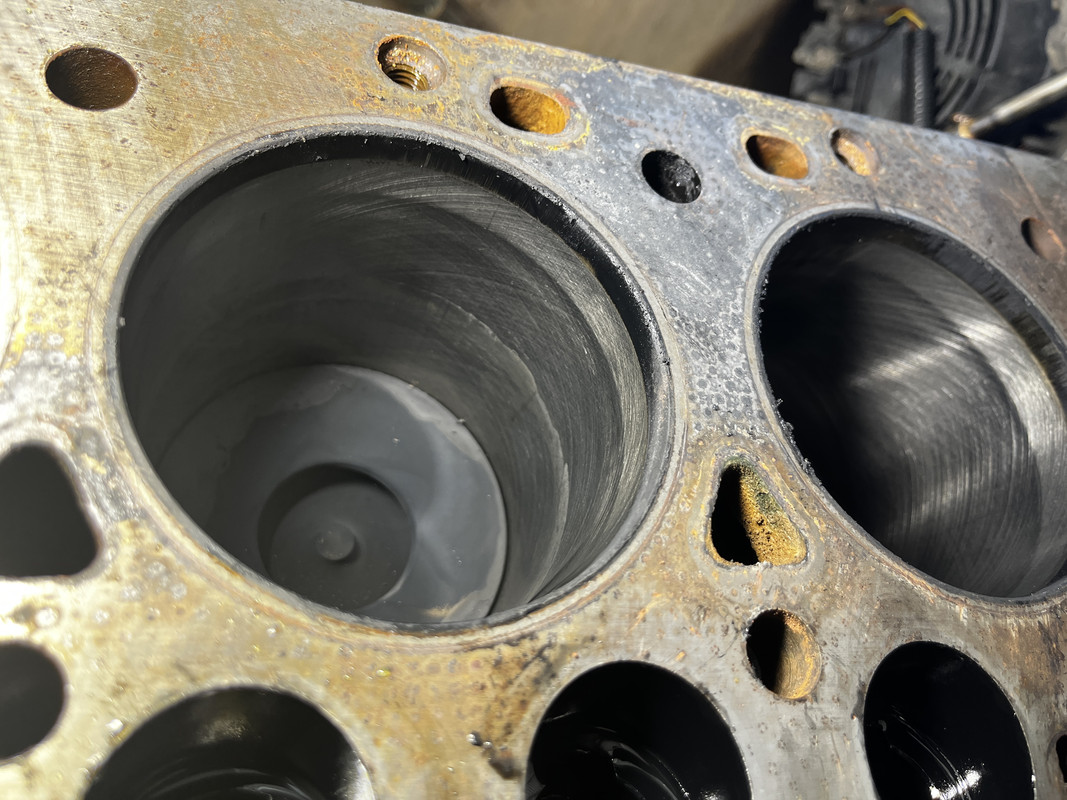
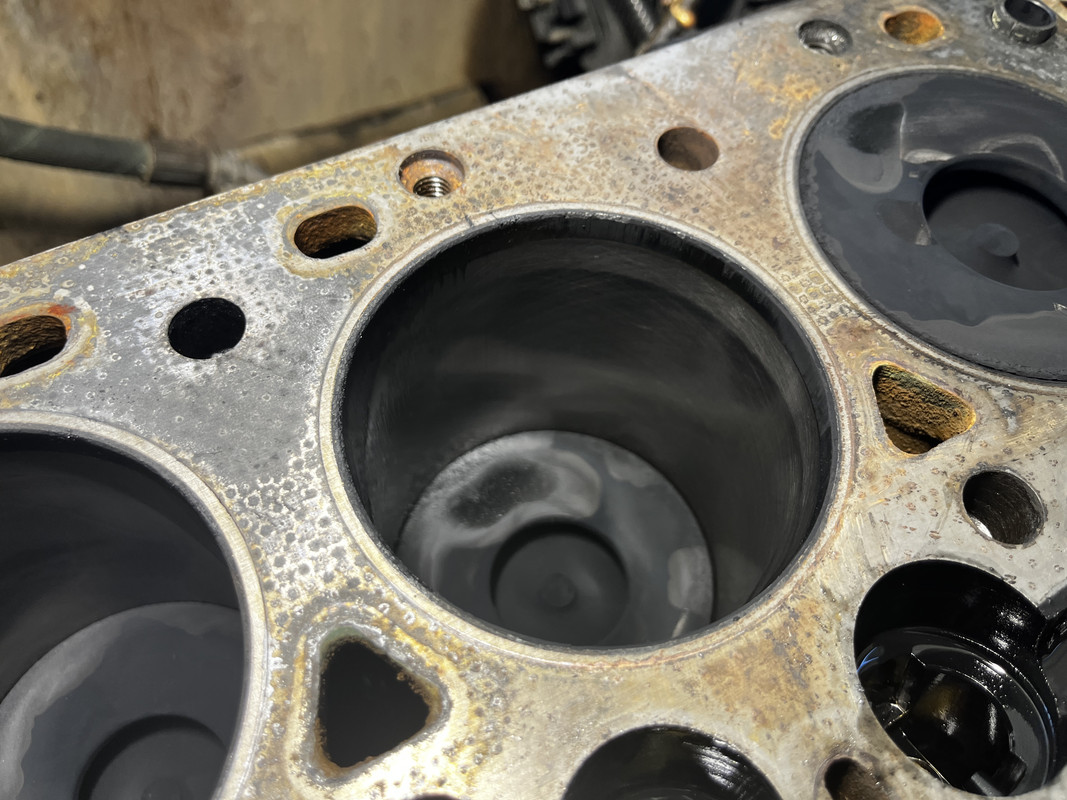
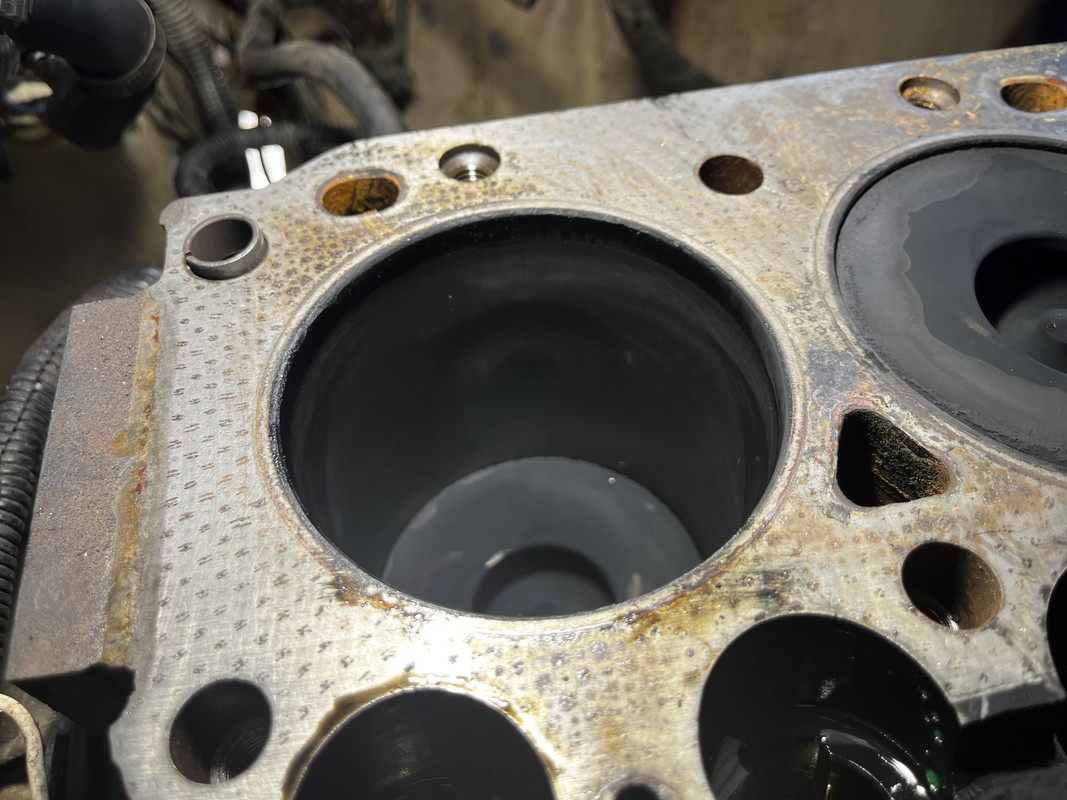
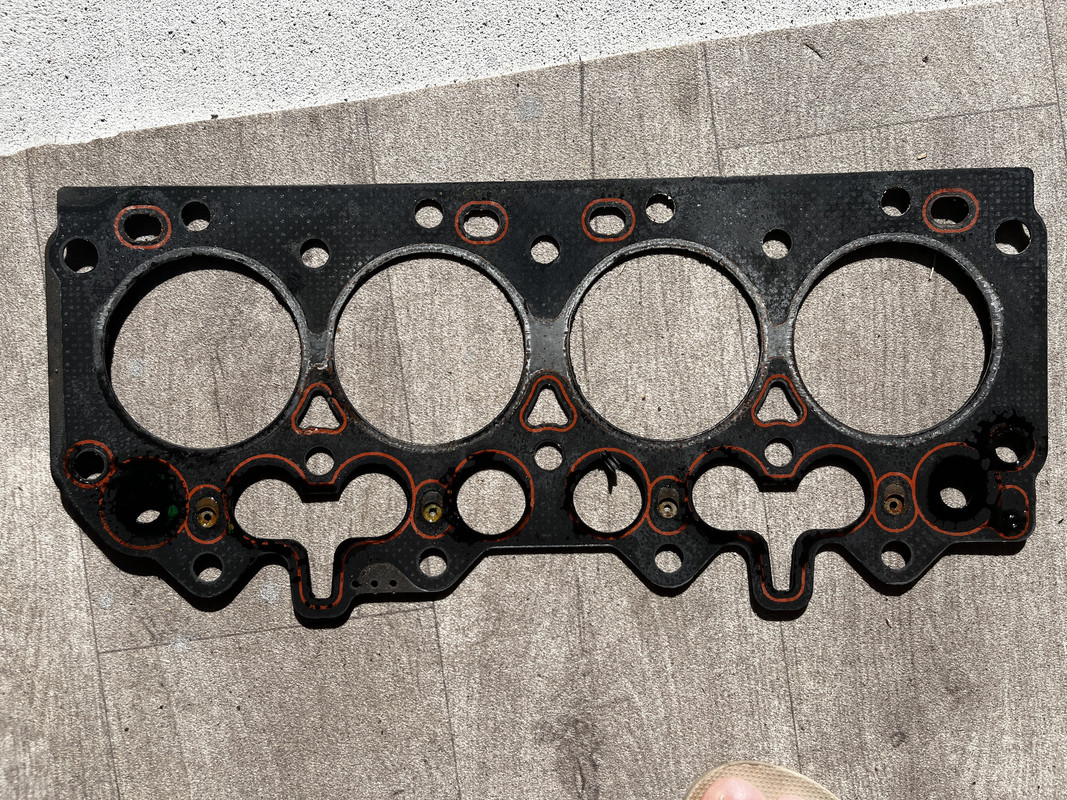
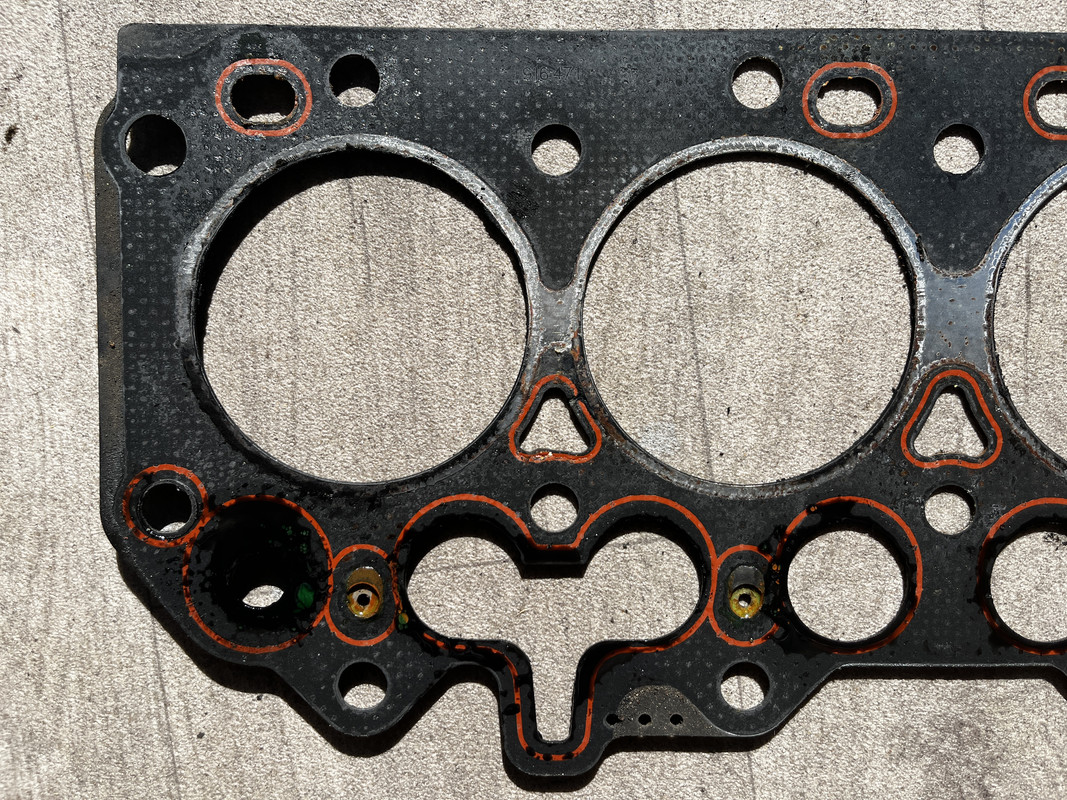
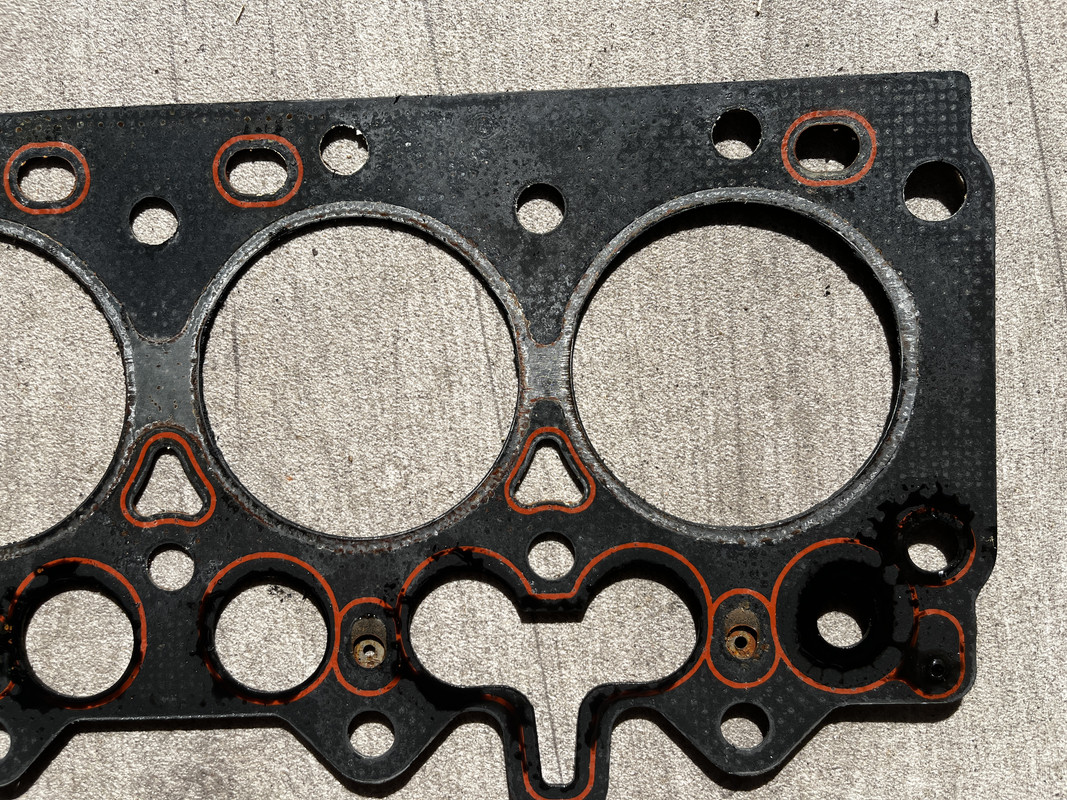
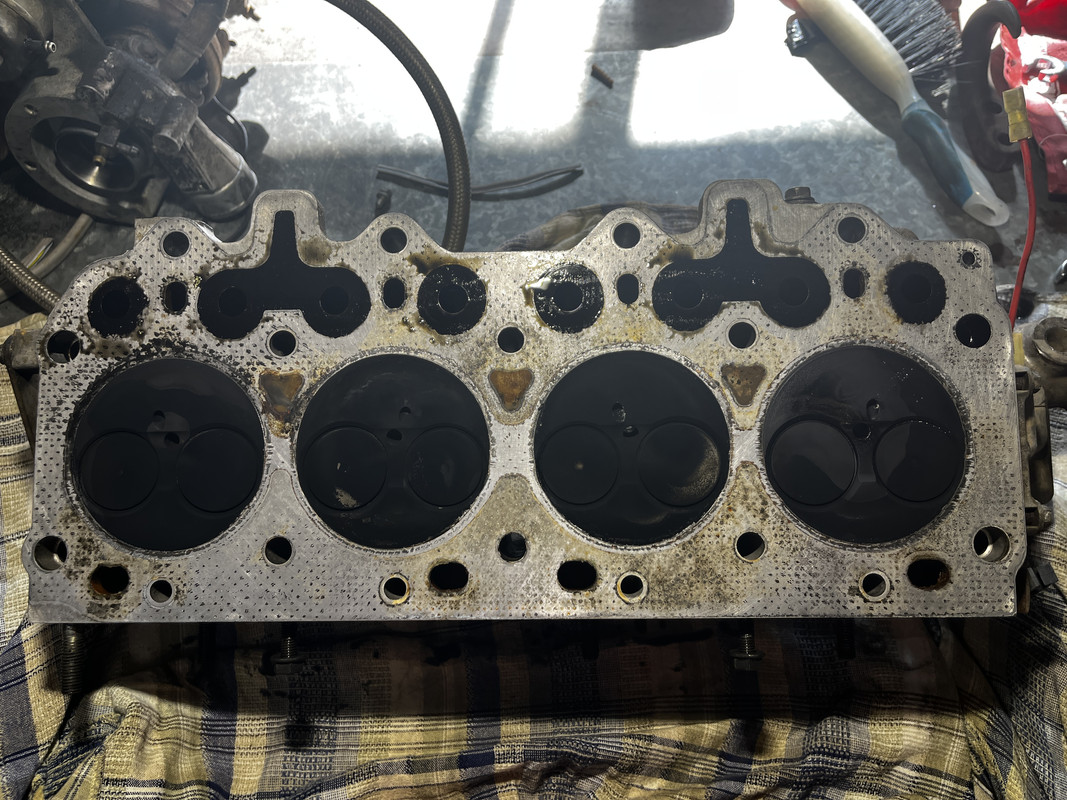
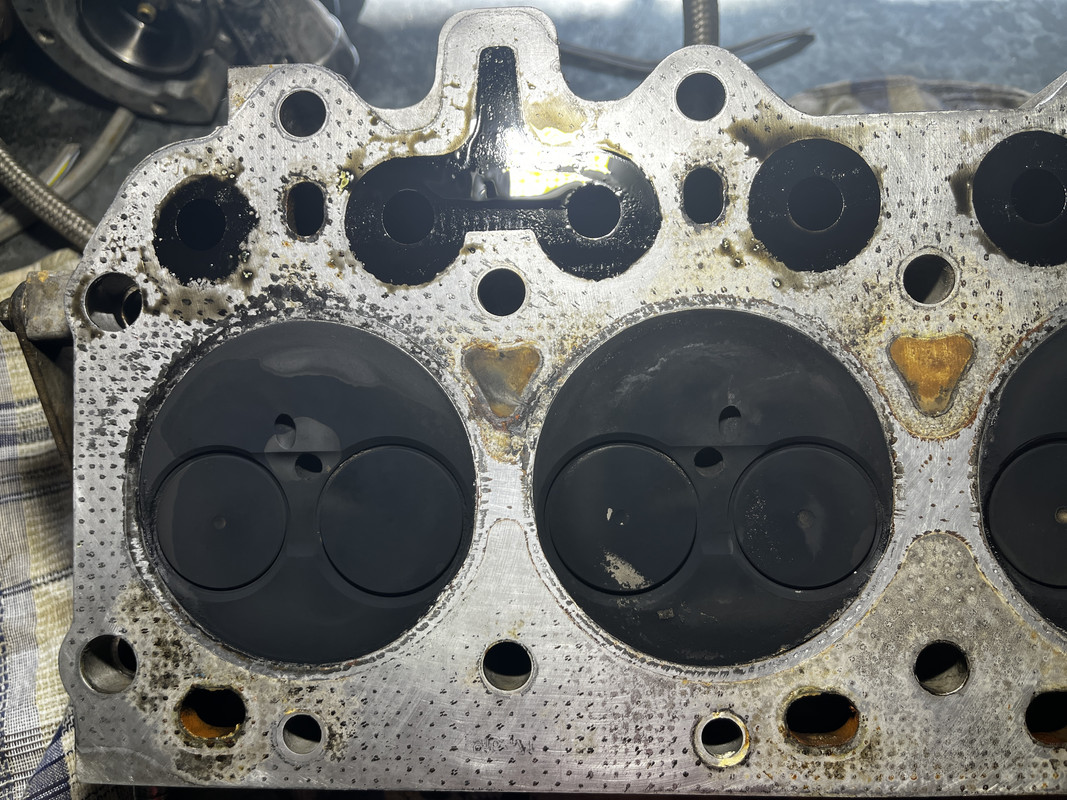
Removed the Head & inspected the Head and Head Gasket and with my limited experience, I could not see anything that stood out indicating the problem.... I then cycled the Pistons through and found what I think may be the issue. It looks like No3 Cylinder Wall may have a crack in it. It's different to the other 3 cylinder walls.(see attached photos)
This engine was rebuilt some 30>40k again with all new 20thou pistons; bearings; camshaft, etc
Number-3
Number-3
Number-2
Number-4
Gasket
HEAD
Master
SubscriberAny more info on this ?
Had the block tested ?
Wizard
Took the Head and Gasket to a Cylinder Head & Engine specialist today for him to check it out. After looking at teh Head and gasket + the photos of No3 Bore, he's 90% sure that the Head Gasket & head is the cause of the issue. He reckons the bore marks are stain marks but just to be sure, he's given me this red dye spray to spray in and around No3 bore where the marks are and then leave for 24hrs, then wipe clean & spray a white powdery substance that will draw out the red dye should there be a crack there... So I'll find out tomorrow the result as to where there is a crack there or not...
The engine builder who has done multiple TDi blocks and has never seen them crack in that spot, so I'm hoping that its just a stain mark and I can fit a new head gasket and the newly skimmed head and all will be good...
ChatterBox
SubscriberFWIW, I agree with the specialist, I've seen plenty "stain marks" in bores, and that certainly looks like one.
LordRover
SubscriberI don't have your experience, but I agree. A quick look at the pics suggests to me that the HG was leaking between the water jacket and cyl #3.
JayTee
Nullus Anxietus
Cancer is gender blind.
2000 D2 TD5 Auto: Tins
1994 D1 300TDi Manual: Dave
1980 SIII Petrol Tray: Doris
OKApotamus #74
Nanocom, D2 TD5 only.
| Search AULRO.com ONLY! |
Search All the Web! |
|---|
|
|
|
")


Bookmarks