Results 1 to 8 of 8

Thread: task for the night - dismantle Clutch Pedal Assembly and Clutch Master Cylinder

  1. #1
    Join Date
    Jan 2007
    Location
    Keilor East, Victoria
    Posts
    183
    Total Downloaded
    0

    task for the night - dismantle Clutch Pedal Assembly and Clutch Master Cylinder

    pulled it apart tonight, no idea how to get the cup from the master cylinder, undid the circlip, removed seal and piston - cup and seal and spring still intact, not sure how it comes out. Any ideas?


    Maybe i just spring for the $49.50 for a new assembly and get it sorted once and for all?

    degrease and cleaning the pedal assembly ready for paint and refit is also in the order. took skin off my wrist from the darn wire brush - ouch!

    Steve

  2. #2
    Join Date
    Aug 2007
    Location
    Foot of the Otways
    Posts
    3,030
    Total Downloaded
    0
    Howdy Steve . I would go with getting a kit as it is only $5.50 for one . to get the cup out of the spring , compress it a little and remove the small rod out of the slotted hole in the cup . The cup should then just slide out . to get the seal off the piston just get a small screw driver and pull the seal back over the lip . It is a tight little sucker too . but it shouldn't take you more than a few seconds to pull it all apart . I hope thats what you meant and i hope i am right with what i have said

  3. #3
    Join Date
    Jan 2007
    Location
    Keilor East, Victoria
    Posts
    183
    Total Downloaded
    0
    Quote Originally Posted by srowlandson View Post
    pulled it apart tonight, no idea how to get the cup from the master cylinder, undid the circlip, removed seal and piston - cup and seal and spring still intact, not sure how it comes out. Any ideas?


    Maybe i just spring for the $49.50 for a new assembly and get it sorted once and for all?

    degrease and cleaning the pedal assembly ready for paint and refit is also in the order. took skin off my wrist from the darn wire brush - ouch!

    Steve
    Took some photos:
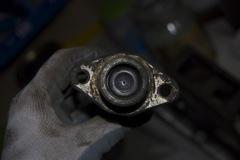
    A few taps on the bench and the piston popped out
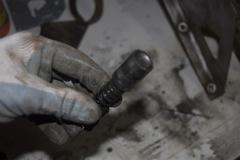


    Hmm, Looks a little corroded. Too far gone, or fine with a kit?

    The Piston

    Clutch Master Cylinder Assembly

    Other photos of painted parts, new axles and motor from Slunnie and the various clutch bits pulled apart

  4. #4
    Join Date
    Aug 2006
    Location
    Melbourn(ish)
    Posts
    26,495
    Total Downloaded
    0
    from those pics it looks like a new seal and a little work with some very fine wet and dry and brake fluid should see the slave side right.
    Dave

    "In a Landrover the other vehicle is your crumple zone."

    For spelling call Rogets, for mechanicing call me.

    Fozzy, 2.25D SIII Ex DCA Ute
    Tdi autoManual d1 (gave it to the Mupion)
    Archaeoptersix 1990 6x6 dual cab(This things staying)


    If you've benefited from one or more of my posts please remember, your taxes paid for my skill sets, I'm just trying to make sure you get your monies worth.
    If you think you're in front on the deal, pay it forwards.

  5. #5
    Join Date
    Jan 1970
    Location
    Central West NSW
    Posts
    14,127
    Total Downloaded
    99.87 MB
    $50 and you have a new one.
    Cheers
    Slunnie


    ~ Discovery II Td5 ~ Discovery 3dr V8 ~ Series IIa 6cyl ute ~ Series II V8 ute ~

  6. #6
    Join Date
    Oct 2003
    Location
    Godwin Beach Qld
    Posts
    8,688
    Total Downloaded
    0
    G'day srowlandson

    Have you got a LR Workshop manual or Haynes type?? if so have a close look at the diagrams of the Clutch Master cylinder, the spring retainer is the little black spring steel thing that sits close to the rubber seal/cup it has 2 sprung-legs that slope in, to hold on to the piston, prise them up with a fine screwdriver,to seperate the piston & spring, valve stem is held by "pearshaped hole".

    TAKE SPECIAL NOTE OF THE DIRECTION THE RUBBER CUP/SEAL FACES (flat face to piston)

    Do it your self,as you learn how,and it gives satifaction when restoring.

    cheers
    Last edited by UncleHo; 16th January 2008 at 07:00 PM.

  7. #7
    Join Date
    Jan 2007
    Location
    Keilor East, Victoria
    Posts
    183
    Total Downloaded
    0
    Quote Originally Posted by UncleHo View Post
    G'day srowlandson


    TAKE SPECIAL NOTE OF THE DIRECTION THE RUBBER CUP/SEAL FACES (flat face to piston)

    Do it your self,as you learn how,and it gives satifaction when restoring.

    cheers
    picked up the kit this morning with a few other things

    Will put it all in over the weekend, engine mounts are in ready to put my spare motor in

  8. #8
    Join Date
    Jan 2007
    Location
    Keilor East, Victoria
    Posts
    183
    Total Downloaded
    0
    Done, as usually, completed the job and realised camera in house so i'll have to pull apart and take some piccies of the process.

    quite easy actually. Lever a little retainer in the piston end of the spring out and the spring loaded piston fires across the garage

    seals popped off and replaced, back together and all put together in about 15 mins all up. nice work.

    i'll re do it and take some photos of the steps

Bookmarks

Bookmarks

Posting Permissions

  • You may not post new threads
  • You may not post replies
  • You may not post attachments
  • You may not edit your posts
  •  
Search AULRO.com ONLY!
Search All the Web!