Page 3 of 3 FirstFirst 123
Results 21 to 29 of 29

Thread: Fitting Maxidrives

  1. #21
    Join Date
    Jan 1970
    Posts
    16
    Total Downloaded
    0

    MAXIE DRIVE

    HI, A QUESTION.... CAN SOMEONE PLEASE TELL ME WHICH WIRES GO AND COME FROM WHERE FOR THE LOCKER LIGHTS....
    mATT

  2. #22
    Rangier Rover Guest
    Quote Originally Posted by matta View Post
    HI, A QUESTION.... CAN SOMEONE PLEASE TELL ME WHICH WIRES GO AND COME FROM WHERE FOR THE LOCKER LIGHTS....
    mATT
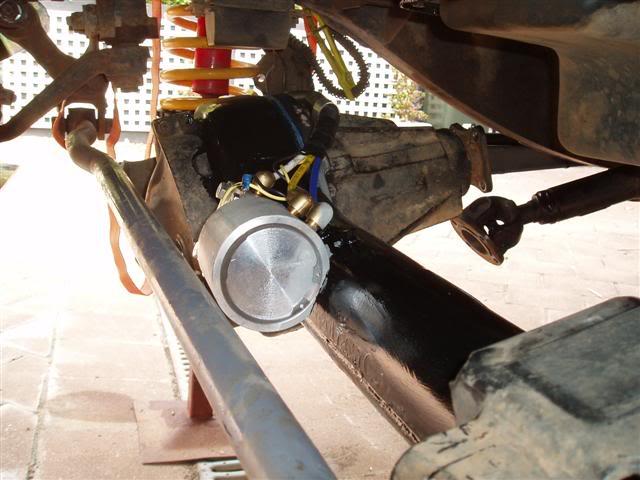
    Black earth, Yellow to insulated threaded terminal on actuator. The power goes to light and is earth switching.
    On light end of harnesss attach the yellow(Wire from terminal on actuator and power wire to a green or white wire in dash for power. If it stays on when diff unlocked check the terminal on actuator.

  3. #23
    350RRC's Avatar
    350RRC is offline ForumSage Silver Subscriber
    Join Date
    Mar 2008
    Location
    Bellarine Peninsula, Brackistan
    Posts
    5,501
    Total Downloaded
    0
    Quote Originally Posted by Defender200Tdi View Post
    ............
    The side where the locking dog engages get a bit of surgery. Basically, the mount for the locking thing gets a date with Mr Hacksaw and Mr File, then drilled and tapped to take a bolt holding a small bit of angle in place. You then mark up the angle and cut it out to make a new locking tab:

    ................


    Paul
    Hi All,

    In this pic the threaded thing that positions the main bearing on the locker side appears to be a sliced off version of the normal one (that is on the other side).

    Is this correct?

    24 spline rear diff with Maxi going in my POS, previous owner lunched the R&P.
    New bits like R&P supplied but not the threaded thing like in the pic.

    cheers, DL

  4. #24
    Join Date
    Nov 2012
    Location
    Acacia Ridge, QLD
    Posts
    582
    Total Downloaded
    0

    fitting maxidrives some pictures

    Some photos to supplement Pauls fine installation report.

    I use the 2 ton jack in the picture to "bend" the axle housing for welding, it was perfect after welding, MIG is recommended because it puts less heat in than stick.

    I used the frame to remove the axle, and to spread the diff and to preload the diff for welding, and for re installation in my garage. My son is helping the paint to dry in Victoria during the cooler months.

    I think the cost of the rear kit was about $1500, 15 years ago, I was quoted about $1500 for fitting, That equated to a $3000 back axle 15 years ago, big money for me, but I've got my moneys worth out of it in firewood alone.

    cheers simmo
    Attached Images Attached Images

    simmo
    95 300Tdi Defender wagon

  5. #25
    Join Date
    May 2014
    Location
    Tamworth NSW
    Posts
    4,295
    Total Downloaded
    0
    Wow, epic necro post! 10ys would be close to a new record. But good to see the info is still here for future generations (by internet standards at least)

    Simmo, OT but is that a factory finish inside your diff housing? Or has someone painted it with Glyptal?
    -Mitch
    'El Burro' 2012 Defender 90.

  6. #26
    Join Date
    Jan 1970
    Location
    NSW far north coast
    Posts
    17,285
    Total Downloaded
    0
    Nothing to add other than I haven't seen Paul on here for a long time.
    Hope he's well.

  7. #27
    Join Date
    Nov 2012
    Location
    Acacia Ridge, QLD
    Posts
    582
    Total Downloaded
    0

    salisbury diff paint inside

    Simmo, OT but is that a factory finish inside your diff housing? Or has someone painted it with Glyptal?[/QUOTE]

    Factory finish inside as far as I can tell.

    cheers

    simmo
    95 300Tdi Defender wagon

  8. #28
    Join Date
    Nov 2012
    Location
    Acacia Ridge, QLD
    Posts
    582
    Total Downloaded
    0

    Maxi drive front actuator cylinder protection


    Even though the actuator is on the front of the axle, it’s right at the top and protected by the steering guard and the panhard rod. If I hit anything high enough to bother the actuator, I think it’ll be the least of my worries 8O


    Hi Paul,

    My only concern with vacuum cylinder actuator on the front diff would be stones coming up off the road from passing trucks etc. I surprised at some of the impact marks under the front of my car.
    The vacuum cylinder is nicely made and precision fitting, but being aluminium I'd be worried, one good stone strike and it might jam.

    Some heavy cable sheath glued on , or vinyl flooring offcut, high density foam, nylon sheet with a couple of metal cable ties would give some protection.

    cheers simmo

    simmo
    95 300Tdi Defender wagon

  9. #29
    350RRC's Avatar
    350RRC is offline ForumSage Silver Subscriber
    Join Date
    Mar 2008
    Location
    Bellarine Peninsula, Brackistan
    Posts
    5,501
    Total Downloaded
    0
    Hi,

    I have a pdf of Mal Storey's original rear Maxi install instructions. The 'thing' I was referring to above is called a bearing cap, no mention of if it as being a modded (aka sliced off) stock one on the locker dog side. In the text he covers my arrangement (24 spline centre with roll pins to hold the caps).

    Off forum advice suggests the cap in question is just a sliced off stock one. Can create same.

    Gotta say that looking at Mal's kit delivered to the OP and all the bits I have (attention to detail and functionality) Mal is indeed a legend.

    Maybe this thread should be in stickies, especially with the OP pics that weren't part of the Pbucket debacle.

    cheers, DL

Page 3 of 3 FirstFirst 123

Bookmarks

Bookmarks

Posting Permissions

  • You may not post new threads
  • You may not post replies
  • You may not post attachments
  • You may not edit your posts
  •  
Search AULRO.com ONLY!
Search All the Web!