

 Reply With Quote
Have a look here....
Click on Tech up the top then browse through the links on the left hand side until you find fender trimming or similar (sorry i can't post a dirct link)
discoweb.org --
CHEERS TIM.

 Fossicker
Hi All,just a quick one ,has anyone got pics or know of any links,with info on choping the Guards,my new tyres dont rub, but off road will be another story,any help or advice would be great,Cheers Brad
TopicToaster
SubscriberHave a look here....
Click on Tech up the top then browse through the links on the left hand side until you find fender trimming or similar (sorry i can't post a dirct link)
discoweb.org --
CHEERS TIM.
Dads-
http://www.aulro.com/afvb/members-ri...-progress.html
Mine-
http://www.aulro.com/afvb/members-ri...-progress.html
Mums- stock 92 200tdi d1.
Swaggie
Ok, here is the low down on how I've cut my Disco2 guards, apparently it's a FAQ. I'm going to tell you that this is the good oil until either I completely stuff it up or somebody cuts better. This is for the Disco2, and so there may be some variations for D1's, Rangies, Volvos or whatever, especially in the measurements.
All pics here are thumbnails, bigger ones can be found at:
http://www.slunnie.com/coppermine/thumbnails.php?album=21
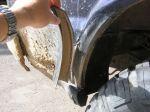
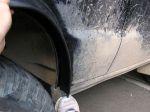
First I opened the door to see what I was dealing with.
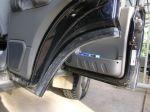
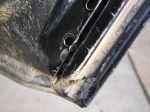
The seal had to go, it was an area that I wanted to cut anyway. The seal comes out very easily and is held in by some plastic clips that look very much like a boat thingy that the rope goes around. There is a little weak adhesive at each end that also hold it on.
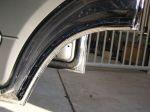
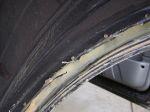
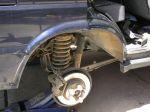
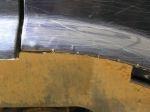
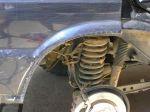
Looking at it, I want to remove at least 1" (25mm) of door around the guard, and that will take me into the area where the door becomes double skinned. Better think carefully here. Here is the "before" photo before I do some irrepairable damage.
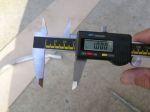
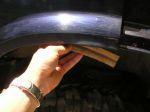
The marking tool I'll use are some thin forming MDF which I will also use later as a template for the door shape. Verniers to measure properly and mark with its hardened jaws, and aluminium angle that will be to close the gap between the inner and outer door skins. The Jenny calipers are just so 80's and not cool enough for me to use, though they look cool in the photo.
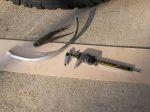
I'm working in inches here. Inches to me is like braille divided by 25.4. I'm measuring the thickness of the MDF as it will flex to the shape of the guard and become my guide for marking the inner cut line. I'm also measuring the thickness of the Al angle as I need to also allow for this when finishing the inner guard as it will later close the panel gaps.
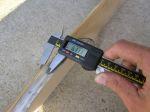
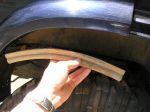
At this thickness re-zero the verniers and then add 1 inch to give the cut line distance. The verniers tell me the measurement 1.000" though of course the reality is that it is 1.113".
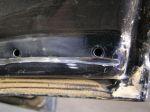
Now because I'm not built like an Octopus (more like a donkey I reckon) I couldn't photograph the next operation, but basically I used the MDF and bent it to fit inside the curve of the guard where the wheel normally sits. I then used the verniers against the outside of the MDF to scribe a line on the inside of the guard where the inner cut needs to be made. If you're a bodgy ass, then it comes out at just under the drilled holes for the clips that hold the door seal on, which is about .6" from the seperation of the inner skin.
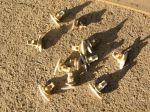
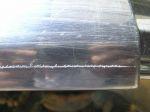
Now those plastic clips can get pulled out. They could have come out ages ago mind you. I squeezed them inbetween the legs of a Jenny caliper (yes, there moment of glory), and levered them out. These are good little clips, being a lot more plyable than others on the 4WD. None broke (or they all broke???). Now you can clean the dust and mud off and see that new scribed cut mark. Beautiful!
Hang onto the little seal clips. Perhaps we can use them again a bit later to improve the dust exclusion.
OK. Breath deep and think clearly.
THIS IS THE POINT OF NO RETURN
If you are confident keep reading.
If you are crazy keep reading.
If it’s somebody elses Jigger keep reading.
If you’re in the "other" 99.9% of Discovery2 owners then stop reading now.
Get the angle grinder
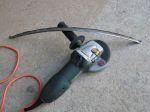
I've used a cutting wheel rather than a grinding wheel. Its finer and a lot more precise and for the panels I'm not after that "booty fab" effect irrespective of my methods - and possibly the end result.
Just trim a light groove on the waste side of your cut line, the cut line should not be removed, theoretically you should remove 1 half of it. Reality is we are using an angle grinder. Take it slowly and carefully doing small segments at a time. Steady yourself off the panel. The purpose of the light groove is to try to control the wander on the angle grinder when doing deeper cuts. No slips needed here. Be wary of where your sparks are going and adjust the grinder shields if need be - I've seen dry material such as cotton catch fire from angle grinder sparks and it would be a shame to burn down the Disco, especially before you're finished modifying the guards to run those glorious 35's!
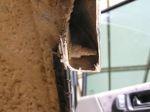
Now take the grinder through and do the full depth cut section by section. Let the groove guide you and hold the guard and grinder in one hand again to keep steady. Be careful not to allow much heat in the panel so nothing gets damaged and the paint doesn't overheat. Also, dont cut all the way through, its only the inner skin that currently needs trimming.
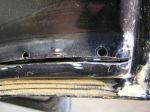
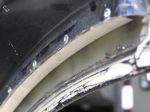
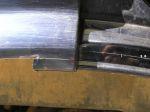
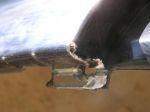
Now using the angle grinder (with the cutting disc) cut along the door seam to remove that corner from the inner door. Be careful here not to cut through the ouer skin otherwise you'll stuff the whole lot and be forced to fast for 12 months while you save for a new door. Also, again be careful not to overheat the paint on the outer skin and watch where the sparks go. I could smell burning plastic when I did this cut which I suspect was filler on the seam that joint the outer/inner skins.
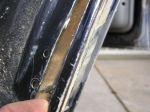

Check out those nasty burrs. Those beauty’s are sharp enough to take an arm or a leg right off!
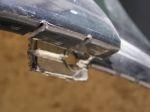
So file them off. I used a 2nd cut file, though a bastard cut file will work also, mind you it'll be rough.
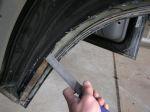
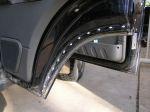
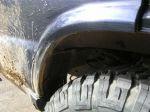
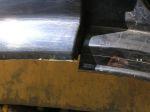
Ok, now the corner is out and looking sweet.
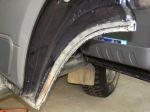
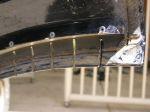
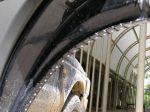
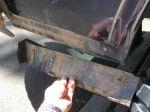
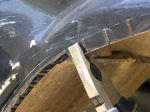
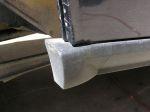
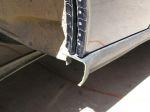
A template is made up using MDF to form the shape of a flange of the inner guard.
Angle aluminium is then taken and cut at approx 1" intervals. This is done to allow the material to bend to the shape of the door. I tried bending it withouth cutting using rollers, and it can be done, but the result is not acceptable. This method did work very well.

Bend the aluminium to follow the template of the cutout in the door. It doesn't have to be overly precise. The material beds easily and the fine tuning can be done in situ.
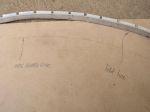

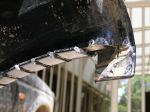
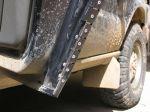
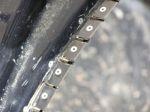
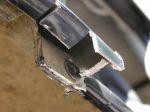
Using the holes that are already in place from the rubber seal clips, I have placed the angle aluminium into position and drilled 1/8" (3.2mm)for matching rivets, and put the first part of the trim into place. The rivets only need to be short. The first hole can be hard to start while holding the angle in place, so I have just marked it and then removed it from the vehcile and drilled.
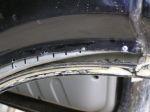
Then continue around, starting at the top and drill and rivet every 3rd hole to get the piece into position. The go back around and rivet each hole;.
Doing the other door up to this stage only took 40mins at a leasurely pace from start to finish. !
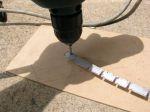
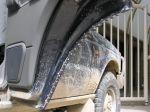
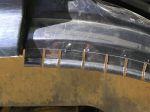
The doors are next marked on the insides along the aluminium strip to determine the fold lines for the tabs. Using verniers again for marking, then 1" tabs are layed out following the cut line. The tabs are cut using an angle grinder (god bless its little heart).
By hand and very carefully these are pushed over and layed as flat as possible onto the Aluminium strips. Its important to push at the base where the fold is needed otherwise it may bend into a radius or in the wrong spot.

The end tabs are then also bent up using pliers on the seams for a good result. The tabs are all tapped flat and sharp using a bossing mallet (has ball like ends and made from timber).
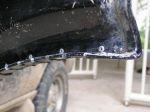
The tabs are then drilled and pop riveted down to the aluminium backing using 1/8" rivets again.
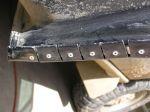
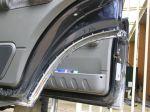
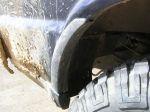
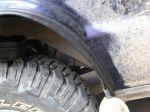
Excess tab is then cut off using the angle grinder to bring the metal from the outer skin down flush with the inner skin. The seam filler is smoky and stinky.
You may want to paint or seal the exposed metal now. The doors are done.
Now looking at the rest of the guard!
That spats has to come off. Double sided tape hold it on!
Scratch in the cut lines using the verniers. These are to match the folds done on the door.
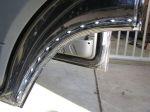
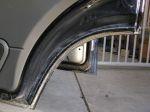
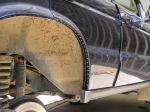
Test fit the flexi flares. This is eventually what it will look like.
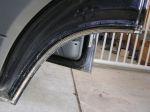
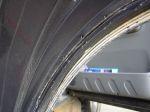
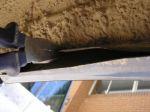
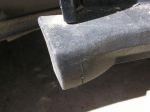
There is a rubber seal under the top of the rear guards that runs on a seam and goes between the inner and outer skins. That comes out.
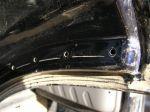
Next, using Vernier calipers again, the rear 1/4 panel get marked for the cutting lines and the folding lines. I guaged this from the inner lip on the guard and then had the depth to match the work done on the door.
The plastic rear 1/4 panel edge trim need to come off to complete the marking. Its held on by 2 screws behind it. My mud flap had already been torn off so this didn't need to be delt with.
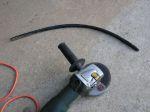
Now into the cut line with the Nibblers.
Next make sure you can pass the nibblers all the way around without getting stuck on things - like seams and other brackets. Move them out of the way and go Nibbling again.
I finished the last bit using the angle grinder as things get a bit comlex behind this part of the panel.
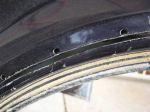
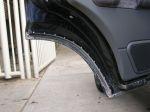
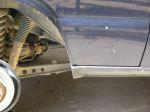
Next I marked out the body panel that sits inside of the door, gauging the cut line based on measurements from the door, and marked out using the verniers. The tabs are at 1" intervals and correspond with the door tabs for the sake of ease.
Fold them all over progressively by hand, and go as far as possible. The fold is determined by the location of the cut by the angle grinder.

The door part is looking good.
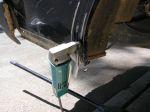
Back to the rear 1/4 panel. That bolt is going to have to go.
Using the angle grinder tab the rear 1/4 panel. Make sure that its not a new cutting disc being used as the radius on the end of an old one is important. The material being cut here is aluminum and Al is prone to cracking with light fatigue. The radius at the ends of the cuts will disperse the stresses that become concentrated here from normal panel movement.
With the other tabs I have generally folded them by hand. I have used pliers on the Al this time and held the ends where I wanted the folds to occur. This metal is bendy and requires a little more care. I suspect incorrect bends will be rewarded with a snapped off tab while trying to repair them.
That bolt has been removed, the captivated nut cut off and the side flap begun to fold up (high, as the next flap which can be seen from outside of the 4WD lays over it.)
The the last flap folded up.
The remaining flange where the bolt was comes off with the angle grinder.
Hmmm, getting there.
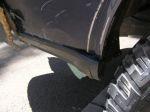
The plastic sill is now too long and needs to be shortened.
Mark it out carefully using a scriber and straight edges. I was carefull to maintain the lines of the wheel arch by cutting parrallell to the end.
And done.

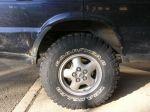
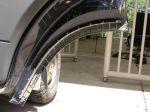
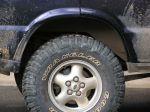
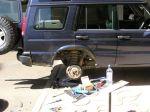
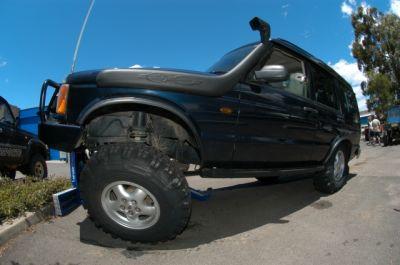
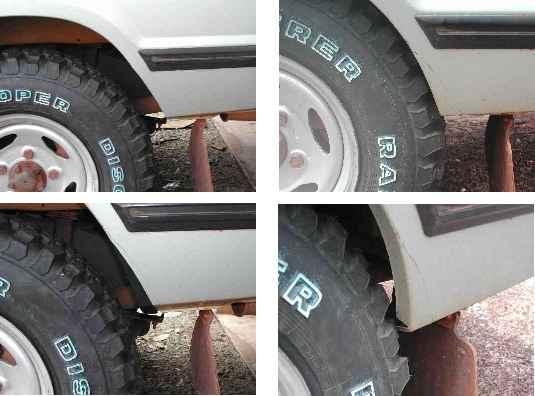
Test fit the 35" tyre
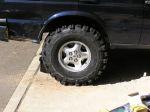
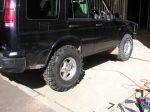
Then check for rub
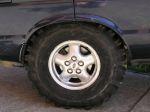

All is fine.
Next is a matter of refitting lower 1/4 trim, flexi flares or whatever. I hope this is helpful, and yes it takes a long time to do.
Cheers
Slunnie
~ Discovery II Td5 ~ Discovery 3dr V8 ~ Series IIa 6cyl ute ~ Series II V8 ute ~
TopicToaster
SubscriberVery nice Slunnie
Always wondered how you got around cutting away at the door.
More pictures needed though
CHEERS TIM.
Dads-
http://www.aulro.com/afvb/members-ri...-progress.html
Mine-
http://www.aulro.com/afvb/members-ri...-progress.html
Mums- stock 92 200tdi d1.
OldBushie
When I did mine on the D1 I had I used a Dremel with a cutting disk.
MY15 Discovery 4 SE SDV6
Past: 97 D1 Tdi, 03 D2a Td5, 08 Kimberley Kamper, 08 Defender 110 TDCi, 99 Defender 110 300Tdi[/SIZE]
 Posting Permissions
| Search AULRO.com ONLY! |
Search All the Web! |
|---|
|
|
|


Bookmarks