Page 2 of 15 FirstFirst 123412 ... LastLast
Results 11 to 20 of 145

Thread: And ANOTHER County Isuzu conversion

  1. #11
    Join Date
    Jan 1970
    Location
    Wheelers Hill, Melbourne
    Posts
    4,085
    Total Downloaded
    0
    Quote Originally Posted by isuzurover View Post
    Sorry Deejay, but that stuff really won't stop noise transmission - for that you need mass - as mentioned below.

    I used that stuff on the underside of the bonnet - more for looks than anything. On the wirewall I glued dense rubber. It is a huge amount quieter than a stock 110 isuzu I was in recently, but I think I will add some of the proper stuff e.g. barium loaded vinyl - down the track.
    I thought it was pretty lightweight stuff. I agree with all said so far, I'm now wondering, like Steve, about whether the Whiworths stuff is any better.
    What I did on my Tray Landie was to use Flashtac from Bunnings on the inside of the firewall & the transmission hump. Works really well.
    Selleys I think make it.
    P.S. Sorry about sending the thread off on soundproofing

  2. #12
    Join Date
    Sep 2008
    Location
    Geelong, VIC
    Posts
    4,442
    Total Downloaded
    0
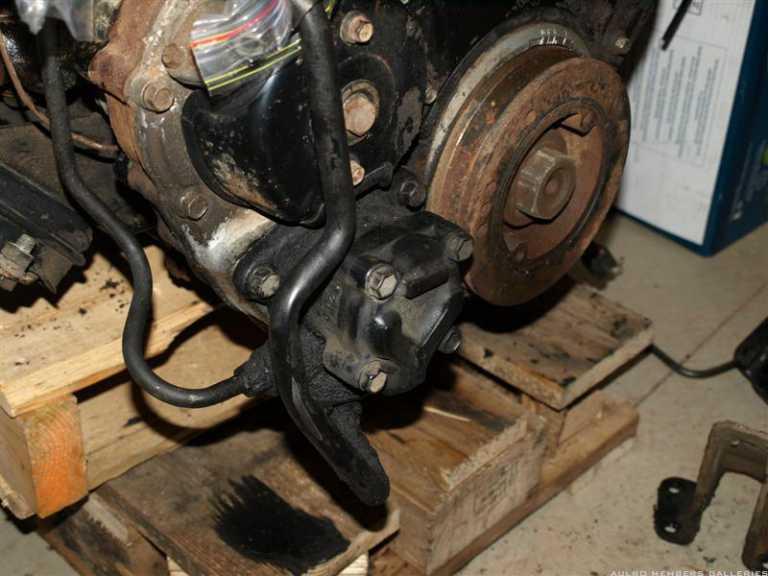
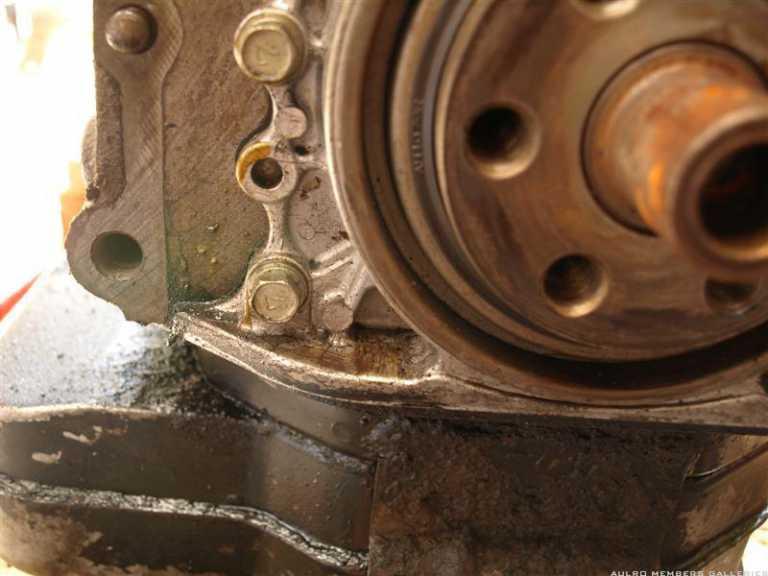
    Tonight I installed the PAS pump after redoing the seal etc.
    Being a Stage1 engine, it never had a PAS pump fitted originally - it just had a blanking plate on the front cover.

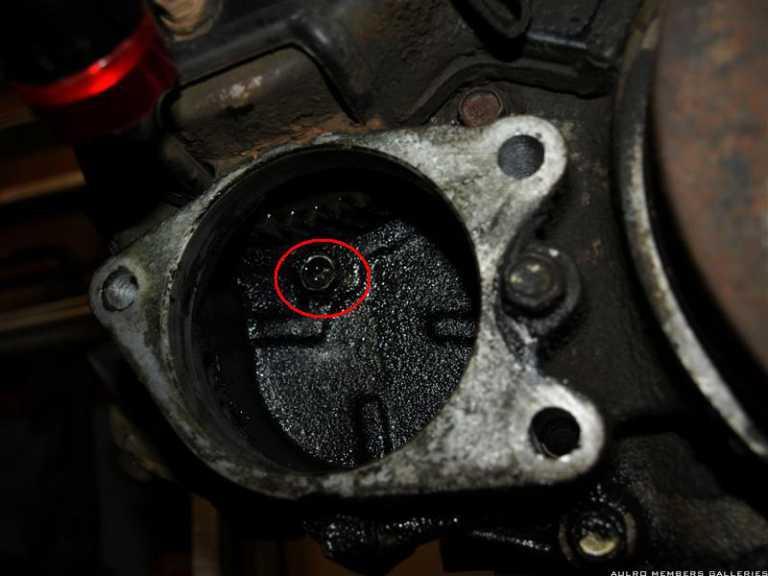
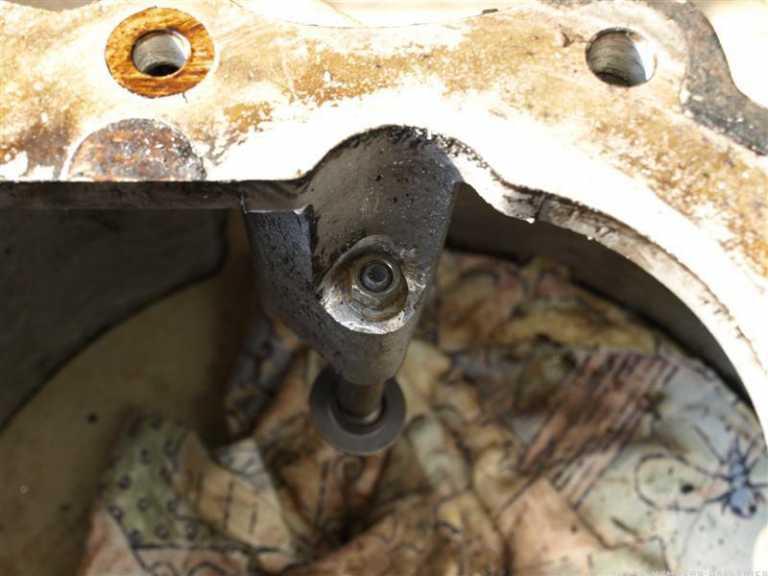
    When it wouldn't go into the cover easily I thought it was just hanging up on the o-ring, but after trying to pull it in gently with the mounting bolts without success I knew something was wrong. A closer look revealed this:


    The bolt was installed from inside the front cover but should have been like this one that Isuzubob posted in his seal tutorial:


    Strangely, the two parts that the bolt goes through are both threaded...
    I removed it and re-fitted from the back of the cover and all is well.


    It will get a decent clean before I paint it, but figured it was better to do it after the pump was fitted so the dirt didn't get into the bearing/seal etc.
    Steve

  3. #13
    Join Date
    Sep 2008
    Location
    Geelong, VIC
    Posts
    4,442
    Total Downloaded
    0
    Not much really to show for a few nights of cutting/welding/grinding and setting myself alight.

    I've made the 2 engine mounts to go on the chassis, and also the LH mount to go on the engine itself (I already had the RH one).

    While I was at it, I cut a hole in the back of the one to go on the engine so that I can get a socket onto the nut of the rubber mount . Figure I'll fit the rubber mount on the bench so I can tighten the nut properly, and then bolt them onto to the engine.


    Steve

  4. #14
    Join Date
    May 2006
    Location
    Woolgoolga
    Posts
    7,870
    Total Downloaded
    0
    good to see you've moved the production into the kitchen

  5. #15
    Join Date
    Sep 2008
    Location
    Geelong, VIC
    Posts
    4,442
    Total Downloaded
    0
    Quote Originally Posted by Vern View Post
    good to see you've moved the production into the kitchen
    Not production, just the documentation department
    For some reason camera's don't like mig spatter and grinder dust...

    I did get the "what are they, and why are they on my table" look when SWMBO went to sit down to breakfast this morning......they're back in the shed now....

    Steve

  6. #16
    Join Date
    Sep 2008
    Location
    Geelong, VIC
    Posts
    4,442
    Total Downloaded
    0
    VERY slow progress over the last month due to work commitments.

    Started getting back into it this week, and finally got the clutch pivot modification/repair completed. I welded the shank of a bolt to the pivot and drilled the existing hole in the bell housing all the way through, then put a nut on the bolt to hold it all together.

    Here's the pivot and bolt ready to be welded together:


    And the finished job. Also had to grind a bit of a flat section for the nut to sit on:


    Getting the bell housing off resulted in the front plate of the gearbox separating from the rest of the box, and I found a few problems when I removed the plate to replace the gasket.
    I'll leave them in their separate thread:LT95 input bearing problems


    Steve

  7. #17
    Join Date
    Sep 2008
    Location
    Geelong, VIC
    Posts
    4,442
    Total Downloaded
    0
    Came to a halt for now with the gearbox waiting for parts etc, so decided to make a start on a few engine jobs:
    - Check the clutch condition
    - Check the rear crank seal to see if its leaking
    - Replace the winged sump with a truck one to make running the dump pipe from the turbo easier.

    Here's a couple of photos of the rear seal area. There's a bit of oil film around, but I'm pretty sure its not coming from the seal.
    I'm thinking its been blown back from the leaking sump gasket.
    The crank itself seems basically dry, and there is no oil slung out on the forward face of the flywheel (just some accumulated clutch dust).


    I'm just going to fit the truck sump with a new gasket and leave it at that unless someone can see something I've missed.

    Steve

  8. #18
    Bearman's Avatar
    Bearman is offline TopicToaster Gold Subscriber
    Join Date
    Jun 2006
    Location
    Hay Point
    Posts
    4,043
    Total Downloaded
    0
    Steve, Replace the rear crank seal. It's not worth the risk. You can bet your bottom dollar that it will leak after you have put it all back together. It is an easy job to do now but if you have to do it later after it's all back in the vehicle???????. Get my drift.
    Cheers......Brian
    1985 110 V8 County
    1998 110 Perentie GS Cargo 6X6 ARN 202516 (Brutus)

  9. #19
    Join Date
    Sep 2008
    Location
    Geelong, VIC
    Posts
    4,442
    Total Downloaded
    0
    Quote Originally Posted by Bearman View Post
    Steve, Replace the rear crank seal. It's not worth the risk. You can bet your bottom dollar that it will leak after you have put it all back together. It is an easy job to do now but if you have to do it later after it's all back in the vehicle???????. Get my drift.
    Yes - I know what you mean
    Just trying to balance "might as well do it while its easy" with "if it ain't broke...."

    Is there any benefit in using the flash 2 part seal if the crank is OK?

    Steve

  10. #20
    Join Date
    Feb 2008
    Location
    Adelaide Hills
    Posts
    221
    Total Downloaded
    0
    Hi steve I've been looking through a parts book for a perentie and it shows a breather in the bell housing,it just a piece of 4.8mm bundy tube with a lenght of hose on it.It might be a good thing to do while is easy to get at.

Page 2 of 15 FirstFirst 123412 ... LastLast

Bookmarks

Bookmarks

Posting Permissions

  • You may not post new threads
  • You may not post replies
  • You may not post attachments
  • You may not edit your posts
  •  
Search AULRO.com ONLY!
Search All the Web!