Page 3 of 7 FirstFirst 12345 ... LastLast
Results 21 to 30 of 63

Thread: ICom IC-450N installation plan

  1. #21
    Join Date
    Sep 2011
    Location
    Minyama
    Posts
    472
    Total Downloaded
    0
    Quote Originally Posted by l00kin4 View Post
    As far as mounting the RJ45 socket for the microphone I'm experimenting with a few ideas. If I can install a panel mount RJ45 socket somewhere that's an option but I generally avoid cutting holes when I can. I did look at the underside of the console when I was running the reversing camera wiring and there aren't many clear spots to mount a socket
    I performed a bit of surgery on a RJ45 double adapter ( RJ45 CAT 5 6 LAN Ethernet Splitter Connector Double Adapter Dual 2 Port | eBay ) and fixed it to the bracket with same double sided tape. Has work without issue for 3.5 years.
    Attached Images Attached Images

  2. #22
    Join Date
    Jan 2015
    Location
    Sydney
    Posts
    899
    Total Downloaded
    0
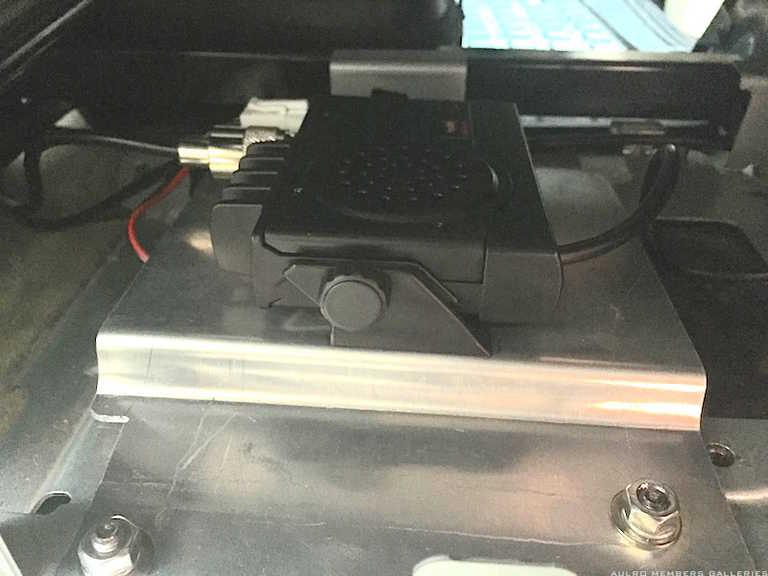
    A quick update - I pulled the lower console off yesterday to look for a position for my clip to mount the mic socket.


    Hoping to slide this money clip in to a spot where I can then use it to attach the RJ45 socket. Very few places to slide it in due to the shape of the mouldings but did eventually find that it fitted nicely in this position. No lateral movement and once the console is repositioned over the top of it, it is very snug. Out of the way of the seat and my leg and puts the mic cable in a good position in relation to the hanger clip above. I'll post a photo once I've fixed it.


    This will give me a good base to attach the socket which is easily removable later...


    Was thinking to use this press stud for a bit of strain relief (as it will rotate) by epoxying each half - one to the clip, one to the connector. I could just glue the connector to the clip of course. Still pondering the fixing of this - open to suggestions...


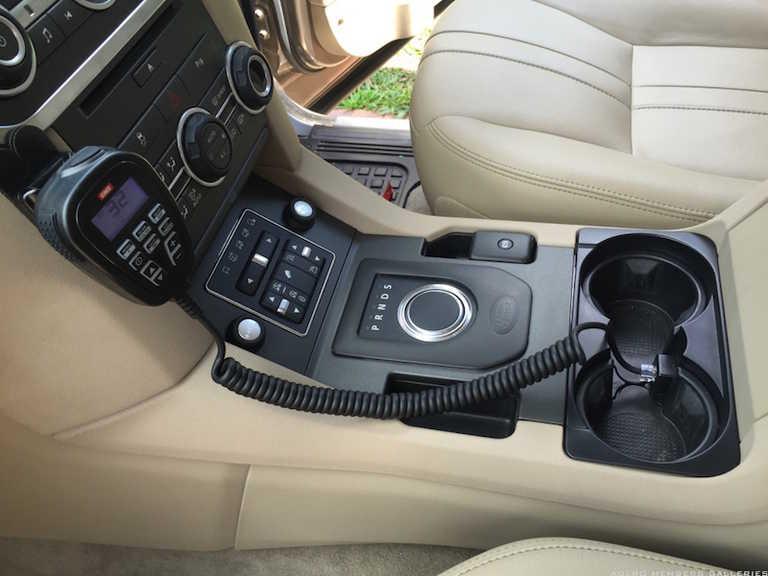
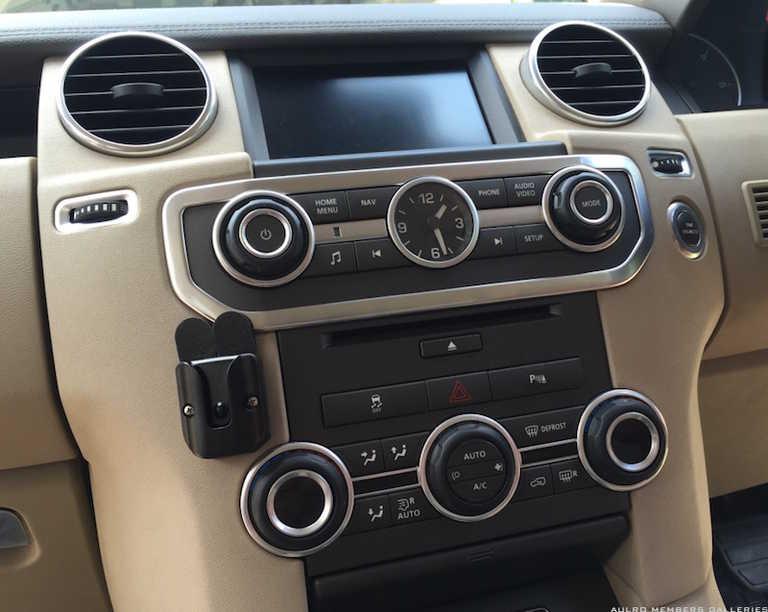
    I also cut the right half of the 'face plate' of the ProClip off to keep it away from my leg - it is still wide enough to mount the mic clip. I'll post a photo of this later.


    David
    Attached Images Attached Images
    Everything is easy when someone else is doing it
    MY14 SDV6 SE Corris Grey
    Compomotive 18s : D697s : Traxide DBS : LLAMS : ARB compressor : IC-455
    Rhino Platform : GOE compressor, Tx & front bash plates, deluxe sliders

  3. #23
    Join Date
    Jan 1970
    Location
    Melbourne
    Posts
    450
    Total Downloaded
    0
    Why not just use double sided tape to mount the mic connector to the trim and be done with it?

  4. #24
    Join Date
    Jan 2015
    Location
    Sydney
    Posts
    899
    Total Downloaded
    0
    Numerous reports here that it doesn't stay stuck...
    Everything is easy when someone else is doing it
    MY14 SDV6 SE Corris Grey
    Compomotive 18s : D697s : Traxide DBS : LLAMS : ARB compressor : IC-455
    Rhino Platform : GOE compressor, Tx & front bash plates, deluxe sliders

  5. #25
    Tombie Guest
    Quote Originally Posted by l00kin4 View Post
    Numerous reports here that it doesn't stay stuck...
    And yet my Mic clip has been 3M taped to my console for 4 years

  6. #26
    Join Date
    Jan 2015
    Location
    Sydney
    Posts
    899
    Total Downloaded
    0
    I cut the 'face' of the clip in half for the mic clip and tried the press stud but it just doesn't have a strong enough hold to stay on when the cable twists.


    Just going to glue (or tape or maybe Velcro) an RJ45 connector to it, put a bit of braided sleeve over the last part of the cable running beside the seat and call it done.


    Attached Images Attached Images
    Everything is easy when someone else is doing it
    MY14 SDV6 SE Corris Grey
    Compomotive 18s : D697s : Traxide DBS : LLAMS : ARB compressor : IC-455
    Rhino Platform : GOE compressor, Tx & front bash plates, deluxe sliders

  7. #27
    LRD414's Avatar
    LRD414 is offline Super Moderator Subscriber
    Join Date
    Oct 2014
    Location
    Brisbane
    Posts
    3,737
    Total Downloaded
    0
    I've recently upgraded my UHF to one with all controls on the mic and have posted more details here (post #76): Upgraded UHF

    I mounted the unit under the front passenger seat like many others. I made a bracket to mount to the empty bracket already under there.

    Looking backwards from passenger footwell

    The GME TX3350 comes with a double-sided Cat6 connector for the connection of the handpiece to the main unit similar to the other units mentioned.
    After a lot of thought about options, I decided to locate it in the cupholder between the two cup positions.


    This required a hole to be cut into the cupholder, which may not be for everyone. My reasoning is:
    - it gives a very neat and hidden finish.
    - the mic cable is perfectly located for use by both navigator and driver with minimum cable stretch.
    - the cupholder is an easily replacable item if required later.

    For the handpiece I'm using the supplied bracket and have mounted it using 3M Command Strip, which is similar to Velcro but stronger.
    It has a strong self-adhesive tape backing but is removable without leaving residue by pulling the tabs.


    The handpiece will live in a small bag in the centre console storage box when not in use. Very happy with the result.

    Regards,
    Scott
    D4 TDV6 MY14 with Llams, Tuffant Wheels, Traxide DBS, APT sliders & protection plates, Prospeed Winch Mount w/ Carbon 12K, Mitch Hitch & Drifta Drawers
    Link to my D4 Build Thread
    D3 2005 V8 Petrol
    Ex '77 RRC 2 door. Long gone but not forgotten.

  8. #28
    Join Date
    Nov 2014
    Location
    WA
    Posts
    126
    Total Downloaded
    0
    Looking the goods Scott, I think a great upgrade from your previous setup and you've given me some good ideas for my handset location.

    I've just started my install. I also used the passenger side empty bracket though went for a more low-tech setup. Basically I've bent down one of the tabs and using one of the bolts have attached the provided icom bracket (with a small piece of double-sided tape). Aside from cutting off a few threads of the bolt to stop it fouling it was about as easy an install as you can get and very easy to add/remove.

    I'm going for the roof gutter mount antenna (drivers side), but don't have any pics of that yet, also very straightforward using the antenna recommended to me by Prestige Comms which has a right angle fitting

    ZCG UHF CB GRN480 Flexi 4dbi Mobile Antenna with cable

    Will add some photos of that soon.
    Attached Images Attached Images

  9. #29
    Join Date
    Nov 2013
    Location
    gold coast
    Posts
    462
    Total Downloaded
    0
    Quote Originally Posted by VK3GJM View Post
    Hi All,


    For those who may be interested. I like making brackets and solutions that retains all the original set-up ( 2 small 2mm holes in ash tray base mount that is hiding once the ash tray is re-installed.


    I wanted to mount my CB head where I could see the display and use the controls, and find a safe place to store the mic and cord. My set-up allows access to all controls as is.
    I like the set up you have there mate! Very good use of space including the HF, and very functional. Will be installing a Barrett over the next week or 2 so looking at some ideas (in a 110 though)

  10. #30
    Join Date
    Jan 2015
    Location
    Sydney
    Posts
    899
    Total Downloaded
    0
    Quote Originally Posted by LRD414 View Post
    I've recently upgraded my UHF to one with all controls on the mic and have posted more details here (post #76): Upgraded UHF

    I mounted the unit under the front passenger seat like many others. I made a bracket to mount to the empty bracket already under there.

    The GME TX3350 comes with a double-sided Cat6 connector for the connection of the handpiece to the main unit similar to the other units mentioned.
    After a lot of thought about options, I decided to locate it in the cupholder between the two cup positions.


    This required a hole to be cut into the cupholder, which may not be for everyone. My reasoning is:
    - it gives a very neat and hidden finish.
    - the mic cable is perfectly located for use by both navigator and driver with minimum cable stretch.
    - the cupholder is an easily replacable item if required later.

    Regards,
    Scott


    Nice Scott. Liking your idea here of using the cup holder I installed the RJ45 microphone socket as per below. I must confess the drilling, cutting and filing is not my finest work but happy with the position of the socket and the drip tray underneath stays in place. If I was doing it again (and I might just to make it a bit tidier - depends how much another cup holder will cost!) I'd probably try to mount the socket so it is positioned at a ~45 degree angle through the side of the cup holder - this would take more careful cutting and gluing probably.


    The connector I used:


    The end result:


    Haven't shown the slot cut in the cup holder below the socket to accommodate the RJ45 plug because it is a bit untidy but because of the position of it, you really don't see it from anywhere you'd normally be in the car.


    David
    Attached Images Attached Images
    Everything is easy when someone else is doing it
    MY14 SDV6 SE Corris Grey
    Compomotive 18s : D697s : Traxide DBS : LLAMS : ARB compressor : IC-455
    Rhino Platform : GOE compressor, Tx & front bash plates, deluxe sliders

Page 3 of 7 FirstFirst 12345 ... LastLast

Bookmarks

Bookmarks

Posting Permissions

  • You may not post new threads
  • You may not post replies
  • You may not post attachments
  • You may not edit your posts
  •  
Search AULRO.com ONLY!
Search All the Web!