Page 62 of 69 FirstFirst ... 12526061626364 ... LastLast
Results 611 to 620 of 690

Thread: Meet my 90, and share the adventure.

  1. #611
    cuppabillytea's Avatar
    cuppabillytea is offline Loud Mouthed Rat Bag Gold Subscriber
    Join Date
    Apr 2015
    Location
    Lillyfield NSW
    Posts
    7,824
    Total Downloaded
    0
    What more can we say? Except: Nuts to you.
    Cheers, Billy.
    Keeping it simple is complicated.

  2. #612
    Join Date
    May 2014
    Location
    Tamworth NSW
    Posts
    4,295
    Total Downloaded
    0

    Intermission- Part Deux

    Made more progress on the Z. Thought Id share another brain fart that happened.

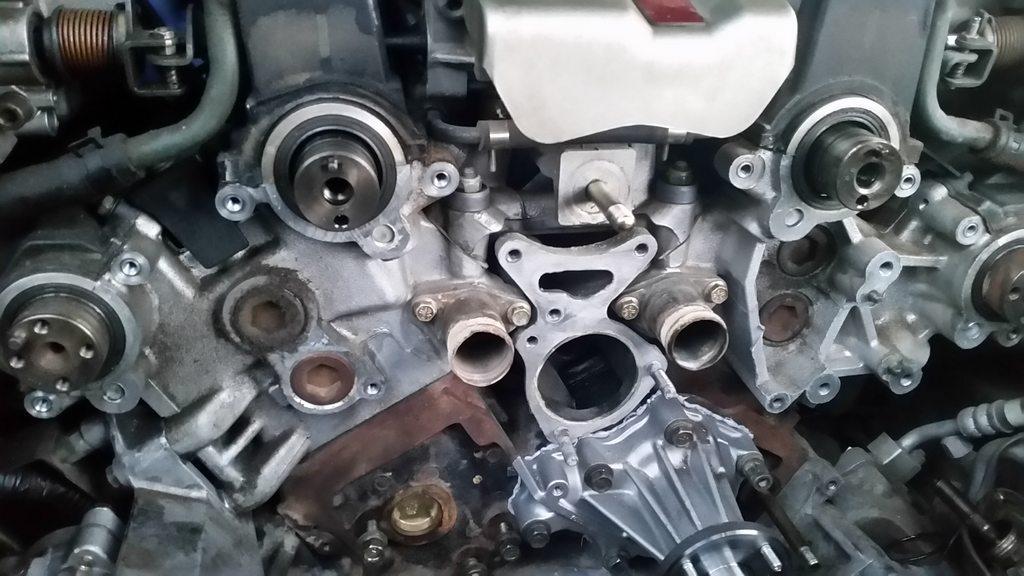
    The timing belt job is going smoothly- crank sprocket came off (unlike others, I didn't need to grind and cold chisel it off- Huge success!). Cam and crank seals went on without too much drama, but getting them off was a bit of an issue due to some deficiencies in my tool department.
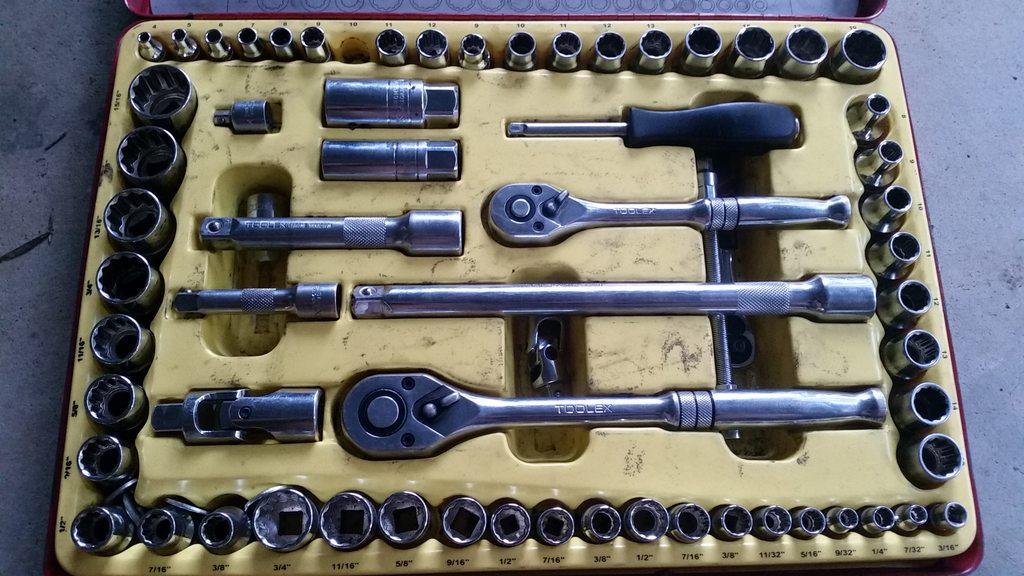
    A Professional seal puller was acquired, and seals were pulled. It even has a chrome shaft, and two size tips for any application!
    The mind boggles.

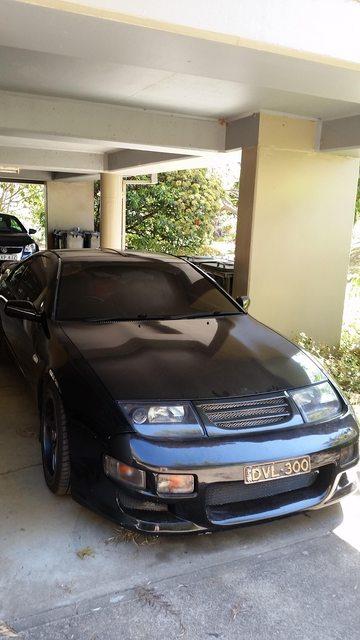
    This is where I was at:


    Anyhow,
    Had Akula from this place over here on Saturday, where I was psychoanalyzed and probed on the peculiarities of my checklist and the method in which I went about the job (I was going off a cheat sheet that is on one of the Z32 wiki pages). I was going thru the items one by one, ticking things off as I went. I was a bit out of sequence with some tasks though, (ie going about putting on a crank pulley while the RTV gasket stuff was setting up, etc) which caused mark considerable consternation.
    Anyway, the timing belt went on, and it came time to putting 125Nm into the intake cam sprocket bolt. With a bit of wang-jangling using the old timing belt as a bit of a grip to stop it spinning, it was done.


    Akula did a stellar job of noticing this- perished fuel injection hose. They mustn't make it like they used to- this is probably 6 years old (and less than 20,000km!)

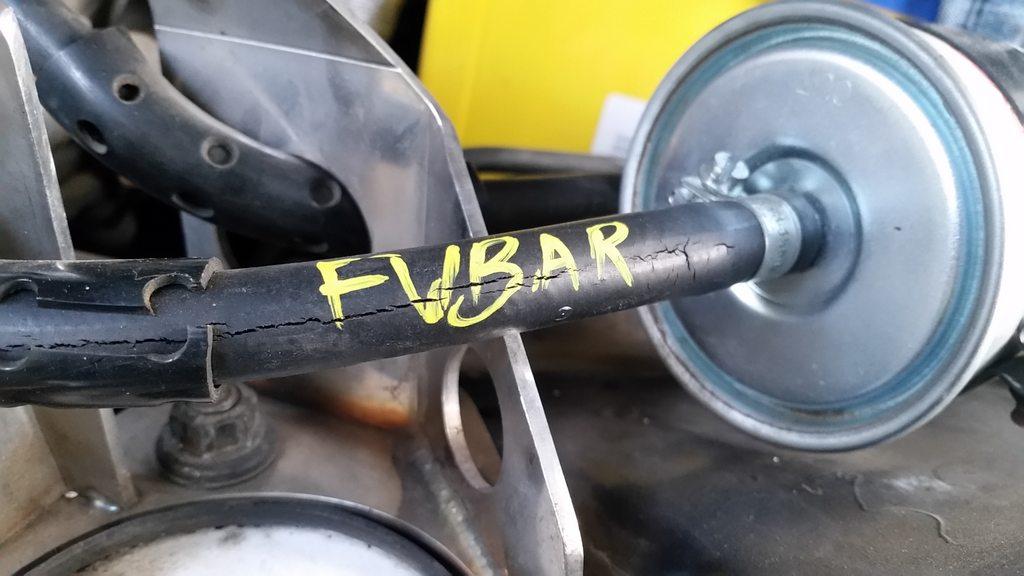
    Glad we caught that in time!


    Made my sacrifice to the gods of automobilia. I'm pretty sure it's down behind the headlight bucket. I'll fish it out 'one day'.


    Spent the rest of Saturday putting it all back together, timing covers, gasket goo on the thermostat housings, and a bit of a general clean-up.

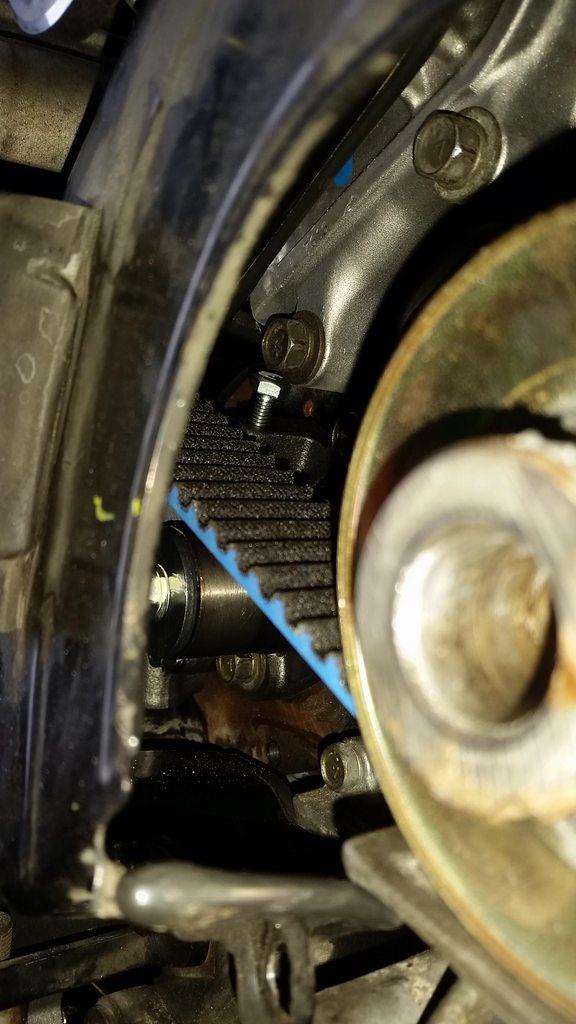
    Now... cue 0300hrs Sunday morning. I awake in a sweat- not only because it's still in the high 20's and dry wind, but because I have this brainwave... "Did I, or more importantly, didn't I, remove the tensioner bolt from the timing belt tensioner?!


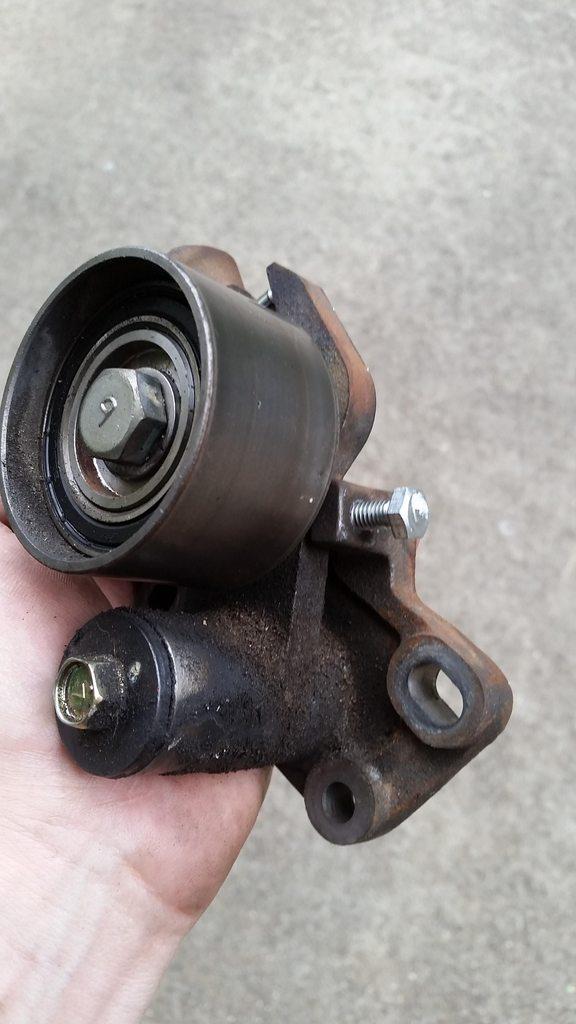
    The Z uses one of these gadgets to keep the timing belt tight. It has a little M6 bolt to pre-tension the swing arm on the idler to keep it where it needs to be during install. This NEEDS to be removed once installed, and all the timing belt tolerances re met, otherwise it can vibrate out, fall straight down into the crank sprocket, and mince the timing belt to shreds, killing the engine in a very spectacular way. I don't need this in my life. And for the life of me, it dawned on me at 3am in the morning that I couldn't recall removing it.

    Cue morning,
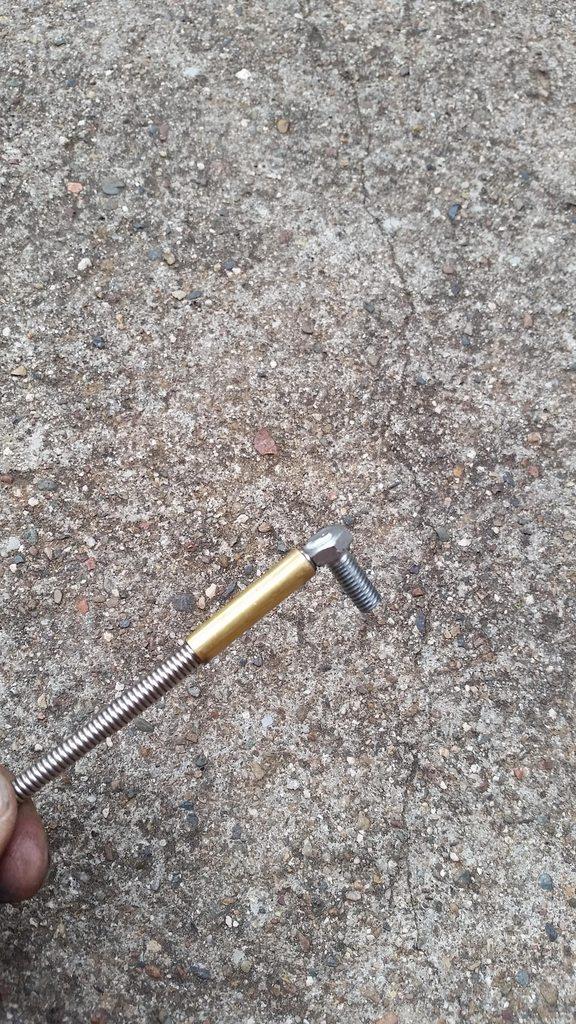
    I get up, and blunder around looking amongst my tools and parts for the elusive M6 bolt with the "7" on the head, and a dab of white paint.
    Nowhere to be found.
    I keep looking. "Surely I'm not that DUMB?!" I think... I'd known this was a pitfall, and had it in my mind the whole time I'd been doing the job, but could not, for the life of me remember taking it out and thinking that it was good to go.
    I review my checklist- adorned with yellow paint pen tick marks indicating I've dillligently completed that task. I note the 'remove stopper bolt from tensioner assembly' has a big fat tick beside it.
    ...but my heart sinks as I realise I'd had to do this portion of the work instructions twice to get the timing belt into the correct adjustment range- which involved putting the bolt back INTO the tensioner. Like a hilux driver, I exclaimed "BUGGER".
    Removing the bolt is a bit of an ordeal- the timing covers are a 3 peice unit which need to come off in sequence, which also involved undoing all the gasket making for the thermostat housing that'd taken a good hour of jiggling to get right.
    Enact Plan B. Off to superchep for some gasket sealant. They didn't have my preferred flavour. Jumped to Autobarn- another fine establishment- also out of the permatex thermostat and water pump housing RTV that I'd been using.
    Enact Plan C. With 8mm socket and 5mm hex key in hand, I commenced undoing all the timing covers as best I could. Thankfully I had just enough wiggle room to remove the crank pulley, and jiggle the bottom cover out of the way enough to see what I was looking for.
    BINGO. GOTCHA.


    With some unsuccessful attempts with a ratchet spanner, I'd grabbed my magnet on a stick, and thankfully it was loose enough to spin out by the force of magnetism alone. How DO magnets work, anyway?!


    TL;DR:
    The brain works in strange ways. By the locating of, and removal of the timing belt tensioner bolt, I had avoided disaster, and prevented a failure that could have grenaded the engine. The mighty Z will live to see another (I hope), 100,000km before I do this again... That's if it doesn't burn itself to the ground before this time.
    -Mitch
    'El Burro' 2012 Defender 90.

  3. #613
    Join Date
    May 2007
    Location
    in the wild New England, NSW
    Posts
    4,918
    Total Downloaded
    0
    Hey Mitch, before you torque anything up, consider cleaning and lubricating both threads.

    With thread lube, or at least motor oil.

    Can be better to torque by feel but I would hardly suggest in case you haven't had the experience of a thread strip

    Funny thing is you end up with what (to me) is a better thread in an alloy casting if you have to helicoil it, Rolls Royce did it.

    Lubricating Threads

  4. #614
    Join Date
    May 2014
    Location
    Tamworth NSW
    Posts
    4,295
    Total Downloaded
    0
    Hi Laurie, I did a heap of cleaning on the critical parts, and she's all buttoned up now. I didn't use any oil when I torqued it all down though. I'll keep it in mind for next time.
    I've had the misfortune of stripped threads in alloy, and have installed my fair share of helicoils. If I could be bothered, I'd probably proactively fit helicoils where the high assembly/disassembly is required.
    -Mitch
    'El Burro' 2012 Defender 90.

  5. #615
    Join Date
    Jan 1970
    Location
    NSW far north coast
    Posts
    17,285
    Total Downloaded
    0
    Enjoying this Mitch.

  6. #616
    Join Date
    May 2014
    Location
    Tamworth NSW
    Posts
    4,295
    Total Downloaded
    0
    Cheers Rick
    -Mitch
    'El Burro' 2012 Defender 90.

  7. #617
    Join Date
    May 2014
    Location
    Tamworth NSW
    Posts
    4,295
    Total Downloaded
    0

    The Z part 3 (and last for a while, I hope!)

    Today I put the finishing touches on the Z.

    Earlier in the week, I toyed with some various ideas for the radiator on the beast.
    It has a PWR core, which has been made to be a dual pass flow, and is approx 50mm thick. Great cooling capacity from this unit. The only issue I've faced is the attachment of the stock shroud to the core, as the plastic is rather old, and in need of replacement.

    I was going to try my poor AC TIG skillz on the core to weld some tabs on for attachment, but ended up just doing a ghetto-fab job with rivets, ally flat bar and some nutserts. Ballin' on a budget.


    The project took a halt for a few days as my brother and I headed (yesterday) to Bryon Bay to pick up his new-to-him 130 dual cab. It's a 2008 (2.4tdci), and I'm sure he'll show up on here some time soon to throw some pics around.


    Despite the large number of hours behind the wheel on this Tamworth-Byron-Tamworth cannonball run, there was a rather good pie and sausage roll in Grafton- I highly recommend Hanks Kitchen in Grafton. Top notch.


    After the road trip was complete, the finishing touches took place.
    I replaced the fuel filter and perished hose.
    The PS / Alt belts were Tensioned, fluids filled, then I crossed my fingers and kicked it over...
    There was all kinds of grindy noises which I feared the worst. In the end it turned out to be the PS pump making some strange noises as a result of sucking foamy fluid. After it was all bled, It came good.

    So now I can say, IT WORKS (always a relief).

    The devil is currently enjoying some time out from under it's car cover, and soon to be back under for another month or so before it's next drive. I should probably drive it more often...


    Next project will be putting this in. Possibly even some larger injectors and fuel pump. I'm leaning out on boost. No Bueno. Me no likey melty melty pistons.


    We can now resume normal Land Rover related transmissions on this channel...
    -Mitch
    'El Burro' 2012 Defender 90.

  8. #618
    Join Date
    Jan 2007
    Location
    Sydney
    Posts
    2,394
    Total Downloaded
    0
    Enjoying the Z stuff Mitch. Reminds me I need to do something other than work on the Defender.

    Cheers,
    Jon

  9. #619
    Join Date
    May 2014
    Location
    Tamworth NSW
    Posts
    4,295
    Total Downloaded
    0
    I need to mention- I found my 10mm socket!
    All is good in the world again!
    -Mitch
    'El Burro' 2012 Defender 90.

  10. #620
    cuppabillytea's Avatar
    cuppabillytea is offline Loud Mouthed Rat Bag Gold Subscriber
    Join Date
    Apr 2015
    Location
    Lillyfield NSW
    Posts
    7,824
    Total Downloaded
    0
    Great job Mitch. My Nephew has a Z. It needs some TLC as well
    Cheers, Billy.
    Keeping it simple is complicated.

Page 62 of 69 FirstFirst ... 12526061626364 ... LastLast

Bookmarks

Bookmarks

Posting Permissions

  • You may not post new threads
  • You may not post replies
  • You may not post attachments
  • You may not edit your posts
  •  
Search AULRO.com ONLY!
Search All the Web!