Page 1 of 2 12 LastLast
Results 1 to 10 of 11

Thread: Defender drop arm ball joint.

  1. #1
    Join Date
    Jan 2009
    Location
    Seymour, Victoria.
    Posts
    751
    Total Downloaded
    0

    Defender drop arm ball joint.

    Hi all,
    Quick question to the floor, can anyone tell me if it is feasible to replace the ball joint in the drop arm (I have a repair kit) without removing the drop arm from the steering box. I don't have a pitman arm/drop arm puller and have a massive amount of slop in the steering.

  2. #2
    Didge Guest
    You're talking about the ball joint on the bottom of the drop arm, correct? If so, yeah, easy enough but getting the cup out of the drop arm seems to be the issue. You would have a cup that the ball joint sits in and it sits in the drop arm. I think you'd need to apply heat to it to get the little cup out (but I could be and often am wrong). It's not your steering damper as well, is it? I had a real lot of trouble trying to get the rubber boot to sit correctly after I installed it.

  3. #3
    Join Date
    Jan 2009
    Location
    Seymour, Victoria.
    Posts
    751
    Total Downloaded
    0
    Quote Originally Posted by Didge View Post
    You're talking about the ball joint on the bottom of the drop arm, correct? If so, yeah, easy enough but getting the cup out of the drop arm seems to be the issue. You would have a cup that the ball joint sits in and it sits in the drop arm. I think you'd need to apply heat to it to get the little cup out (but I could be and often am wrong). It's not your steering damper as well, is it? I had a real lot of trouble trying to get the rubber boot to sit correctly after I installed it.
    That's the one! It's not the damper. When you giggle the steering wheel and he play is plan to see. The manual says it should tap out with a drift. This looks to be the awkward bit about doing it in situ. I'm not overly keen to apply heat to a steering component.
    But I'll give the job a go if you think it's feasible. I wish I had my shed back!!

  4. #4
    Didge Guest
    I don't mean apply heat whilst it's all in position - heat was only to get that little cup out of the drop arm. I bought a cheap ball joint remover that is basically like a big two pronged fork on steroids and you just hammer it in from the side and the ball joint will then drop out but that cup will remain in the drop arm. If that's not rusted, it could probably stay (I left it in once and it was ok but I think my mechanic also left the cup in when he replaced the ball joint). I'd agree that it should come out with a drift - maybe first spray a bit of lubricant in and leave overnight?

  5. #5
    Join Date
    Jan 2012
    Location
    Geelong
    Posts
    46
    Total Downloaded
    0
    After recently going through the same thing. You will find that the ball joint top cup is extremely difficult to remove (in my case anyway) and will be extremely difficult to do in situ. The pitman arm is also very tough to budge, if you don't have a good pitman puller (i broke mine) the easiest might just be to by a new arm with ball joint and get the local tyre/suspension shop to out the new one in for you.

  6. #6
    Join Date
    Dec 2008
    Location
    Brisbane
    Posts
    216
    Total Downloaded
    0
    Agreed, removal of the ball joint is difficult but not impossible. You just have to keep working at it. The fork drift is good and works better if heat is first applied.

    Tip. Throw away the clip that's supposed to hold the new rubber boot in place and use a length of seizing wire instead. It'll save hours of bad language!

  7. #7
    Join Date
    Aug 2012
    Location
    Logan,Queensland
    Posts
    921
    Total Downloaded
    0
    The tool helps.
    Usually wise to buff the bore of the droparm before installing the new cup. Getting the internal circlip on that holds the bottom plate is also a pain in the butt.


    Ball Joint Fitment and Removal Tool - Paddock Spares


    Should be easy enough to make something similar.


    If you are really lucky the droparm will come away from the steering box and allow you to do the ball joint with a hydraulic press.
    '95 Defender 130 Single Cab
    HS2.8 TGV Powered
    ------------
    98% of all Land Rovers built are still on the road.
    The other 2% made it home.

    Cost difference between Britpart and Genuine seals: £2.04. Knowing that your brakes won't fail at any moment: Priceless.

  8. #8
    Join Date
    Jan 1970
    Location
    Melbourne
    Posts
    2,972
    Total Downloaded
    0
    DIY - Ball joint removal tool.

    It's been awhile since I did one, but I used a long bolt, a couple of thick washers and then a socket as a spacer, to pull it out. The socket can sit on the rim of the arm and pull on the bolt running through it. Looking at the pic of the tool in the above post will give you the idea.

  9. #9
    Join Date
    Jan 1970
    Location
    Narre Warren South
    Posts
    6,796
    Total Downloaded
    0
    Did one a while ago and getting the joint out of the arm took some force. From memory a two legged puller (pusher) did the trick

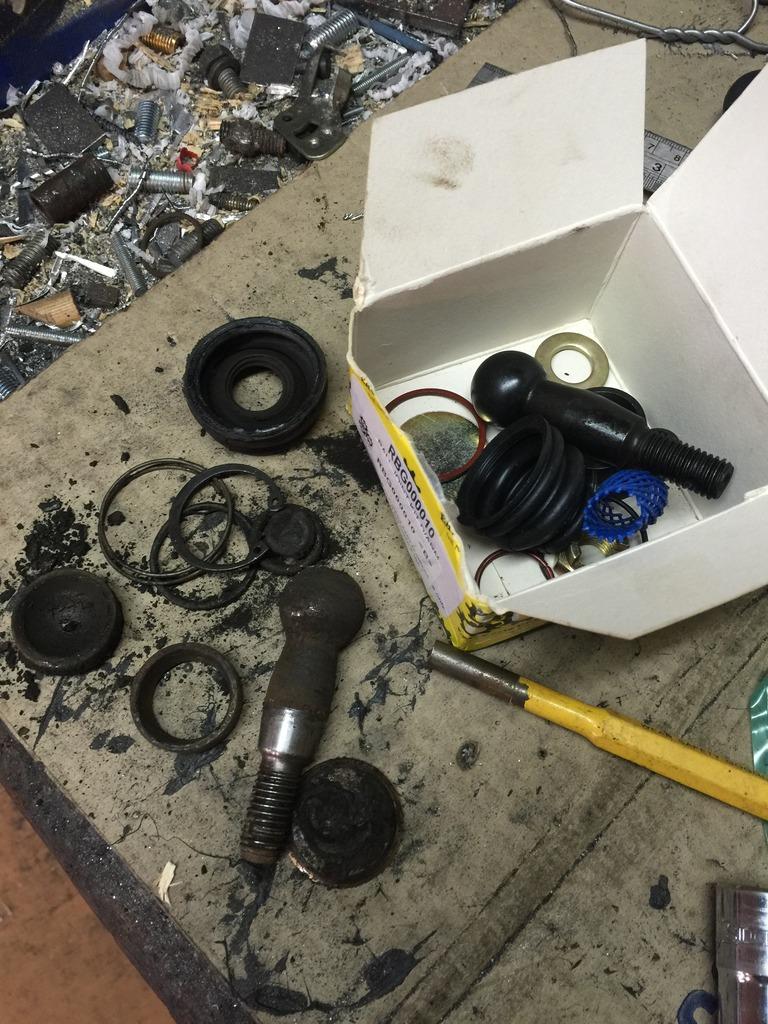
    I got the removal kit from Paddocks which is basically a couple of thick washers, a spacer and a nut & bolt.
    The spring in it makes re-assembly 'interesting'. Ended up using an old motorbike valve spring compressor to hold it all together while I inserted the clip.

    Colin
    '56 Series 1 with homemade welder
    '65 Series IIa Dormobile
    '70 SIIa GS
    '76 SIII 88" (Isuzu C240)
    '81 SIII FFR
    '95 Defender Tanami
    Motorcycles :-
    Vincent Rapide, Panther M100, Norton BIG4, Electra & Navigator, Matchless G80C, Suzuki SV650

  10. #10
    Judo's Avatar
    Judo is offline ChatterBox Silver Subscriber
    Join Date
    Feb 2012
    Location
    Parkdale, Melbourne
    Posts
    2,919
    Total Downloaded
    0
    I did mine a few weeks ago. I'm guessing original part from 1986. I briefly tried hitting it out and squashing it out with the vice, but promptly gave up and put it under the press. Luckily the arm came off the steering box easily but I would have been there a long time trying to drift the cup out I think. Hopefully it isn't as bad as mine!

    This was mine when I opened it:


    - Justin

    '95 Disco 300TDI - sold
    '86 County 110 Isuzu
    2006 Range Rover Vogue td6

Page 1 of 2 12 LastLast

Bookmarks

Bookmarks

Posting Permissions

  • You may not post new threads
  • You may not post replies
  • You may not post attachments
  • You may not edit your posts
  •  
Search AULRO.com ONLY!
Search All the Web!