Page 3 of 6 FirstFirst 12345 ... LastLast
Results 21 to 30 of 59

Thread: Rebuilding my 300Tdi

  1. #21
    Join Date
    May 2007
    Location
    NSW, Australia
    Posts
    4,656
    Total Downloaded
    0

    Mind the gap.

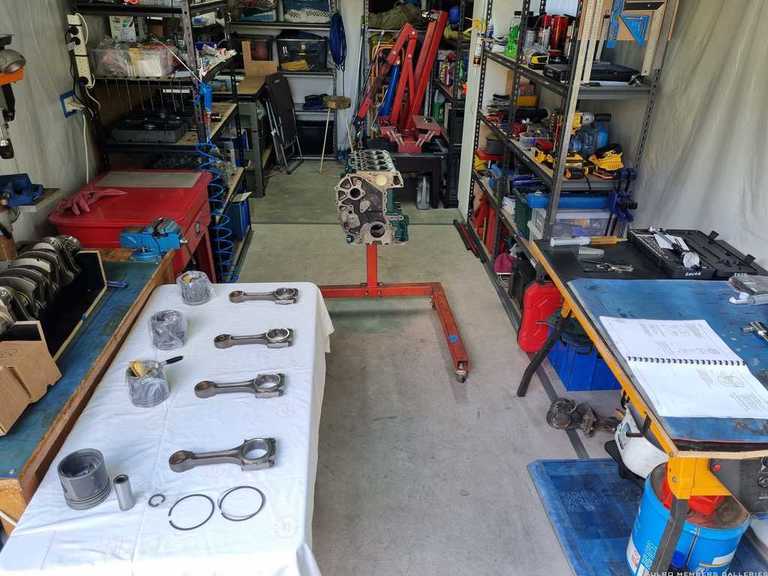
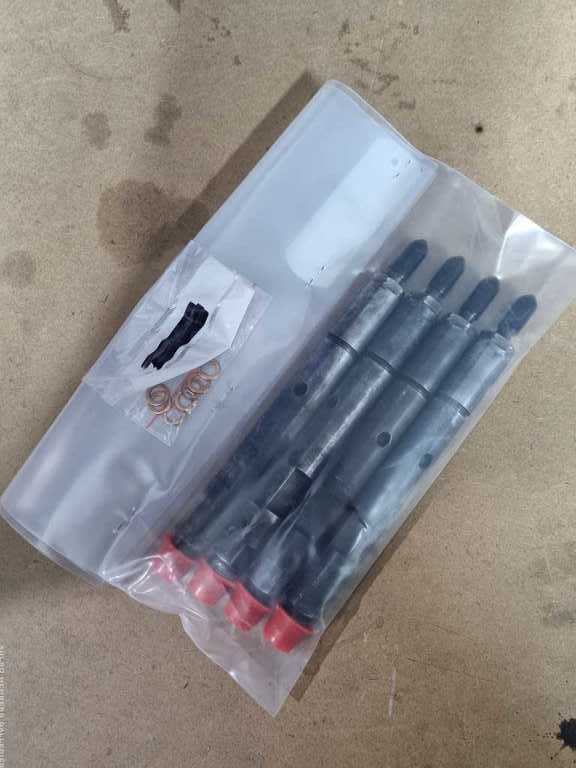
    With the block painted up and absolutely begging to have new parts thrown at it, I started out measuring the ring gaps on the Allmakes replacement pistons. These seem nicely made and seem to be of excellent quality as best I can tell.

    The top compression ring on each cylinder required a little fettling with the ring filer and a small fine-cut jewellers file to get the gap up to the 0.40mm-0.65mm spec, as they were all around 0.33mm. I got them all to 0.432mm. The second compression ring gaps were all 0.381mm straight out of the box and were perfectly in the requisite 0.30mm-0.50mm range. I left the oil control rings largely alone, except for the one on Piston #2, which I very expertly snapped in half. I've ordered another ring set today.


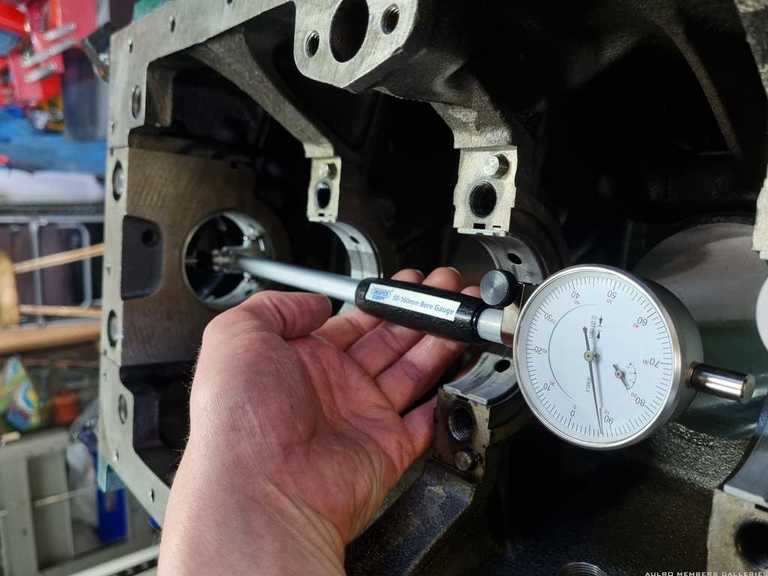
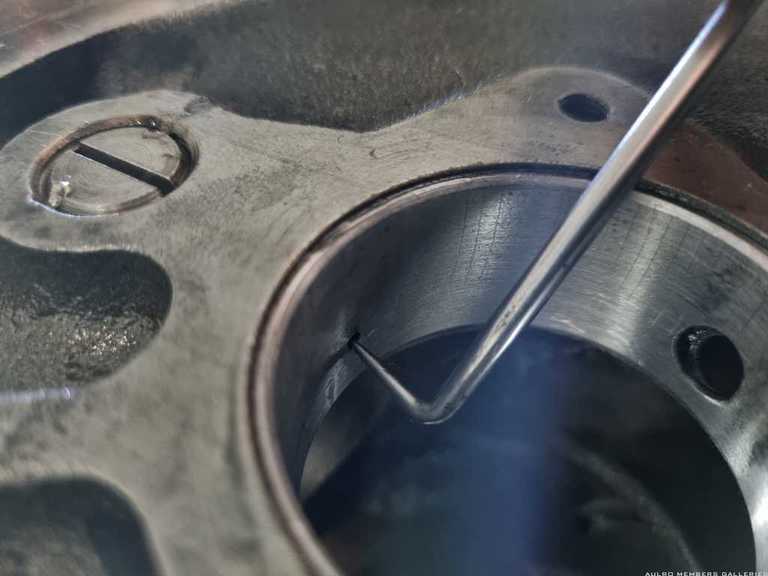
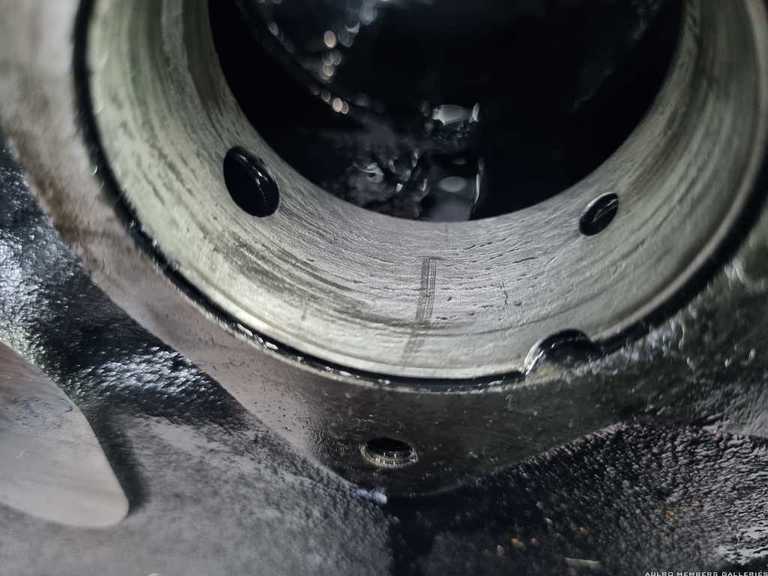
    In the end, it didn't matter much anyway as after methodically checking the conrod end float (all perfect) and clearance on the journals (also perfect), the last item on my checklist was to check for warping of the big-end cap. This is done by torquing down the fasteners, releasing one side and testing for any opening of the mating faces with a feeler gauge as per the manual.


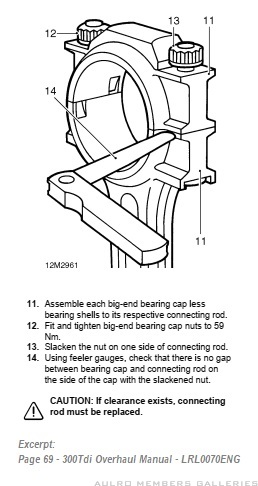
    As you can see, I don't need a feeler gauge to tell me that this con-rod is gone-rod. All four were like this, and as such are destined to join their now-undersized piston friends in the bin. For the sake of curiosity, I did measure the gaps and they were between 0.076mm and 0.152mm, which is a little more than the zero mm it should be.


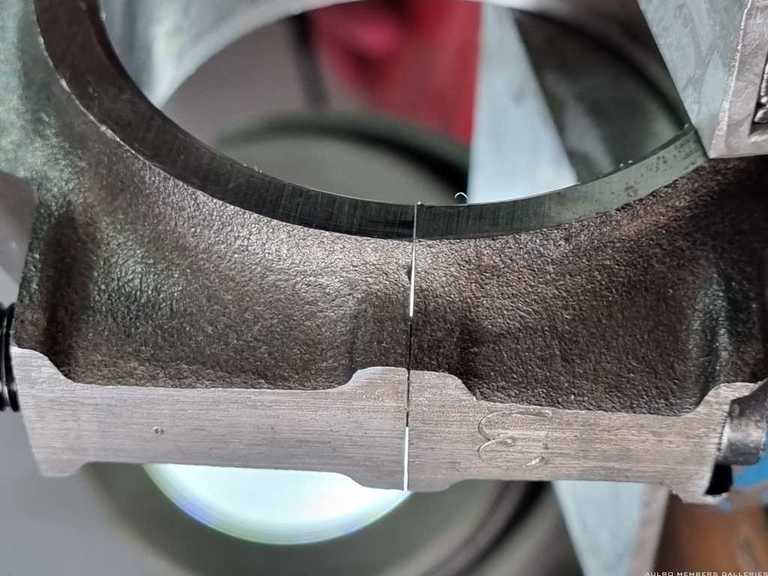
    Of course this was the last thing I checked, having got all set up to build some pistons onto them.


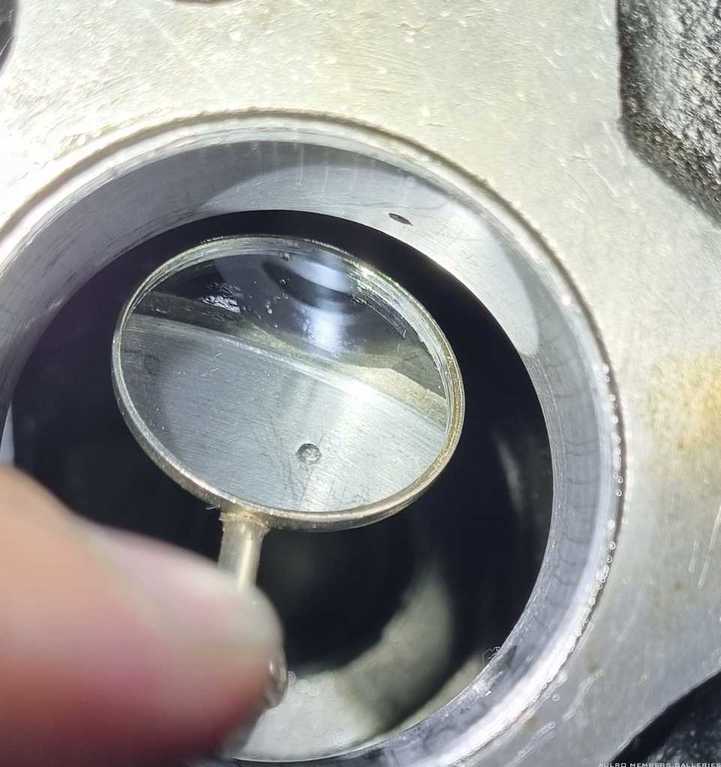
    For those interested, Here's some shots of the plastigauge in action. I hadn't used this before, and whilst I appreciate that it is not super accurate, for gross error detection and confirmation of the more accurate measurements done by the machine shop, it's quite handy.


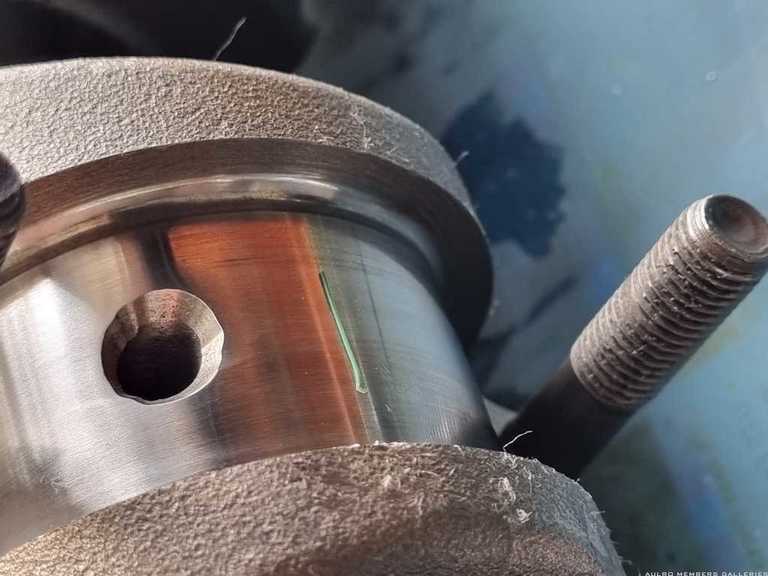
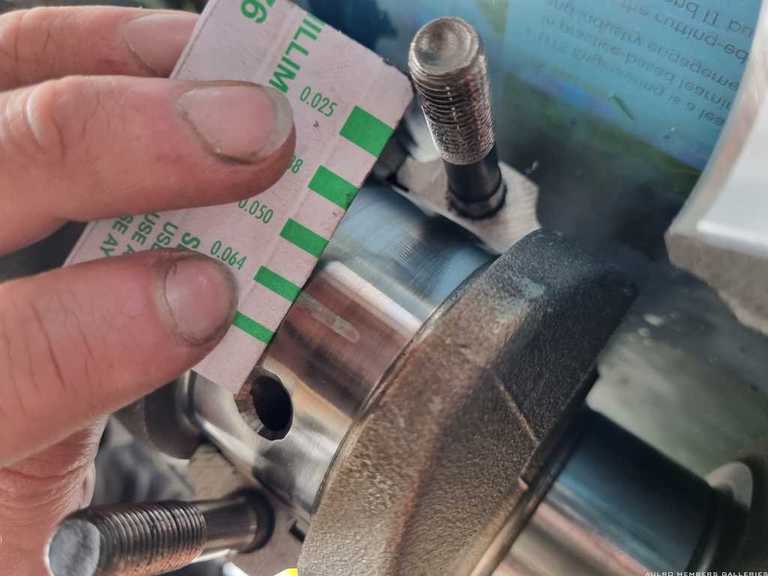
    As you can see, the big-end bearing to journal clearance is neatly within the 0.025mm - 0.075mm tolerance.
    [B][I]Andrew[/I][/B]

    [COLOR="YellowGreen"][U]1958 Series II SWB - "Gus"[/U][/COLOR]
    [COLOR="DarkGreen"][U]1965 Series IIA Ambulance 113-896 - "Ambrose"[/U][/COLOR]
    [COLOR="#DAA520"][U]1981 Mercedes 300D[/U][/COLOR]
    [U]1995 Defender 110[/U]
    [SIGPIC][/SIGPIC]

  2. #22
    Join Date
    Jan 1970
    Location
    Brisbane
    Posts
    1,652
    Total Downloaded
    0
    Nice work Andrew

    My 12 month 1998 300TDI detonated in a serious why last Tuesday night. Picture tells the story. I am pretty gutted as I have owned my 130 for over 14 years and at 354,000kms I thought the engine has plenty of life left in it. Oil and filter changes at every 5,000kms using Penrite oil. Big end shells were replaced at 300,000kms. But something at number 2 piston/conrod has let go in a big way.

    I am in the process of removing the engine. A new crate short block is on its' way to me. I'm ordering a high flow head from Turners.

    So seeing this is giving me some inspiration to keep going.

    What are doing with your existing injectors? Will you replace (at $300 each for genuine Bosch) or have existing one's cleaned? I am not sure which way to go.

    Cheers
    Damaged Block.jpg
    Andrew
    1998 Landrover Defender 300Tdi 130 HCPU Expedition
    1972 Peugeot 504 Sedan - Daily Driver

  3. #23
    Join Date
    May 2007
    Location
    NSW, Australia
    Posts
    4,656
    Total Downloaded
    0
    Quote Originally Posted by 86mud View Post
    My 12 month 1998 300TDI detonated in a serious why last Tuesday night. Picture tells the story. I am pretty gutted as I have owned my 130 for over 14 years and at 354,000kms I thought the engine has plenty of life left in it. Oil and filter changes at every 5,000kms using Penrite oil. Big end shells were replaced at 300,000kms. But something at number 2 piston/conrod has let go in a big way.

    I am in the process of removing the engine. A new crate short block is on its' way to me. I'm ordering a high flow head from Turners.
    Oh man... my condolences, Andrew - that's one heck of a mess. Sounds like you took even better care of yours than I do mine (and I'm pretty fastidious, so that's saying something!) but I guess catastrophic failures can be like that.

    Are you going to strip it down for a post-mortem? Looking at the location, perhaps the number two big-end cap has come adrift and either it or the remainder of the conrod has been kicked through the block by the crank? It would be interesting to know.

    I am terrified that this will be me in a few weeks...


    Quote Originally Posted by 86mud
    What are doing with your existing injectors? Will you replace (at $300 each for genuine Bosch) or have existing one's cleaned?
    I gave both the injector pump and the injectors to Sydney Diesel Centre at Smithfield in NSW. They tested the injectors and found them all to be serviceable, with one having a slightly wide spray pattern. I got them back with a written report, 6 months warranty, spotlessly clean, capped and bagged and they even stapled a little baggy of leak down washers on for me. This was $156 well spent and I'll just put them back on now.

    Absolutely outstanding service from SDC also. Easily the best workshop I've ever dealt with.


    I just went back to the archives and my original injectors were replaced with these ones (also Bosch, but made in India) in 2014, for 258.50 each. I bought them from Karcraft in Silverwater. I still have my originals, and if I had my time again I would just get them tested and serviced if required like I did on this occasion.
    [B][I]Andrew[/I][/B]

    [COLOR="YellowGreen"][U]1958 Series II SWB - "Gus"[/U][/COLOR]
    [COLOR="DarkGreen"][U]1965 Series IIA Ambulance 113-896 - "Ambrose"[/U][/COLOR]
    [COLOR="#DAA520"][U]1981 Mercedes 300D[/U][/COLOR]
    [U]1995 Defender 110[/U]
    [SIGPIC][/SIGPIC]

  4. #24
    Join Date
    May 2007
    Location
    NSW, Australia
    Posts
    4,656
    Total Downloaded
    0

    How to stall an engine that doesn't even run

    The last few days has been a case of two steps forward, one step backwards.

    After being stymied by con-rods the other day, I decided to crack on and at least get the main bearings squared away. All was going well until I checked the clearance of the 5th main bearing shell and found it to be in excess. The maximum book value is 0.079mm, and my plastigauge only goes to 0.076mm, but it was over that and I don't exactly want to be at the limits of specification on rebuild anyway.

    On retest, despite all conditions being as they should, it was still out of spec. Since plastigauge is really only a reference, not a measurement, I wanted to know what the clearance actually was before I lashed out on yet more parts. After remeasuring the crank with the micrometer again to confirm my earlier measurements were correct (they were), I measured up the main bearings and found the following differences, which largely agreed with what the plastigauge suggested:

    1: 0.065mm
    2: 0.040mm
    3: 0.070mm (marginal...)
    4: 0.060mm
    5: 0.080mm (oversized)

    (NB: Bore gauge is zeroed to the diameter of the 5th main bearing journal, which was 63.470mm)


    So there's no getting around it - I need a set of undersized main bearings.

    I know that sounds counter-intuitive, and indeed I went looking for "oversize" bearings, but my lesson for the week when it comes to bearings such as these; was:
    Oversize ones have the same inside diameter, but a larger outside diameter and would be used where you've spun a bearing and needed to line-bore the main bearing bore.
    Undersize ones have the same outside diameter, but a smaller inside diameter and would be used where you've had to grind your crank, or it is worn and your bearing clearance is excessive.

    Since my main bore hasn't got larger, but my crank has worn and been linished to be smaller, undersize is what I need. They should be here this week, and I can crank on with it.

    Until then, I may as well put the camshaft in and start building on ancillaries!
    [B][I]Andrew[/I][/B]

    [COLOR="YellowGreen"][U]1958 Series II SWB - "Gus"[/U][/COLOR]
    [COLOR="DarkGreen"][U]1965 Series IIA Ambulance 113-896 - "Ambrose"[/U][/COLOR]
    [COLOR="#DAA520"][U]1981 Mercedes 300D[/U][/COLOR]
    [U]1995 Defender 110[/U]
    [SIGPIC][/SIGPIC]

  5. #25
    Join Date
    May 2007
    Location
    NSW, Australia
    Posts
    4,656
    Total Downloaded
    0

    Cam-do attitude.

    Quote Originally Posted by Shonky
    Until then, I may as well put the camshaft in and start building on ancillaries!
    Only joking.


    I installed the cam oil jet and gently slide the camshaft into place with plenty of assembly lube. I had earlier checked the end-float and it was very acceptable at 0.13mm.


    No sooner had I buttoned up the cam, that I decided to have a cup of tea. Rather fortuitously, I decided to watch a video from Brittanica Restorations on YouTube whilst I overindulged on hobnobs...


    Literally the first thing he does is point out a tiny little oil hole in the front cam bearing. The problem is, I don't recall seeing this. The seed of doubt has been planted. I know I have to pull the cam out again to check it now. My neighbours must think I lead an exciting life, with all the moaning and groaning that has emanated from my garage this week.


    I'm bloody glad I did, though.

    Hiding up at the 2 o'clock position is a tiny little hole, which feeds into an oil gallery that goes up and around the cam follower guides. Looking through strip-down photos, this was substantially larger on my original bearing and I can see how this little one got missed. Apparently it was made smaller to keep the oil pressure up and to maintain the hydrodynamic wedge over the bearing surfaces of the front cam bearing, rather than escaping via the path of least resistance into the follower galleries.

    Earlier in this thread, I posted a picture of this bearing and expressed curiosity as to why it alone was a bit chewed up. I think I found my answer!

    In this case, however, the hole was clocked about 10 degrees out, and so whilst there was an adequate aperture for the main hole to let oil up into the cam bearing, the small hole out of the cam bearing into the follower galleries was blanked against the wall. The latter shot is a bit of a confusing perspective - it is taken into an inspection mirror.


    So as it stands right now, I have a freshly painted, newly machined block, and thousands of dollars of new and refurbished parts to put in it, and I can't do any of it because the three main components that everything else depends on cannot be installed. No pistons, no crank, no cam.

    I guess tomorrow I will be reloading the block back into the car and driving it to my machine shop again.
    [B][I]Andrew[/I][/B]

    [COLOR="YellowGreen"][U]1958 Series II SWB - "Gus"[/U][/COLOR]
    [COLOR="DarkGreen"][U]1965 Series IIA Ambulance 113-896 - "Ambrose"[/U][/COLOR]
    [COLOR="#DAA520"][U]1981 Mercedes 300D[/U][/COLOR]
    [U]1995 Defender 110[/U]
    [SIGPIC][/SIGPIC]

  6. #26
    Join Date
    Jan 1970
    Location
    Brisbane
    Posts
    1,652
    Total Downloaded
    0
    Oh geez Andrew, lucky you found that now.

    Funny that you are using your old Benz as the ute... What year is it?

    My other car is a 1972 Peugeot 504, so it is doing the daily driving duties while I rebuild the 300Tdi.

    I am thinking that mine might just be the number 2 big end cap bolts coming undone. Funny how is how it has lasted 50,000kms since doing the big end bearings at 300,000kms. But I triple checked torque settings on the bolts. Will pull it down and investigate.

    I have found a new crate short block so I am going down that path. I just don't have the time for block work right now. Happy to add to the block. I will order a new Turners High Flow head.
    I have my exhaust manifold and turbo hot side housing getting ceramic coated and am about to drop off some alloy brackets to the vapour basters.

    I am getting an engine crane tomorrow night then I can yank the engine. I have disconnected everything except the injection pump and timing gear.

    Any tips on removing the engine leaving the gearbox in place?

    It is simply a case of attaching engine crane (it has a leveling device on it), undoing bell housing bolts and engine mounts bolts, slide engine forward then lift out? Do I need to remove engine mount brackets from the block as well?

    Thanks heaps

    Cheers
    Andrew
    1998 Landrover Defender 300Tdi 130 HCPU Expedition
    1972 Peugeot 504 Sedan - Daily Driver

  7. #27
    Join Date
    May 2007
    Location
    NSW, Australia
    Posts
    4,656
    Total Downloaded
    0
    Quote Originally Posted by 86mud View Post
    Funny that you are using your old Benz as the ute... What year is it?

    My other car is a 1972 Peugeot 504, so it is doing the daily driving duties while I rebuild the 300Tdi.
    Haha I noticed that... We should start a club for blokes named Andrew with broken 300Tdi Defenders and Euro trash daily driver sedans.

    The 504 is magnificent. Probably one of the most stylish Pugs ever made in my opinion. The Benz is a 1981 300D with 300,000kms on the clock. I am only the second owner, after it outlived its first one. It's done 2,500kms in the last 4 weeks without a hitch!


    Quote Originally Posted by 86mud
    I am getting an engine crane tomorrow night then I can yank the engine. I have disconnected everything except the injection pump and timing gear.

    Any tips on removing the engine leaving the gearbox in place?

    It is simply a case of attaching engine crane (it has a leveling device on it), undoing bell housing bolts and engine mounts bolts, slide engine forward then lift out? Do I need to remove engine mount brackets from the block as well?
    Sounds like you're mostly set. There's no real tricks to these - it really is as simple as it seems. You don't actually need to remove anything from the engine except the AC compressor, power steering pump (both can remain connected, just moved aside), fan, and the radiator/intercooler assembly. Obviously there are things to unplug or disconnect, but that's all that must actually be taken off.

    If you have a crane with a leveller then you should have no real troubles. You can unbolt the engine mounts from the chassis side from underneath the car and leave the rest of them attached. It can be worth removing the studs from the bottom face of the mounts to make it a straight rearward slide when reassembling though.

    Here's the little checklist I wrote up to help me along.

    [B][I]Andrew[/I][/B]

    [COLOR="YellowGreen"][U]1958 Series II SWB - "Gus"[/U][/COLOR]
    [COLOR="DarkGreen"][U]1965 Series IIA Ambulance 113-896 - "Ambrose"[/U][/COLOR]
    [COLOR="#DAA520"][U]1981 Mercedes 300D[/U][/COLOR]
    [U]1995 Defender 110[/U]
    [SIGPIC][/SIGPIC]

  8. #28
    Join Date
    Mar 2010
    Location
    Queensland
    Posts
    4,124
    Total Downloaded
    12.97 MB
    Hello Andrew - the Shonky one,

    Thank you for putting up the interesting, entertaining and very informative posts about your 300tdi rebuild. The only bit I did not comprehend was the part about "the small hole out of the cam bearing into the follower galleries was blanked against the wall". Was the small hole not connected to an oil gallery when the motor was originally made? Or did the re-machining do something to the gallery as in blank the small access hole off?

    Kind regards
    Lionel

  9. #29
    Join Date
    May 2007
    Location
    NSW, Australia
    Posts
    4,656
    Total Downloaded
    0
    Quote Originally Posted by Lionelgee View Post
    Was the small hole not connected to an oil gallery when the motor was originally made? Or did the re-machining do something to the gallery as in blank the small access hole off?
    G'day Lionel. Glad you're enjoying it.

    The original front cam bearing had two large holes, that correspond with two similarly sized oil galleries in the bore where the bearing sits.


    The lower hole is where oil enters from the main gallery and lubricates the bearing as it turns, and some of this oil escapes out the second hole at about the 1 o'clock position after it is carried around the bearing. This second hole is the gallery that runs between and around the cam follower guides, which themselves have oil holes in them to let oil in to lubricate the rollers and slides.

    On replacement bearings, this second hole has been greatly reduced in size. I have heard that this was to keep the oil pressure up in the bearing to improve wear. Looking at the bearing surface pictured above, I can see why this might have been desired.


    The problem in this occasion is that the bearing was installed slightly clocked around from where it should have been. This was not an issue for the lower hole as it is large and really only needs to be at least half-lined up. The upper hole though, being so small, was now not lined up with the gallery and hence was a hole to nowhere, with the gallery blanked by a section of bearing with no hole in it!

    I hope that makes sense. I'm about to post up some pictures which hopefully will show what I'm waffling on about.
    [B][I]Andrew[/I][/B]

    [COLOR="YellowGreen"][U]1958 Series II SWB - "Gus"[/U][/COLOR]
    [COLOR="DarkGreen"][U]1965 Series IIA Ambulance 113-896 - "Ambrose"[/U][/COLOR]
    [COLOR="#DAA520"][U]1981 Mercedes 300D[/U][/COLOR]
    [U]1995 Defender 110[/U]
    [SIGPIC][/SIGPIC]

  10. #30
    Join Date
    Mar 2010
    Location
    Queensland
    Posts
    4,124
    Total Downloaded
    12.97 MB
    Hello Andrew,

    Got it this time with the clocking and the small oil feed hole being blocked off by the incorrectly placed bearing. Who would be fault for the incorrect placement of the bearing? As the other Andrew wrote - damn lucky you picked it up after watching Mike on the Britannica video. Those hobnobs were worth it after all! I would go out and buy some extra packs to celebrate along with a couple more drinks of tea!

    Kind regards
    Lionel

Page 3 of 6 FirstFirst 12345 ... LastLast

Tags for this Thread

Bookmarks

Bookmarks

Posting Permissions

  • You may not post new threads
  • You may not post replies
  • You may not post attachments
  • You may not edit your posts
  •  
Search AULRO.com ONLY!
Search All the Web!