-
4th December 2024, 03:45 PM
#1
Some mods for the RFSV and the FFR and the No. 5 Trailer - a thread
I've been locked out of facebook for being a russian bot apparently. Facebook hates VPNs and I don't use the internet without one, so facebook will always go by the wayside before my VPN does. Sorry not sorry FB, but if there weren't perentie groups I'd have zero interest in it at all. REMLR forum is more for the rivet-counting purist than for vehicle mods, especially interior or camping ones, so posting here seems to be the most appropriate course of action.
Mods planned or executed on the RFSV, the FFR and the No. 5 trailer.
RFSV
My RFSV (upgrade model) was lightly modified when I bought it and I have been slowly working towards the vehicle being put back into its in-service configuration. These repairs include:
- Replacing rusted door frames
- Repairing cracked bonnet
- Restoring the chopped-out pack and jerrycan carriers in front of the rear storage bins
- Reinstalling the rear seat and the chopped mounts for it
- Making the trip-counter work again (power issue)
- Modifying the NOS canopy to add grommet holes for fitting the cam net rack
- Making up the various cargo straps for the cargo bed and for the rood rack. I have all the hardware required, but I'll be using surplus khaki nylon webbing rather than the dark green stuff originally used on the RFSVs. Why? Because I have 25m of it on a roll.
Mods the vehicle has already include:
- SRV-SF IR driving lights (12v bulbs fitted). Switching for these is a simple toggle switch with missile cover and an LRPV IR switch bracket mounted above the heater and fan levers. Wired to the alternator so the IR lights only work when the engine is running.
- SRV-SF antenna mounts on bullbar for UHF CB and VHF antennas respectively
- Barrett 950 HF rig mounted inside the vehicle (radio body mounted to the ROPS plate, head unit to the centre console tray, radio powered by the RFSV's rear ROPS-mounted cigar lighter socket)
- Autotune antenna for the above mounted at rear of driver's side RFSV side basket with a couple of bits of angle. I have an indian repro M38 military jeep antenna mount I'll use for this one in the same location after I have made up a base plate for the Barrett antenna
- NATO Military HF antenna base mounted at rear of passenger's side RFSV side basket using a chopped FFR sugar scoop this one is used with my amateur Xiegu G90 HF rig
- Not really a mod, but 2-pin Lucas plug to dual cigar lighter socket lead powered by the vehicle's front inspection socket. I need to add a fuse to this lead, but aside from that I haven't had any problems with it in the couple of years I've owned the vehicle.
- Restored the completely-chopped-out rear inspection socket just inside the tailgate using a surplus bracket and a very pricey 2-pin lucas socket set out of the UK. I made up lead with a 2-pin lucas plug on one end for plugging into the rear inspection light socket and an anderson fitting on the other end. I'll probably add a fuse to this lead too in the near future.
Planned mods -
- Rivnuts for fitting the short cam net rack to the ROPS brackets rather than nuts and bolts - simplifies one-man removal and installation of the rack and the canopy if you don't have to half roll up the canvas in four or five places first
- Reinforced under-door sill pieces for the SRV mission kit tube doors I have
- I have a spare in-dash RFSV fuse box cover to which I'll fit some RAM mounting hardware for a Mk8 CF-19 Toughbook laptop running situational awareness and nav software (the toughbook has GPS and 4G built in). The same mounting hardware will also suit a FZ-B2 toughpad 7-inch android tablet. I'm waiting on parts to arrive, but when I test-install them I'll see just how much I'll have to reinforce the spare fuse box cover.
- Phone mounts have been a problem for me in my Perenties. I usually use a nite-ize magnetic mount or just self-adhesive velcro on the dash and the device, but these were not secure for the OTL on Cape York in my FFR. I came across a mob in the UK who make RAM mounts which fit into the ashtray receptacle for 90 and 110 land rovers including the 4x4 Perenties, so I've ordered one and I'll see if I can rig up a reliable phone mounting system using it. Any given time I have either a Samsung Galaxy S9 phone in a juggernaut case or a Toughpad FZ-X1 phone-sized android tablet being used in the vehicle. The phones are used for normal turn-by-turn navigation and for music and audiobooks mostly.
- Effect some minor repairs to my old and very faded original RFSV canopy and paint the canvas black
- Hit the vehicle body and rims with some gunmetal grey plasti-dip spray paint for a bit of a temporary colour change
Threads such as these are useless without pictures, so I'll add them as the work progresses.
Cheers!
-
5th December 2024, 10:21 PM
#2
Mods for the No. 5 Trailer (so far):
The trailer was manufactured in 1963 and it retains the original tail light configuration.
I have some minor repairs to effect on the trailer:
- Remove surface rust underneath and in the wheel wells
- Remove surface rust on tac plate holders and rear reflector mounts
- Straighten a minor dent in one side where it looks like something heavy has fallen on the side of the trailer
- Check and test the original 12-pin NATO cable and plug interface to ensure it's always 100% reliable
- Respray the exterior ADF 3-colour camouflage to match the Perentie RFSV
- Respray the interior of the tub first with some cold gal, then etch primer followed by several top coats of Protec Camouflage Green
- Locate another bridge plate to replace the one which was missing when I bought the trailer
- Locate another tail light bucket to replace the original which was rusted out and onto which I have roughly riveted a patch.
All mods being performed are reversible aside from the unavoidable holes which have been drilled, but I guess these can be fixed easily enough if the next owner wants to restore the trailer.
Mods so far:
- Replaced the original Lucas blinkers with perentie front blinkers. The Lucas ones kept blowing and the rubber was perished which prevented the glass lens from being fitted. I'm using Bearmach brand blinkers which aren't ideal - tighten the screws in the lens even a teeny bit too far and they break. I have several spare sets.
- Spliced in a harness for a 7-pin flat plug. The configuration uses a 7-pin flat socket at the front of the trailer into which is plugged a lead with 7-pin flat plugs on both ends. One end plugs into the low profile socket near the front of the trailer and the other end plugs into my Mrs' 4 door jeep Wrangler when we take that away on family trips. The original 12-pin NATO harness is still intact for use with both the Perenties.
- Fitted a Kings ute rack to the trailer. To this rack, on the passenger side, is currently fitted an old 2m x 2.5m awning which has seen better days. The awning is demountable using an Ironman 4x4 quick release awning kit. This rack and awning configuration has been tested with a 2m x 2.5m awning tent and it works well.
- In the process of modifying an old olive drab canvas canopy to fit around the ute rack
- Bought a tractor hitch pin for the rear of the trailer. It's about 15cm longer than the original. When the trailer is decoupled from the vehicle, I insert a length of 30mm square tube over the pin and secure it with a lynch pin. This simple mod keeps the trailer stable in conjunction with the front jockey stand and stops it from tipping up.
Mods planned -
- Once the canopy is done, replace the rope with 5mm olive drab shock cord.
- Fit a second awning to the driver's side of the ute rack for an under cover food prep and lounging around area in camp
- Fit some sort of lightweight roof rack between the two awnings. Used for carrying a medium-sized waterproof cargo bag which in turn will carry the awning tent and a couple of tarps.
- Fit RFSV split rims with NOS hi-miler tyres to the trailer for commonality with the RFSV. At the moment it still has its in-service Steeltrek tyres which have seen better days
- Rig up a simple in-tub mounting system for a spare wheel. The idea is to secure a length of chain between the lashing points inside the tub, install a footman's loop and then use a commercial RFSV style "Y" ratchet strap to secure the spare wheel inside the tub up against the front wall of the tub. I considered an external spare tyre carrier, but I didn't want to drill the extra holes required.
That's pretty much it. The main goal is to have the awnings attached to the trailer rather than to the RFSV to allow parking up the trailer and pitching the tent, then you can still drive the vehicle around without having to pitch and strike the tent every time.
It should look good when it's all done and if there's a requirement to return it back to an in-service configuration for Anzac Day or whatever, it's just a case of unbolting and removing the ute rack and fitting the new geocam trailer canopy I have for it and it'll look original.
-
6th December 2024, 01:17 PM
#3
Some RFSV pics:

This one shows the amateur HF whip antenna mounted on a chopped FFR sugarscoop bolted to the passenger side jerrycan basket

This one you can see the IR driving lights and the civilian UHF antenna mounted to the SRV-SF bracket on the bullbar

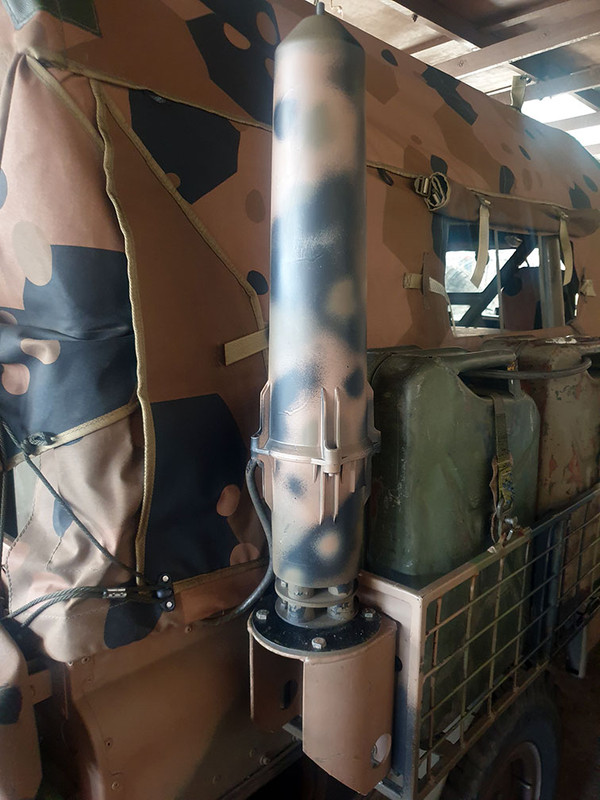
Barrett HF autotune antenna base on a makeshift bracket attached to the rear of the driver's side jerrycan basket

The Barrett 950 HF radio in its storage case when not installed in the vehicle. The Barrett is used for Outpost HF and for VKS-737 club freqs. The low power Xiegu G90 is better for amateur use which is why that's carried too.

In case anyone's wondering, here's the Xiegu G90 manpack style amateur HF rig. This usually runs off a Kings 12Ah battery strapped to the radio's chassis and the radio can either use the whip antenna pictured above mounted to the vehicle, or the off-centre dipole wire antenna which is carried with it in its bag.
-
6th December 2024, 10:14 PM
#4
Some more pictures related to my RFSV

Defender centre seat I had shipped over from the UK. In the process of being cleaned here. The plan is to have it installed and engineered in the front of the RFSV so our little one can accompany us in the RFSV on trips when he's a little bit older.

The head unit of the Barrett 950 radio installed onto the front of the centre console tray in the RFSV. Excuse the dust and grime.

A better view of the NATO antenna base for the whip antenna for the amateur HF rig. You can also see the awning I used to run on the passenger side of the RFSV. That awning is now mounted to the ute rack on the No. 5 trailer. For shade and shelter with the vehicle I carry an OzTrail camper tarp and a couple of telescoping tarp poles.

IR driving lights switch mounted to the side of the (rather dusty) dash using an LRPV IR light switch bracket. Exposed wiring has since been secured and covered with a short piece of flexible black conduit

A better view of one of the SRV-SF infrared driving lights. On the SRV-SF these mount to brackets welded to the steel bullbar in the same position as seen here. Since my RFSV has the mass reduction alloy bar, I opted for easily reversible clamps to mount the lights.
-
8th December 2024, 10:27 PM
#5
I took the RFSV for a run for the first time in several months today. Predictably the cranking battery didn't have enough juice to turn it over, which necessitated a jumpstart. I blatted up the highway then took it for a run through a local state forest in order to blow out the cobwebs. The vehicle ran beautifully, but when we encountered a little light rain on the way home I discovered the passenger side windscreen wiper blade disintegrating itself, presumably from old age. I ordered two new sets of wiper blades tonight which I'll install when they arrive on both the RFSV and the FFR.
One more mod I forget to mention for the RFSV is the steel original RFSV bullbar I have sitting here in the shed. I've heard of people bending the alloy RFSV bars, so I reckon it's worth weight and fuel consumption penalties to use the heavy duty steel bullbar. There's also the fact that when I have a full complement of 3 jerrycans in each side basket, there's nowhere to carry the hi-lift jack. The steel bullbar includes bracketry for carrying a hi-lift jack so that solves that problem.
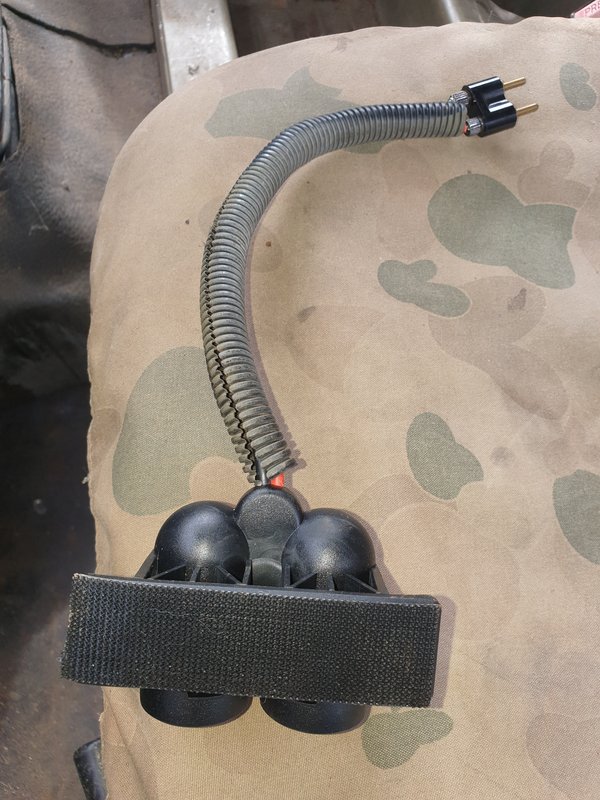
Another mod. I have had really bad luck with the original spotties on the vehicle, so I bought a pair of 7-inch LED spotlights to fit in the same position. I have a pair of these on the FFR and they work great. Being a single large LED rather than rows of smaller LEDs they retain the look of the original spotties somewhat, and when canvas covers are installed you'd never know the difference.
Some finnicky repair/replacement parts:
The vent lever knobs on the RFSV both broke soon after I purchased the vehicle, which is odd because the ones on the FFR are going strong despite being a bit older than the RFSV ones. I had a hard time finding replacements for them. They are available, but you have to purchase a complete Series III vent assembly to get them, which is overkill if you're only after a pair of replacement knobs. The solution came in the form of 3d printing.
I don't have a 3d printer and only barely understand how they work (kind of like a computer-guided hot glue gun?), but I managed to track down a 3d printing model for the vents on thingiverse (Land Rover Series 3 Vent Knob by lakelly - Thingiverse).
Then I looked around for Australian 3D printing services and ultimately went with a mob called KAD3D because they offered a 3D printing plastic called ASA which is UV-resistant and strong, so should be OK for this purpose. I ordered a pair of these vents which will need a bit of sanding and smoothing by the looks of it, then the lettering filled in with some white paint. To install them on the vents you need to apply some heat to the vent lever then push the vent knobs on and let cool. If that doesn't work I'll go in after them man-to-man with some araldite.
The same order included a pair of replacement seat adjustment lever knobs for the FFR which I also found on thingiverse (landrover defender seat lever by Cwoodyuno - Thingiverse). These look OK and should work. I'll make them work regardless and they'll look a great deal better than the little lengths of cut up garden hose on the vehicle now.
Last edited by craigbushman; 9th December 2024 at 12:35 PM.
Reason: Edited to avoid making a subsequent post
-
18th December 2024, 01:13 PM
#6
A quick (pictorial) update on the RFSV mods.
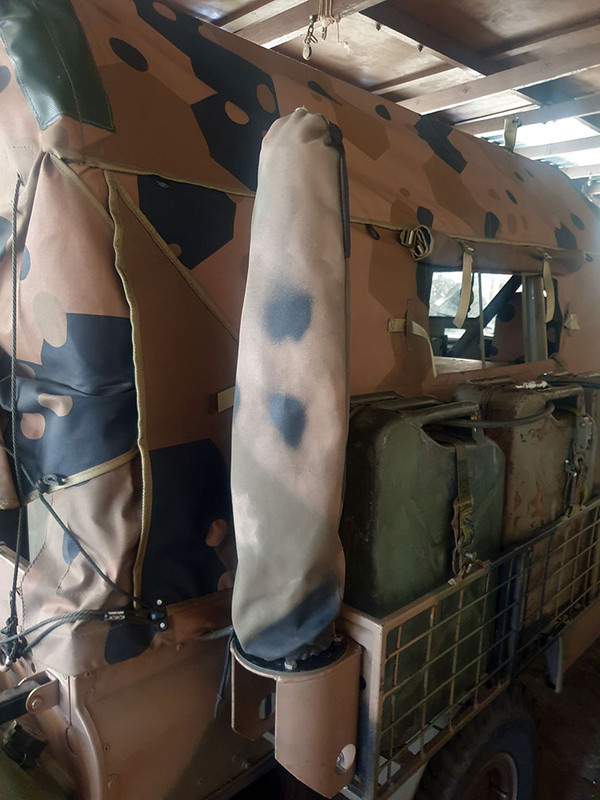
1. I chopped and installed an FFR "sugar scoop" NATO-pattern radio mount on the aft of the driver's side jerrycan basket to match the one I'd earlier installed on the passenger side. This replaces the dodgy bracket I'd made from two pieces of angle which was never secure enough for my liking. This sugar scoop mount is fitted with a 5mm thick circular mounting plate with a single hole in it for mounting civilian CB antennas and such. It works great for the Barrett autotune antenna unit and is solid as a rock. It also allows the fitting of the canvas antenna unit cover to keep most of the rain off. These antennas are weather sealed but as they get older and older, the seals can degrade and allow water in. It's never happened to mine but I've seen it on other people's vehicles, so unless in use, mine has the canvas cover fitted.
2. 3D printed replacement windscreen vent lever knobs. These came out great and they press-fitted too. I'll secure them properly with a dab of epoxy on the lever. Refer to my previous post for the link to download the 3D model for them. I probably won't bother with whiting the lettering, after all I know what they are for. Note also all the glorious dust in the dash. I'll have to get around to detailing it one day, being stored in a machinery shed, the whole vehicle is covered in dust most of the time.

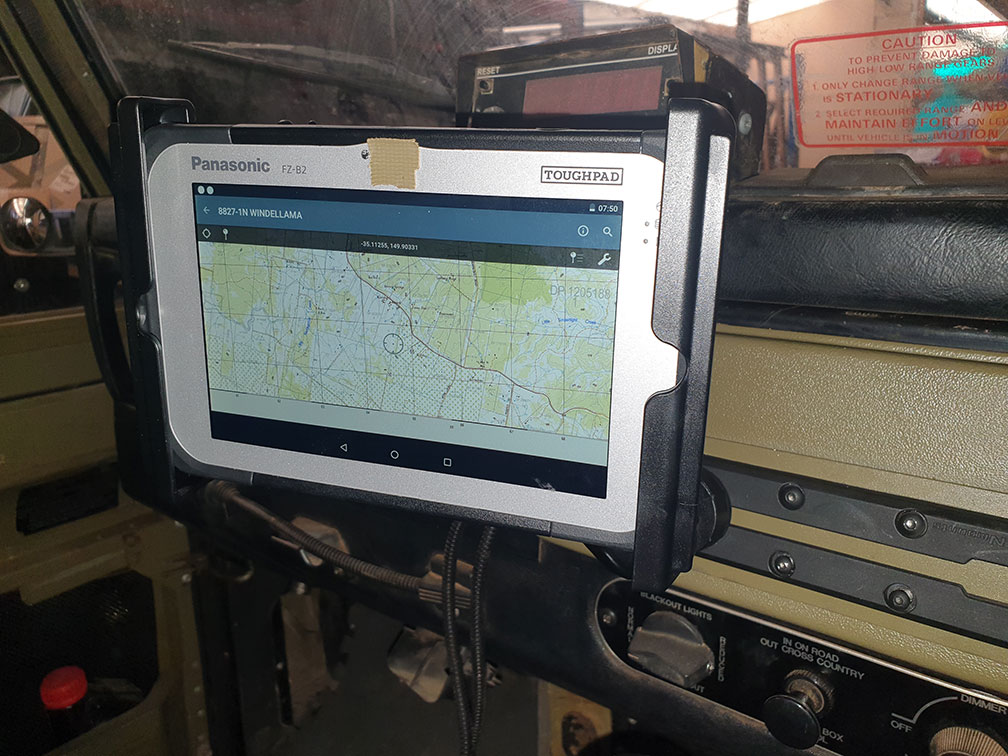
3. Spare RFSV dashboard fusebox cover. This one was cracked and broken when I acquired the vehicle so I replaced it early on in my ownership with a NOS one which came out of a surplus fusebox upgrade kit. I ended up repairing the cracks on the original fusebox cover and installing 60mm wide aluminium backing plates on the front and rear surfaces to which I have bolted a 5 inch length of kayak track to suit the RAM mounting system I use. The modified fusebox cover was plastic primed then painted protec cam green before I added the backing plates which were then hit with etch primer and also painted protec cam green before they were installed on the cover. The kayak track section just bolts on. You can just make out the ball mount used with the track. At the moment the track holds a 7 inch toughpad tablet but I have enough room to mount one of my handheld Motorola XTS3000 UHF radios on the same track at the same time as the tablet using a large phone mount and hardware to suit.

4. Tablet mounted. The tablet is a surplus Panasonic FZ-B2 Toughpad 7-inch android tablet. It's a bit long in the tooth these days, but it works and it was pretty cheap second hand. I use it for communications, wide area nav and situational awareness. It's usually used offline or sometimes uses wi-fi from a separate 5G hotspot for online hi-res imagery from the likes of Nearmap and for network connectivity. Apps installed include - AndFlMsg, Morse Code Agent, Papermap, Avenza Maps, ATAK-MIL. In this photo it's displaying a geo-coded PDF topo map using Avenza Maps.
-
20th December 2024, 10:36 PM
#7
Here's an old image I dug out showing my dual cigar lighter socket cable which utilises the inspection light socket on a Perentie. The cigar socket end velcroes to the dash or on an RFSV/SRV to the side of the fusebox in the dash. This cable would work for series Landys too I'm guessing.
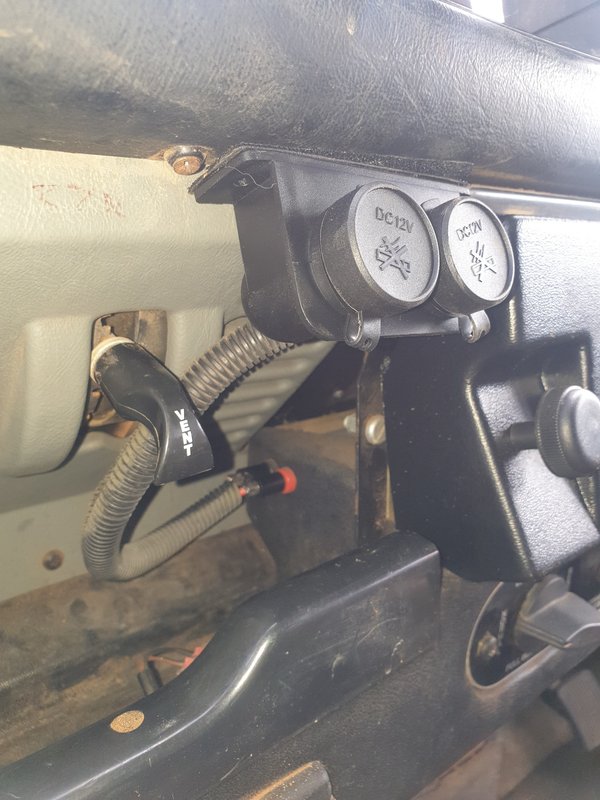
On the inspection light side of the cable is one of those stupid-expensive and quite fragile Lucas 2-pin plugs.
My cable is unfused simply because the fuses for the two inspection light sockets on the vehicle (front and rear) are located right there in the fuse box next to the cigar lighter sockets.
-
31st December 2024, 12:54 AM
#8
I hope you all had a great Christmas, and here's to a brighter 2025.
Updates -
No. 5 trailer:
- I discovered that my old olive drab canopy has seriously deteriorated so I have scrapped it and I am currently working out how best to utilise the new old stock geometrics cam canopy I have for it. I won't be cutting this canopy to fit around the ute rack so I'm not sure exactly how best to proceed as yet.
- The Kings Ute rack has been installed onto the trailer and upon it I have installed 2 x roll out 4wd awnings. These are both on quick detachable brackets. 1 set of detachable brackets is the excellent Ironman4x4 thermoplastic type which has stood me in good stead for a few years now when it was mounted first on the FFR and then on the RFSV. The other set of detachable brackets are a solid XTM design. I prefer my 4wd awnings to be detachable since it simplifies rolling them out on the lawn for cleaning, etc.
- I made up a rear jockey stand for the trailer from 30mm square tube. When the trailer is set level, the rear jockey stand is set into place and the oversized rear hitch pin secures it in place so the with both jockey stands in place the trailer can't tip forwards or back. It's not as stable as weld-on rear stands, but it also doesn't harm the originality of the trailer.
- There was no way to have the spare wheel standing up in the front of the trailer while still being able to fit the canopy, so I've shelved that idea. Instead I'll chain the spare down flat in the front of the trailer and chuck a piece of ply over it. Underneath the plywood will be the trailer jack and wheel brace. Atop the plywood Will be stored the tucker box (3-inch mortar timber ammo box from WWII), a 135Ah battery box and the 40l Waeco fridge. That should keep the weight nicely on the drawbar.
FFR:
- She's had the body repainted all-over camouflage brown again. I have to paint the canopy and the defender 110 hard top panel and Perentie cam net rack. These were painted camouflage green last time, but I think I'll lean into the brown this time instead.
- The camouflage brown wolf rims I bought from the mob in Windsor a while back have completely faded to pink, so I need to respray them camouflage brown.
- I really need to sort out the replacement hardtop panel seals. There's a lot of water coming in when it rains.
- I've got a pair of IR lens covers coming to suit the 7 inch spotties on the FFR which will make it night vision capable too.
- I have a pair of early RFSV rear cargo bins creatively installed in the FFR (no brackets) so I plan on removing these and moving them on, then filling in the 8 or so holes I drilled in order to fit each one.
- I used to have RFSV side baskets fitted to the FFR too and this also necessitated some holes being drilled in the body for the mounting plates. The plan is to fill these in too, however...
- The SRV Mission Kit I won at the auctions a while back included a set of SRV side body rails, and since I had no takers when I had them for sale, I might just install them on the FFR since it already has compatible RFSV bullbar and scrub rails.
- The FFR has always been mechanically rock solid and since there were no takers when I put it up for sale, I think I'll just keep tinkering with it, giving it a nice resto-mod.
RFSV:
- Not much to report here aside from what's been shown in the pictures above.
- The ashtray receptacle RAM mount arrived and I've installed a phone holder on it. Works great Sadly the same cannot be said for the old Panasonic FZ-X1 Toughpad phone/tablet which was destined for use in the vehicle. I have wasted far too much time trying to get this thing to install the apps I need but to no avail - way too old. I bought a Panasonic FZ-T1 Toughpad phone/tablet off ebay pretty cheap which has a more recent android version so should run the apps I need. It's not quite as well-suited to the great outdoors as the old FZ-X1, but it's waterproof and dustproof and that's what counts for use in the RFSV.
- I now have another RAM "Fingers" phone holder mounted to the kayak track on the spare fusebox cover. It fits either of my main UHF or VHF handheld radios (Motorola XTS3000 for UHF or a Godforsaken huge Baofeng AR-152 UHF/VHF for VHF use)
- Sometime in the next week I'll be swapping the full canopy for the bikini canopy and I'll probably take the rear ROPS hoop off too while I have them swapped over.
Next update will include some more photos. Until then, thanks for continuing to humour my various 'tisms.
Cheers!
-
9th January 2025, 07:21 PM
#9
Tags for this Thread
 Posting Permissions
- You may not post new threads
- You may not post replies
- You may not post attachments
- You may not edit your posts
-
Forum Rules
Search AULRO.com ONLY!
|
Search All the Web!
|


 Reply With Quote


Bookmarks