Page 1 of 3 123 LastLast
Results 1 to 10 of 26

Thread: Milford Cargo Barrier Disco 2 install thread

  1. #1
    Join Date
    Nov 2010
    Location
    Murgon
    Posts
    495
    Total Downloaded
    0

    Arrow Milford Cargo Barrier Disco 2 install thread

    The Disco I bought a few months ago is slowly being accesorised before it goes into service as my commuter on/off Fraser Island where I work.

    As the vehicle will sometimes have my wife and children in it a cargo barrier or load restraint was top of the list for items to install.

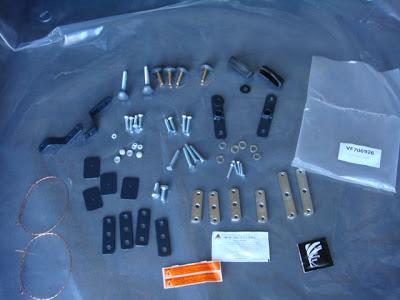
    The barrier was off ebay and the fitting kit from Vanquip. The fitting kit price was a shock at $130 delivered. But the engineering that has gone into the combined barrier and fitting kit is significant and I appreciate that this costs money to develop and produce.

    I searched the web and found very few traces of anyone having written up an install thread for this barrier going into a Series 1 or 2 Discovery.

    The ARB and Vanquip people wanted $260 to install the item. I figured I could buy a couple of the required drill bits and still get change out of the $200 - and then write an invoice to my wife for my installation fees! It's always nice to have some play money eh?

    I'll include a few pictures per post to illustrate various steps in the process. And perhaps scare off anyone contemplating doing this themselves. The salesperson at Vanquip indicated that they have a "Degrees of difficulty" rating scale for the Milford products they sell. She kindly pointed out that the Discovery is rated a D4 - the highest on their scale. Great, I thought...this will teach me a thing or two.


    A copy of the 6 pages of instructions can be found here (approx 4Mb pdf file).

  2. #2
    Join Date
    Feb 2010
    Location
    Wangaratta
    Posts
    370
    Total Downloaded
    0
    Good onya for having a go. I did mine a couple of months ago. I found the instructions to be mostly very good however I had to cut some of the holes larger than advised to fit the mounting plates in.

    I also Sika flexed around the rubber boot that covers the floor mount. Just to keep any moisture and dirt out. You especially wouldn't want any sand or saltspray up in there under the carpet.

    It will be good to see the rest of you tutorial.

  3. #3
    Join Date
    Nov 2010
    Location
    Murgon
    Posts
    495
    Total Downloaded
    0
    Ditto re their instructions, they were adequate in most areas. And also re the access holes. I've got more photos to put up next week. I'll also be using a sealant around those bottom floor mounting points - that aspect of it is quite a poor design I believe. The other thing was they could have made mention that the bottom mounts could be fitted with a 2nd person assisting and that would negate the need to drill the bigger 22mm hole to slide that plate through...and smaller holes in the floor of your vehicle are preferable to bigger holes I guess.

    I've finished the install now and it's very reassuring to feel how robust it is. It certainly brings home how small the loadspace is though. I like to pack my gear into those Nylex/Nally crates and they stack quite well even 3 or 4 high. I'll probably use a bungee to (loosely?) secure them to the top of the barrier and prevent too much movement. I know they don't recommend this but I'll look into the merits of some different ways of stopping the crates from rattling and moving around. A rubber mat is on the wishlist to save the carpet and make cleaning easier.

    More next week. Stay tuned folks.

    Quote Originally Posted by mattyg View Post
    Good onya for having a go. I did mine a couple of months ago. I found the instructions to be mostly very good however I had to cut some of the holes larger than advised to fit the mounting plates in.

    I also Sika flexed around the rubber boot that covers the floor mount. Just to keep any moisture and dirt out. You especially wouldn't want any sand or saltspray up in there under the carpet.

    It will be good to see the rest of you tutorial.

  4. #4
    Join Date
    Feb 2010
    Location
    Wangaratta
    Posts
    370
    Total Downloaded
    0
    I use a ratchet strap to secure those plastic tubs and my fridge in the back of my disco. I just hook the ends over the 2 tie down d - rings closest to the tailgate and go over the top of all the stuff. It worked a treat on the rougher inland tracks on Fraser over Easter. The only thing better would be a drawer system $$$$!!!

    As for the rubber mat, I went to Clarke rubber an bought a length of textured rubber off a roll. I just cut it to suit the cargo area and the back seat floor. Its cheaper than genuine and you get a custom fit.

  5. #5
    Join Date
    Nov 2010
    Location
    Murgon
    Posts
    495
    Total Downloaded
    0
    Thanks for the ideas. I've not got any ratchets that are small enough - but they're cheap as these days so I'll grab a set or two when supercheap have them on sale next. I'll also check out clark rubber too. The advantage to a LR mat or some of the other aftermarket ones that are available is the raised lip on the sides to keep all the sand and crap within the mat. I don't suppose it's anything that some careful application of a black silicone or sikaflex wouldn't fix though.

    Hmm, where has my wife hidden her wallet today?

  6. #6
    Join Date
    Nov 2010
    Location
    Murgon
    Posts
    495
    Total Downloaded
    0

    The thread continues...

    Well, I made the bold statement " More next week" in my first post on this install thread, sometime back in May. So, not quite next week or next month but better late than never eh? (thanks for the reminder Chris!)

    Right. My child is finally sleeping so I have some spare time to try and make some progress with this write-up.

    Before starting to drill holes in things that are important/expensive/belong to someone else it pays to heed the old "measure twice, cut once" adage. I reckon I must have measured at least half a dozen times...to be sure, to be sure, to be sure.

    My masking tape template shown in the picture was satisfactory. What I found was that the instructions didn't specify whether the tape measure should be perpendicular between the spot to be drilled and the top of the window trim (It says to measure "482mm vertical from top of trim at window") or on an angle as if you were trying to join the two points with a piece of string.

    I found approx 8mm difference between (a) running the tape on the angle between the top of the trim and the spot compared with (b) bringing the tape out from the trim and having it properly vertical. It made the difference between getting the drill through into the hole in the metal panel behind the trim as opposed to missing it and having your pilot hole too low.

    About now would be a good time to remember which of these two ways of measuring was best. But I can't be 100% sure which it was since it's been a few months. Doh! I seem to recall the more accurate method was keeping the tape on an angle.
    Attached Images Attached Images

  7. #7
    Join Date
    Nov 2010
    Location
    Murgon
    Posts
    495
    Total Downloaded
    0

    Trim removal

    Trim removal.

    Make a 'trim removal tool' using a hammer with some masking tape if you haven't got one of the proper tools. The masking tape will save making a mess of your beige interior with a rusty hammer. DAMHIKT.

    Once all the panel pins are out you can reach around and disconnect the alarm sensor connection. Some of the pins are different in the way they engage - make a note of which ones go where.

    Having never removed much more than the occasional car stereo from a vehicle this was a major learning curve for me. All the creaking and groaning noises that the trim makes when you're bending and levering it are a bit scary. I had visions of coming out of the shed with 4 pieces of trim that should have been 1 and saying to my wife "have we got any super glue mate?". Thankfully that didn't happen as it's quite resilient stuff.

    To make removing the 2 main side pieces of trim easier I'd recommend unclipping the section that runs along the top of the rear door too. Despite being a bugger to get back in, it was having this piece removed that made getting the side pieces back in much easier. Sorry, no photo of that.

    In the picture you can see the mounting holes for the rear passengers' grab handles if the vehicle is a 7 seater. The right-most hole is the one that your pilot drill should have managed to hit. You can see now why there isn't a huge amount of room for error.
    Attached Images Attached Images

  8. #8
    Join Date
    Nov 2010
    Location
    Murgon
    Posts
    495
    Total Downloaded
    0

    Drilling the holes

    I bought a step drill to do this job and it was a great bit of kit to use. It didn't mean that I'd be able to drill a 22mm hole in some of the locations required though. This is because some of the sections of cantrail/box wall are too close to the outer skin of the vehicle to enable you to get to the 22mm 'cutters' on the step drill. The photo shows how far the bit could penetrate before hitting the last bit of steel you'd never want to go through. The outermost hole (in the 2nd pic from the left) there is still not a true 22mm.

    In the 3rd pic from the left you can see the different layers of the cantrail.
    The innermost hole is quite important to get right here as it needs to be able to accommodate the M10 bolt that goes through later on.
    Attached Images Attached Images

  9. #9
    Join Date
    Nov 2010
    Location
    Murgon
    Posts
    495
    Total Downloaded
    0

    Entry holes for brackets

    A note on these entry holes that are used to get the brackets behind the cantrail sections: they need to be quite a bit larger than the 22mm the instructions states (as noted by mattyg)

    The 1st pic shows the angle that you slide the bracket in at. The 22mm entry hole is meant to be drilled perpendicular to the surface of the metal but the fact that it is a double walled section and the bracket needing to be slid in at an angle means that the hole is better to be oval shaped.

    The second pic shows the butchering I was able to, er, achieve with my Dremel in order to get the hole to an acceptable size/shape to get the bracket in. Gotta love the Dremel.

    I almost wonder if it'd be better to use the Dremel to cut a couple of angled slots into the metal after drilling the initial 22mm hole? ie. cut two rectangular sections out that allow the bracket to slide straight through. That's for somebody else to work out...I don't plan on doing this again for some time

    The copper wire is your means of getting the brackets in behind the cantrail. I didn't find this too tricky apart from managing to pull the wire out of one before it had made it into position. It could be recovered ok as it hadn't gone in too far. If you had one come off further in I reckon you'd be doing pretty well to get it out without losing your sanity.
    Attached Images Attached Images

  10. #10
    Join Date
    Nov 2010
    Location
    Murgon
    Posts
    495
    Total Downloaded
    0

    Front mounting points

    The same process applies for the front mounting points if you intend to fit them (measure twice/cut once, drill big holes, clean up the swarf before it gets too deeply embedded into your carpet, fiddle about with the brackets and tighten everything up to the hilt). I figured that I may as well so the option is there for moving the barrier forward in the future (and because I'd gone to all the bloody effort of pulling the vehicle apart to do the job anyway...).

    Milford make a note on page 3 of their instructions that is worth mentioning. On steps 9 and 10 it is particularly important to get your measurements correct.

    I did find that when attaching the extension bracket to the front mounts there was about 5mm play in the extension bracket - this means that the pilot hole can be out by a fair bit if your extension bracket is also off line too.

    The 2nd pic shows that my guesswork didn't turn out to be too far off the mark.
    Attached Images Attached Images

Page 1 of 3 123 LastLast

Tags for this Thread

Bookmarks

Bookmarks

Posting Permissions

  • You may not post new threads
  • You may not post replies
  • You may not post attachments
  • You may not edit your posts
  •  
Search AULRO.com ONLY!
Search All the Web!