

 Reply With Quote
In the case of Camel Landy's pics the shelf/bin arrangement was done by Land Rover Special Vehicle Operations for the G4 event cars.
So does that make it built or modified?

 Wizard
I love the fact that people, especially in 4wd Action state they "build" their vehicles. It's like saying I built my house by changing the light fittings, changing the blinds, adding on a verandah and giving it a paint job. No, Nissan, Toyota, Land Rover etc built the vehicle, the current owners added to it, changed it or modified it.Originally Posted by OffTrack

Also, notice that Nissan and Toyota owners nearly always indicate that they have "trucks", whereas I prefer to drive my car, which is a Landrover. Really ****ed off my mate when I pointed this out to him.
YarnMaster
In the case of Camel Landy's pics the shelf/bin arrangement was done by Land Rover Special Vehicle Operations for the G4 event cars.
So does that make it built or modified?
Swaggie
SubscriberCustom fit out is more the term, rather than build, as for Camel Landys custom, to me that is not a custom fit out, more the adding of a shelf.
A custom fit out is more like stripping out the rear of the car and building something more useful for touring, utilising the space more efficently, which I think is more what Hamish is looking for.
Baz.
Cheers Baz.
2011 Discovery 4 SE 2.7L
1990 Perentie FFR EX Aust Army
1967 Series IIa 109 (Farm Truck)
2007 BMW R1200GS
1979 BMW R80/7
1983 BMW R100TIC Ex ACT Police
1994 Yamaha XT225 Serow
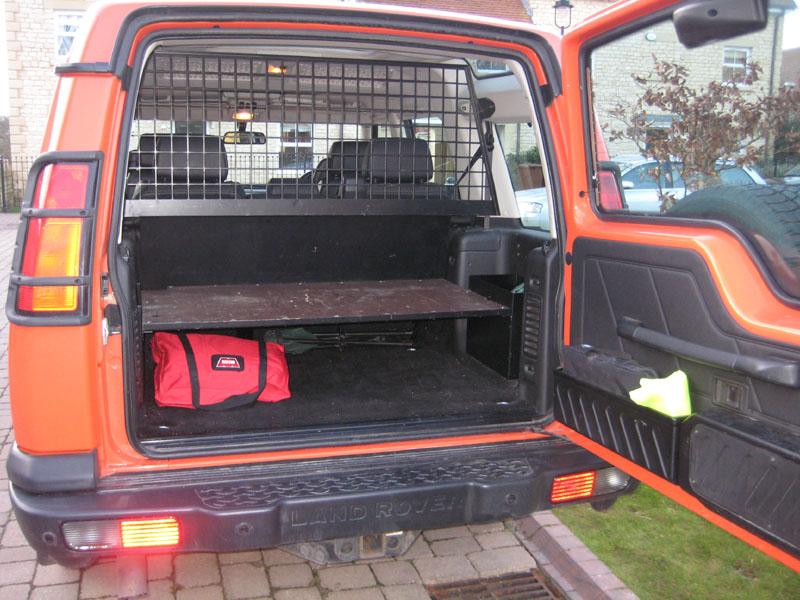
Thanks....but not quite what I meant. In this picture I can see your bin, which sits in the oem dark grey interior plastic trim, and then above that is the light grey interior window trim. In the centre, you have your shelf. In that space I have a set of "drifta drawers" (www.drifta.com.au) and above that a modified fourby fitout frame.
I want to completely remove that dark grey trim (done a long time ago), and replace it with a ply box, which is "wider" (ie intrudes into the floor more by about 30mm, matching if you like the rear door width, and taller, in that it fits in with the light grey windrow trim panel. The desired result is more storage space, stonger boxes, not to mention a stop to that annoying plastic rattle. This will free up space for a water tank, a subwoofer, and dedicated recovery gear and parts storage.
To help illustrate this, the picture below shows a fourby fitout picture of a D2. I have this frame, but different drawers. Mine are two low drawers, with a fridge slide on top, with a wooden divider between the top of the drawers, and the drop down shelf.
I want to bring the side cubbies out to the metal frame legs, and up to the window trim, all the way to the cargo barrier......make sense?
YarnMaster
A shelf and two small bins.
I had the rear bins out recently, and it didn't seem there was a huge amount of extra space. The back of the bins are very close to the body framing. The front edge has limited usable space due to the framing for the second row seat belt mounts and wheel arches. The only area there was substantial extra usable space was between the back of the bins and the door frame.
It's also worth mentioning the lower edge of upper trim sections clips directly onto the dark gray plastic of the lower trim, so you'd need to work out a way of securing those mounting points or your plastic rattles will be far worse than standard.
YarnMaster
I realise that, I was just showing you a different setup to give you some 'food for thought' as it is a very simple, yet effective setup which was used on both Camel Trophy & G4. I use a mixture of Zarges ally boxes, Peli cases and North Face Duffels... These work well with a simple shelf setup like that. (Ally cases underneath the shelf, ally cases on top of the shelf and then a layer of duffels on top to stop everything rattling around.)
Why not just leave the bins as they are and use them for storage of stuff nat needs to be carried, just not used all the time. e.g. Spare parts, tool rolls, oils, etc???
FWIW - Here's the setup in my 110:
I have a set of drawers & chest on the floor, that come level with the floor box. The chest has the spare parts & the drawer has the 'kitchen'.
Above all of this, I have an 18mm ply shelf, level with the bottom of the rear windows...
Under the shelf I have 3x ally Zarges boxes & 2x Peli cases. These have the food, tools & 'office' equipment.
On top of the shelf, I have a couple more Peli cases & 6x duffel bags (1x duffel for each person, 1x for the sleeping bags & 1x for 'stuff').
Again, very simple, yet effective.
M
 Posting Permissions
| Search AULRO.com ONLY! |
Search All the Web! |
|---|
|
|
|
")

Bookmarks