Page 2 of 3 FirstFirst 123 LastLast
Results 11 to 20 of 25

Thread: where to install uhf radio

  1. #11
    Join Date
    Nov 2012
    Location
    Kingsley, Perth
    Posts
    1,045
    Total Downloaded
    0

    roof console

    Quote Originally Posted by mattadelaide1975 View Post
    Hey everyone,

    I'm about to get hold of a UHF radio, but not sure how and where to mount it in my 2004 D2.

    Where have members mounted their UHF radios.

    Perhaps if you can provide pics and short description of how it was installed.

    Thanks everyone

    Matt.
    hi matt,

    i know everyone already posted same as im about to but ill add my pics too. i personally think the roof console is the best place. i found under the dash theres not enought space and you would hit ur legs on it and have the mic wire get in the way.

    some people have custom made dash jobs which look really neat but i think quite a lot of effort.

    i know some people dont like the roof option as they say the mic coil gets in the way of sight but you can always fold it away or tuck it under sun visors etc.

    mine isnt installed yet but ive done the wiring as you can see from pic. there was the factory power supply behind the panel but i left it as is and brought new power up as i wasnt sure about fuses etc. i got some power from under the dash and fused it there and brought the wired up to the overhead with the antenna cable.

    anyway hope this helps a little

    good luck

    larry
    Attached Images Attached Images

  2. #12
    Join Date
    Sep 2012
    Location
    Adelaide
    Posts
    167
    Total Downloaded
    0
    Well I finally got around to installing a UHF radio in my D2, and at the same time installed one in dads D2.

    We did mine first, so that we could encounter and rectify any issues prior to doing dads (Dont know how that happened, must be that father son thing.)

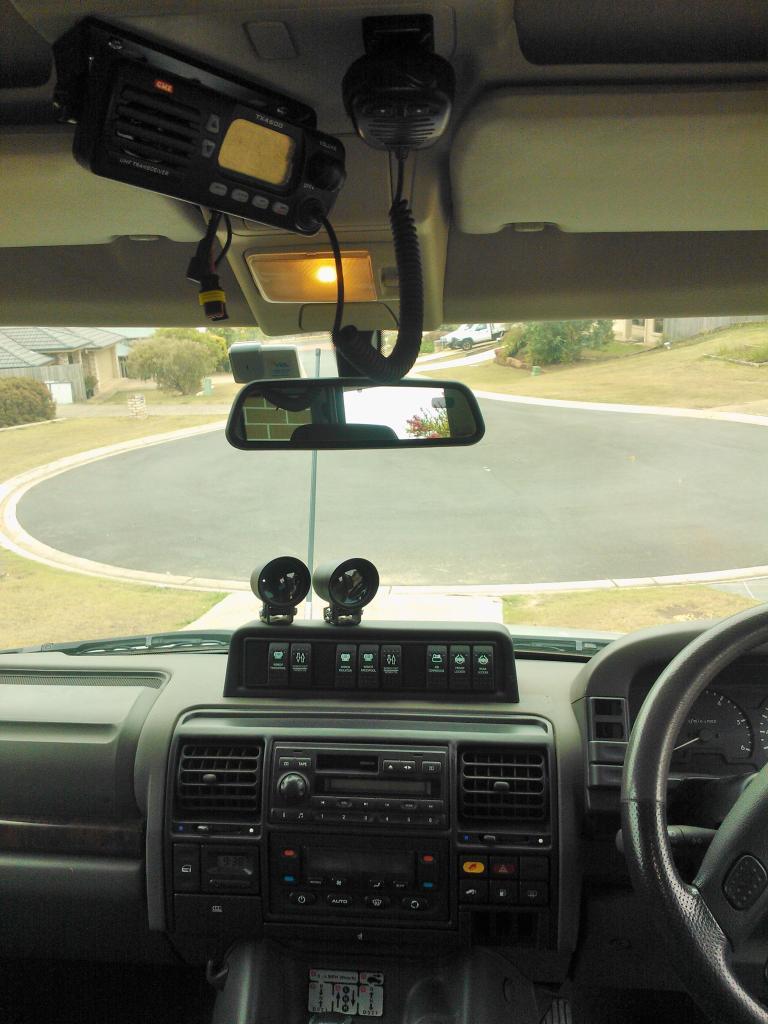
    Anyway, like others, we installed it on the roof. Suprisingly it was rather straight forward, with minimal problems encountered.

    I piggybacked the power from the light as others have done, and had no issues (apart from forgetting to turn the power off on the radio, therefore lowering the battery voltage.)

    I have included a few photos of the job done on my D2.

    2012-12-30 17.16.21.jpg

    2012-12-30 15.45.03.jpg

    2012-12-30 16.16.13.jpg

  3. #13
    Join Date
    Feb 2010
    Location
    On the Murray at Echuca
    Posts
    105
    Total Downloaded
    0
    My GME is quite thin and fits nicely inside the map tray above the sun shade. I fed the coax out through a hole in the roof panel using a grommet. Power comes from the light wiring. My criticism of the GME is that its hard to see the channel display from an angle.

  4. #14
    Join Date
    Aug 2009
    Location
    Brisbane, Sunshine Coast, Gladstone, QLD
    Posts
    1,351
    Total Downloaded
    0
    I chose the roof as well for mine, I cant recall what model it is right now but it is designed for use on varied vehicles and quad bikes etc given the design and mounting it has.

    Works quiet well I think angled down and towards the driver seat.


  5. #15
    Join Date
    Jan 1970
    Location
    Alex Heads
    Posts
    2,932
    Total Downloaded
    0
    What sort of unit are you getting?
    I've got mine on the roof like most here, between the visors.
    Easy install, and it's out the road.

    If you're looking at GME, the TX3540 is the remote head, you can mount it anywhere.
    There's a lot of space under the steering wheel (where the flip down cover is). You can run an extension piece, so you don't need to mount the handset.
    You'll hear the speaker fine from there. Otherwise you can get units with a speaker in the handset as well.
    A small unit like a TX3100 can be mounted anywhere and even fits in the map pockets above your visor, or inside the centre console.

  6. #16
    Join Date
    Jan 2011
    Location
    Gippsland
    Posts
    1,508
    Total Downloaded
    0
    ditto FenianEel - here's what that type of install looks like :-


    no clutter!! or potential for obstruction of forward vision.

    NB: My antenna is a 1/4 wave vertical mounted centre of roof.

    onebob
    Last edited by onebob; 12th January 2013 at 09:41 PM. Reason: clarification

  7. #17
    Join Date
    Jan 2013
    Location
    Jervis Bay
    Posts
    58
    Total Downloaded
    0
    image-755607556.jpg


    This is how I did mine its an Origon. The switch below it is to change it from the main battery to the auxiliary battery

  8. #18
    Join Date
    Dec 2012
    Location
    Brisbane
    Posts
    12
    Total Downloaded
    0
    I mounted mine in the pocket above the sun visor with the Mic in the centre between the visors .
    Attached Images Attached Images

  9. #19
    Join Date
    Dec 2007
    Location
    Sydney, you know. The olympic one.
    Posts
    4,853
    Total Downloaded
    0
    I have the GME 3520 remote head, have the base unit as per onebobs pics. The face fits up on the top consul on the far right in the smaller cutout perfectly (as above pic). Just double sided taped it in there, did the same with the base unit (just hit up a panel beater for some exterior grade tape for body mouldings). Have the mic fitted to the base, comes out a hole drilled just on the steering column side of the 1/4 turn screw for the panel. Pull the two lower switch blanks on the left of the switch panel on the instrument binacle. Screw the back side of the mic clip to the bar between the two switch holes, then fit the front. Make sure the top of the clip is just at the bottom edge of the top of the top hole so the mic clears the switch above.

    Can't do pics at the moment, it's getting the kangaroo remains removed from the front and everything replaced. But it's great, no distracting lights (plus can be made to any color, dark red is great at night) and the mic lead doesn't hang down on your leg and it's right at hand. You can even hit the button with both hands on the wheel and talk if necessary.

  10. #20
    Join Date
    Mar 2012
    Location
    Adelaide SA
    Posts
    416
    Total Downloaded
    0

    IC-440N fitting

    I used one idea from one install and one from another install

    Icom IC-440N in the roof pocket.


    Mic on the coin tray.

Page 2 of 3 FirstFirst 123 LastLast

Bookmarks

Bookmarks

Posting Permissions

  • You may not post new threads
  • You may not post replies
  • You may not post attachments
  • You may not edit your posts
  •  
Search AULRO.com ONLY!
Search All the Web!