Results 1 to 10 of 10

Thread: An amateur attempts some rust repair (upper windscreeen)

  1. #1
    Join Date
    Mar 2020
    Location
    Perth
    Posts
    225
    Total Downloaded
    0

    An amateur attempts some rust repair (upper windscreeen)

    There's been some rust bubbling and a bit of leak from the top of the windscreen mostly since I bought my disco. Once I took everything off to replace the wiper pelum, I started to have a poke around and noticed it was all a bit average and thought hey I've welded before how hard can rust repair be. Inital photo was after ripping the rubber finisher off, cutting off the excess goop and giving everything a wire brush by hand. Other side was fairly similar
    PXL_20250720_110049437.jpg

    Got one of those cheap wire cutter kits to remove the windscreen with, you get what you pay for but they work well enough. Main two take aways was use some heat, softens the glue right up (tho not sure if too much will crack the screen). The other is really think about how you're going to pull the wire, I got the window out in one piece but I've damaged a few spots along the edges because I was pulling against the glass*. What helps sometimes is getting the wire looped around so you've got both handles on the same side (might make more sense if you google the tool the professionals use)

    PXL_20250731_091917130.jpg

    Rather disconcerting, I've never had suck a clean view alas I live on a main road else I'd have taken a lap as is.
    I did an initial clean up of the goop with a stanley knife but a scraper would have been a better idea, this is when I got the heat gun out and it was magic how much of a difference it made.
    PXL_20250731_091752991.jpgPXL_20250731_091804764.jpgPXL_20250731_091809039.jpg

    Stuck some painting plastic up around to try and keep the inside of the car clean which didn't work, I suspect I need to use ramboard or something similar (annoyingly you can only buy big rolls of the stuff) and then gave it a good once over with a wirebrush
    PXL_20250731_103101567.jpgPXL_20250731_103109116.jpgPXL_20250731_103044709.jpg
    oh look at that more holes, need to give the corners a better de goop and de rust but fairly happy so far.
    Need to go buy some steel and I'll be picking up a friends welder and press brake tomorrow. Might buy a joggler (weirdly the air one is cheaper than a hand one at hare and forbes), I'm hoping my patches are all small enough I'm not going to need a shrinker to get a curve on them but will see, there's a few small holes that going to be sensible start/practice points.

    *tbh I started this with the main goal to remove it in one piece wasn't particularly expecting it to be reusable as it's got a few existing rock chips etc. imho if I took another out tomorrow probably could manage to reuse that.

  2. #2
    Join Date
    Sep 2013
    Location
    Darwin
    Posts
    1,707
    Total Downloaded
    12.74 MB
    Quote Originally Posted by admiralranga View Post
    ...hey I've welded before how hard can rust repair be...Need to go buy some steel and I'll be picking up a friends welder and press brake tomorrow. Might buy a joggler (weirdly the air one is cheaper than a hand one at hare and forbes), I'm hoping my patches are all small enough I'm not going to need a shrinker to get a curve on them but will see, there's a few small holes that going to be sensible start/practice points.
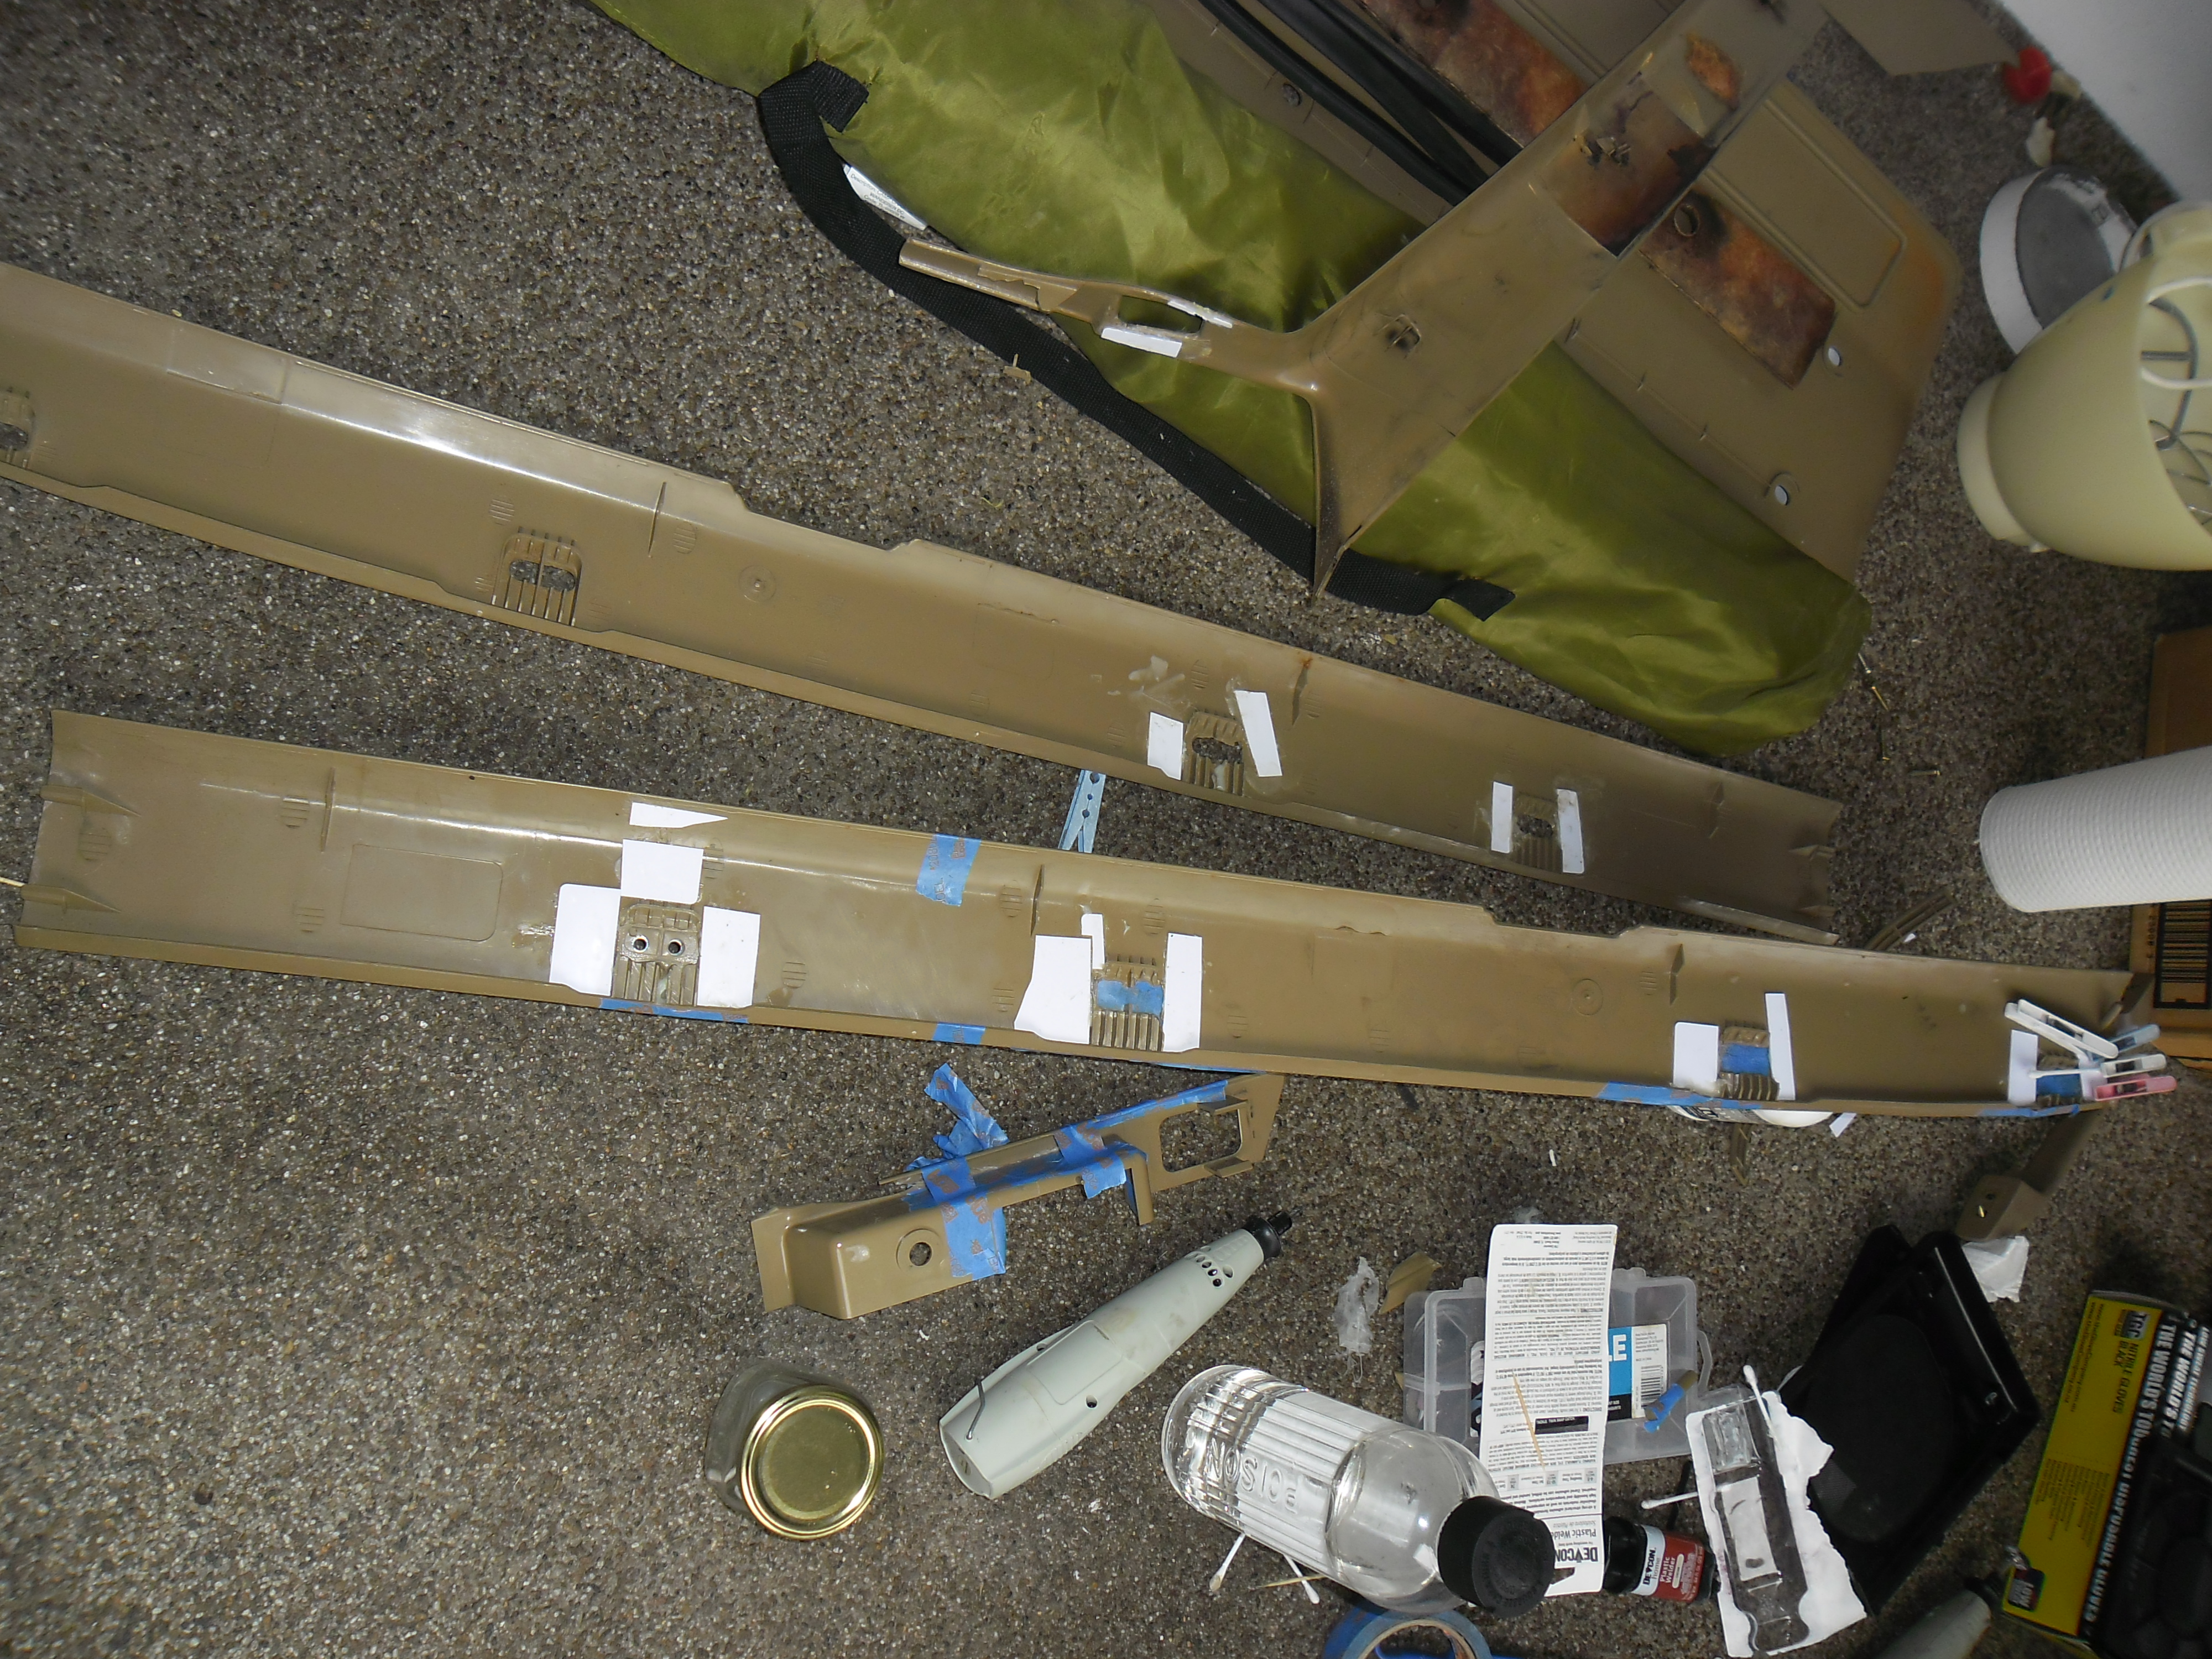
    Flat or shaped pieces of copper can be used behind small holes to support the weld metal being deposited. Iron will not stick to copper. Double skinned situations will add complications ie access to the rusted sheet. If your sheet around the hole is thin then you will be chasing the hole and may be better off cutting new steel to shape. If you make the copper plates long enough you can use super magnets to hold the copper to the steel ie hands free. You can get the copper from splitting a piece of copper piping. Did a lot of rust repair on a Range Rover classic, Disco 1 and LandCruiser and from memory all the steel is 0.9 mm thick. Used solid mig wire with gas. Flux core explosiveness just makes delicate work too difficult.

    Never used a joggler, but looks useful. Always had trouble with vertical spot welds.

    I usually cut and shaped replacement steel such that it was a gap fit ie not a perfect tight fit - magnets again come in handy holding the part in place until a couple of spots have been applied. Lots of practice before hand with scrap to set the machine to the right power level such that each dot had flow to the back of the weld joint. Avoid weld runs...just lots of dots...and a torch to shine from the back to pick up remaining pin holes. Lots of youtube stuff on this.

    Found the dremel thin disks extremely useful, for both cutting out segments, and while your probably not supposed to, as a mini grinding wheel to shape a hole (with care). Tungsten tipped probe for popping black hematite rust spots. Found oscillating fine tungsten toothed cutters useful for tight spots or for reaching down past gutters etc.

    Curves made around bolts or other appropriate shapes, hand bending etc. Steps made by clamping sheet between scraps of plate steel (steel plate thickness dependent on depth of step required), hammer and chisel to get sharp corner in the fold.

    Look forward to the thread. Good luck.

  3. #3
    Join Date
    Mar 2020
    Location
    Perth
    Posts
    225
    Total Downloaded
    0
    Appreciate all the advice, unfortunately access is rather limited. Absolutely spots over runs, I had quite a bit of fun till I realised the machine had been left on pull to start, pull to stop so just releasing it wasn't enough (aren't fancy welders dandy). Did manage the first hole, initially was basically plug welding it till I blew the backing bit out so it's just a bunch of tacks ground down.
    Attached Images Attached Images

  4. #4
    Join Date
    Mar 2020
    Location
    Perth
    Posts
    225
    Total Downloaded
    0
    Some updates now it's all (mostly) back together. After much swearing and cursing attempting to use 0.9mm wire and big welder (ENVY MULTI 230), I went out and bought some 0.6mm wire. That was significantly easier to use but because the torch was too big it birds nested at the drop of a hat. Next step was buying a sensible sized torch for tin work which really made things go well (minus that I bought a 5m one so still ended up with the odd birdsnest). Got it all welded up to a good enough standard, it's all sealed but it's just not the most perfect visually.
    PXL_20250903_115630021.jpg
    Nothing some high build and bog can't fix (plus the rubber finisher hides most of it)
    PXL_20250829_085200148.jpg
    Somehow managed to fill a hole without actually welding the backing bit in.
    PXL_20250831_033434532.jpg
    Being aggressive with cutting bits out also is something that I was stubborn about not doing and it made my life harder than it should have been till I stopped being silly.
    PXL_20251012_021526858.jpg
    I really didn't want it to rust again (norshield red oxide primer x3, coat of norglass 2 part undercoat/primer, their epoxy bog, 2 more coats of undercoat and then a final 3 coats of 2k Chawton White mixed into a spray can), long term I need to do something to the rest of the roof the gloss is gone and both I'd like to go white and frankly I'm not going to get a seamless result imho a "feature" looks better than failing to match. So much masking off for the spray coat tho
    PXL_20251022_104118013.MP.jpg
    The entire reason I started this little side adventure - replacing the front plenum cover and giving everything around it a spruce up (scope may have ballooned)
    PXL_20251024_083309385.jpg
    Did also fit new wiper arms etc but did draw the line at new wiper nut covers as they're somehow $40 each. Unfortunately I did snap the gutter trim finisher's while installing them, think it was a combination of the extra thickness of the paint on both the (new 3d printed) gutter trim finisher's and the gutter trim. I have ordered some from aliexpress ($40) so I'm waiting on them before I install the A pillar covers (still the originals somehow if the date sticker's are to be believed) but hey she's at least able to move*. Also swapped the snorkel fasteners to the A pillar with nice wafer head ones (because while you're there). See also the extra roof insulation as it was on special at repco on one of many visits.
    5xmSBmRx.jpg

    *If someone git hadn't gotten bored and pulled the intake manifold off while waiting for a coat of paint to dry so I could troubleshoot some intermittent starting issues. Turns out the starter motor wasn't well bolted in and would occasionally fall out. Close as I can figure when I swapped the engine out previously I used too long bolts and tightened them down onto their shoulders still leaving the starter loose. The top nut held on for a while but eventually went AWOL and so occasionally wouldn't be in postion to engage with the flywheel. Have bolted it back in with correctly sized bolts/nut and now just need DHL to deliver the new intake gasket (plus some other miscellanous bits I'd either forgotten to order, couldn't find or broke in the process.

    Interior trim is all in my living room waiting for the enthusiasm to clean it before refitting it.

  5. #5
    Join Date
    Mar 2020
    Location
    Perth
    Posts
    225
    Total Downloaded
    0
    Having waited the required time I got in inside and got my fiancee to hose over the windscreen and oh look at that there's water coming in. Glad I did check because it was both a spot that would have been covered by the a pillar plastics (inside and out) and it was really obvious the issue was not enough sealant under the windscreen (I'm hoping they don't need to remove the windscreen start from scratch but also dunno how I feel about a "patch"). No issues from what I could with my repairs and was very satisfying watching the water run off the plenum as it should.

    Did notice the carpets were still wet (from like originally) so went through and pull them out (plus the seats and way more trim) to both let dry and to give a good clean. Didn't actually realise how much you had to remove till I was too far in but such is life. Spent the evening glue some of the damaged trim back together.

    Carpets were too wet this morning so instead of doing the sensible thing and go enjoy breakfast somewhere nice I ran down my list of things that need fixing on the car and landed on heater core piping. Seemed sensible enough given I was basically half why there. Not so when attempting to remove the dash and discovering just how many fasteners need removing and also that I'd manage to pin the dash in with some of the wiring I'd added.

    Swapping the pipes was pretty easy once the dash and heater assembly were both out (would it have been too hard to flip the bracket so you don't have to pull the heater box), it's back in now will see if the car starts without the instrument panel etc attached, I'd like to make sure it's not leaking first but also will see.

  6. #6
    BradC is offline Super Moderator
    No one of consequence
    Supporter
    Join Date
    Mar 2018
    Location
    Perth (near Malaga)
    Posts
    3,545
    Total Downloaded
    0
    A bit of hard won info that may help in future. I've spent years with old cars and decaying plastic and this is the best way I've found :


    The issue is with age the plasticiser leaches out of the plastics and they become terribly brittle. Epoxy will make a mechanical bond, but it eventually breaks off (whether peeling or shearing on the bond line). I found "Bunnings gift cards" were the perfect reinforcing material. They are a generic PVC plastic card, so I got on the net and bought a pack of blank security ID cards (same but I didn't have to beg at Bunnings to get them). They work great for reinforcing the break.

    Prep involves cleaning thoroughly and then wiping the surfaces with PVC priming fluid (from Bunnings, it's about a 50/50 mix of Acetone and MEK). That really softens things up.

    The glue I use is Devcon Plastic Welder. It's an MMA (Methacrylate) epoxy. Has a pot life of a couple of minutes and smells something terrible, so work fast.

    Nothing I ever repaired failed anywhere near the repair. The best part about the MMA adhesive is it makes a chemical bond with the plastic so it's not reliant on sanding or roughening the surface, and it'll pretty much glue any plastic to any plastic (with the exception of low surface energy plastics like H/LDPE or some impregnated Nylons). The epoxy is also good for building, so can be shaped (with a bit of a makeshift mould), drilled/tapped and filed. Having said that it's a ton more flexible than normal Araldite style epoxy, so it handles a bit of movement.

    For the ABS/PVC often used in cars it's perfect.

    I reckon the 740 I sold a few years ago was probably 20% PVC ID cards. Looked good and held together.

    I ordered 10 tubes from E-bay about 15 years ago. Keep them in the fridge. I've run out, but just found it in stock at Blackwoods and have some more coming.
    MY08 D3 - The Antichrist - "Permagrimace". Turn the key and play the "will it get me home again" lottery.

  7. #7
    Join Date
    Mar 2020
    Location
    Perth
    Posts
    225
    Total Downloaded
    0
    Appreciate the recommendation, I've used other Devcon stuff and it's been bloody good. Unfortunately I was working with whatever Bunning had available at 6pm on a Saturday, was meaning to order some of the tubes of metal stuff anyway so will get some of that as well.

  8. #8
    Join Date
    Mar 2020
    Location
    Perth
    Posts
    225
    Total Downloaded
    0
    Carpet and some of the trim around the doors back in, it's odd how much of a difference carpet/no carpet makes to it looking like a car not a money pit (and if I'd have thought about there would be a before/after).

    Dash has had some glue and TLC applied, currently waiting impatiently for auspost to deliver a cage for the radio as I suspect it'll be worth installing in on my lounge room floor over in the car.

    Windscreen mob insist on me driving it to their office to inspect the leak, which I get but also annoying. They're also complaining I got it wet after 24/36 hours, both that's longer than the installer said when I asked and from what I can it's more high pressure cleaners that you need to wait longer for.

  9. #9
    Join Date
    Sep 2010
    Location
    The Hills.
    Posts
    19,161
    Total Downloaded
    152.79 MB
    Quote Originally Posted by BradC View Post
    I found "Bunnings gift cards" were the perfect reinforcing material. They are a generic PVC plastic card, so I got on the net and bought a pack of blank security ID cards (same but I didn't have to beg at Bunnings to get them). They work great for reinforcing the break.

    That's not a bad plan. I collect "rewards" cards, and the old defunct officeworks print cards. Never thought of just buying them......
    ​JayTee

    Nullus Anxietus

    Cancer is gender blind.

    2000 D2 TD5 Auto: Tins
    1994 D1 300TDi Manual: Dave
    1980 SIII Petrol Tray: Doris
    OKApotamus #74
    Nanocom, D2 TD5 only.

  10. #10
    Join Date
    Sep 2010
    Location
    The Hills.
    Posts
    19,161
    Total Downloaded
    152.79 MB
    Bunnings works on the supermarket model. They stock what people buy, and people buy it because they stock it. Like a supermarket, you want something on their shelves, you pay. You pay more to have it at eye level.

    Good tip about Blackwoods.
    ​JayTee

    Nullus Anxietus

    Cancer is gender blind.

    2000 D2 TD5 Auto: Tins
    1994 D1 300TDi Manual: Dave
    1980 SIII Petrol Tray: Doris
    OKApotamus #74
    Nanocom, D2 TD5 only.

Tags for this Thread

Bookmarks

Bookmarks

Posting Permissions

  • You may not post new threads
  • You may not post replies
  • You may not post attachments
  • You may not edit your posts
  •  
Search AULRO.com ONLY!
Search All the Web!