

 Reply With Quote
Try giving Traxide a call. Tim is always willing to help

 Fossicker
Hi All,
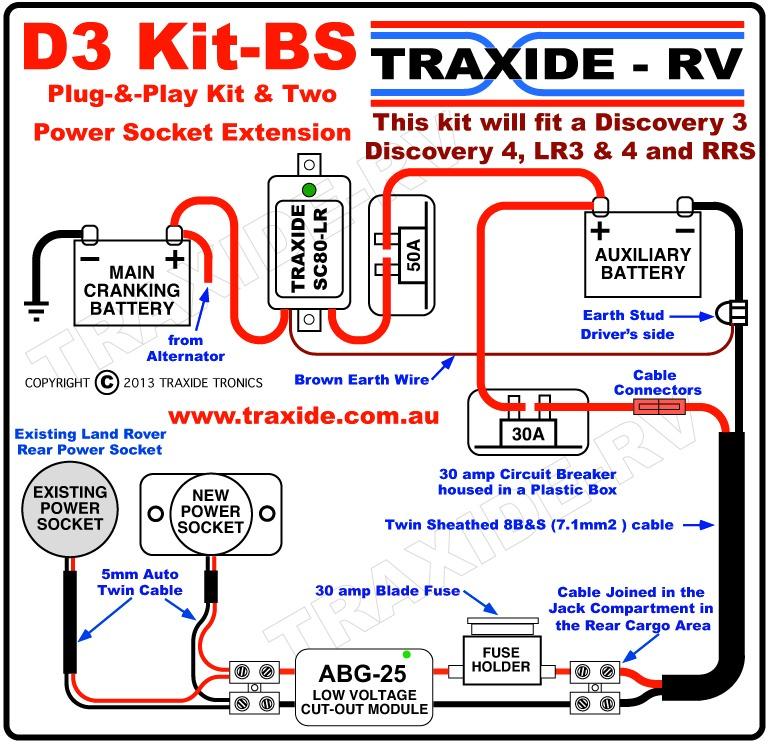
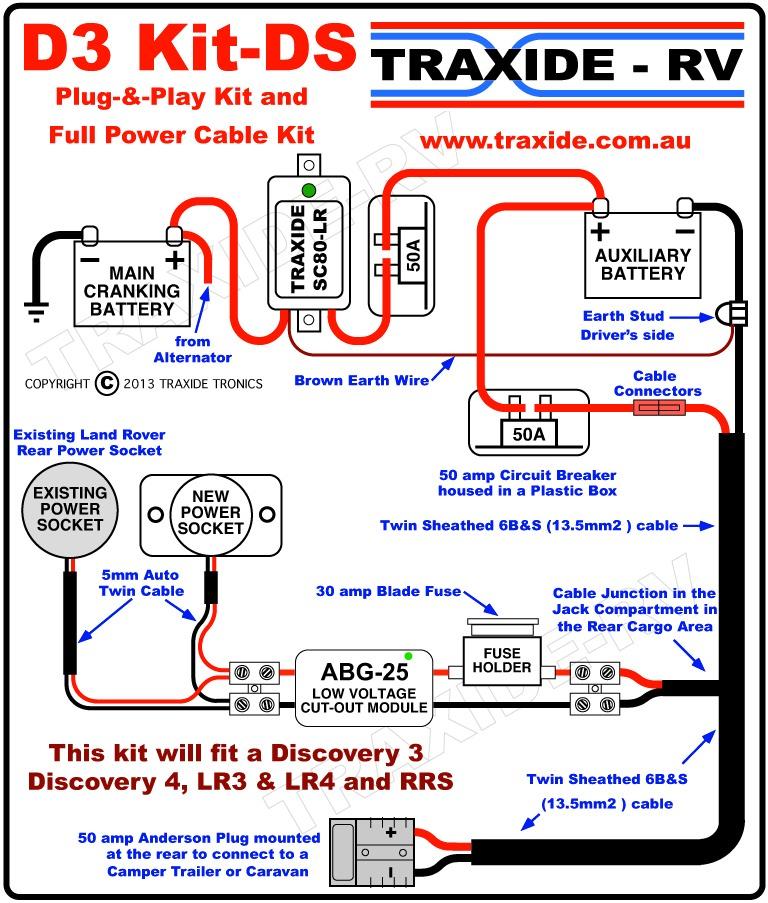
I currently have a traxide SC80-LR dual battery set up with the Kit B option, i.e. with the power run to the rear of the LR3 for two additional power sockets (see wiring diagram 1 below). I am looking to purchase a trailer/caravan and would like to add a 50 AMP power cable to the rear hitch area of the LR3, much like what traxide offers with their Kit C (see wire diagram 2 below). I plan to retain the 8 B&S cabling for the existing two power sockets and will add a 6 B&S set of cables for the caravan 50 AMP cable. My question is - do I need to run the black/ground wire all the way from the rear of the LR3 to the engine compartment to ground in the same location as where the aux battery grounds (as shown in diagram 2) OR can I get by with running only the red/power cable to the front and then run a shorter black/ground cable and ground somewhere closer in the rear of the LR3? I ask b/c running a shorter length cable will save a fair bit of money given the cost of 6 B&S cable. I assume its ok b/c a ground is a ground and any true ground should work. Additionally I've always heard that your ground cable should always be as short as possible. Wanted to check with you all here just in case I'm missing something where for the SC80 to function properly (i.e. to charge a 3rd battery in the caravan/trailer) it needs to be grounded at the same location as the 2nd/aux battery.
If there is no problem with this...any suggestions where to pick up a good ground point in the rear of the LR3? I assume there are some factory ground points somewhere in the rear, but don't know where they are located.
Thanks in advance for assistance with my questions,
Jason
Diagram #1:
Diagram #2:
Fossicker
Try giving Traxide a call. Tim is always willing to help
Fossicker
I'm from the US so calling is a bit expensive. I've tried emailing Tim recently on this topic but no response yet. I know he's super busy from and exchange I had with him a couple weeks ago regarding purchasing the ADG-25, so was hoping to get a quick answer here since I'm looking to tackle this project this weekend.
Wizard
It is best to have it grounded all the way back to the second battery. However on my previous D3 the previous owner only had the positive running back to the rear of the car and ran the ground to the chassis and it worked fine.
There are ground points in both rear compartments and your current set up will use one of them. I would be tempted just run the ground from the caravan back to that one.
Or the other solution is to replace your current 8B&S with 6B&S all the way through.
Fuji white RRS L494 AB Gone
2023 Ford Ranga
 OldBushie
Hi John and it is always safer to run both positive and negative cables in high current situations.
So your best set up would be to run twin 6B&S cable from the auxiliary battery to the rear bumper, BUT, this does not have to go inside.
I have not done this myself but others have, you can run this new cable down to the back via the chassis, or my accurately, inside one of the chassis rails.
All you need is a length of what we call over here, a plastic strip from a sheet of Tongue-N-Groover type floor board.
You feed the plastic strip down through the chassis rail till it comes out the back, then fix your twin 6B&S cable to the other end and pull it through.
Once the cable is in place, at the auxiliary battery, connect the negative cable to the same earth stud you used to earth the auxiliary battery to.
Then fit a 50 amp auto resetting circuit breaker to the positive cable and then fit a short length of cable between the other side circuit breaker and the positive terminal of the auxiliary battery.
Fit an 50 amp Anderson plug at the rear.
JOB DONE.
Fossicker
Tim,
Thanks for the reply and offering up the alternate way of routing the cable to the back. I will likely go with this option as it will save me from having fish the cable thru the already nearly full firewall grommet and stringing it thru the interior. Should end up saving me a couple hours.")
The MOD Father
a solar panel would fix this.
I havent plugged my andersons in in over two years.
"How long since you've visited The Good Oil?"
'93 V8 Rossi
'97 to '07. sold.
'01 V8 D2
'06 to 10. written off.
'03 4.6 V8 HSE D2a with Tornado ECM
'10 to '21
'16.5 RRS SDV8
'21 to Infinity and Beyond!
1988 Isuzu Bus. V10 15L NA Diesel
Home is where you park it..
[IMG][/IMG]
Master
SupporterTim,
I have been looking at this kit on ebay and I am wondering if you do something similar.
H/DUTY CAMPER TRAILER CARAVAN CHARGING KIT + 50AMP ANDERSON PLUGS 6B&S CABLE
H Duty Camper Trailer Caravan Charging KIT 50Amp Anderson Plugs 6B S Cable | eBay
Regards.
Mods sorry if I have put this in the wrong place.
Master
Just a word of caution re:cable through the chassis rails; there are a number of repairs that require a body lift / body off chassis to get to engine / driveline components. A couple of Anderson plugs in the right place (entry and exit from rail) may save a few hassles later.
OldBushie
Hi rufusking and that’s some very handy info.Originally Posted by rufusking

Hi jspyle, that’s a good price and one I can not compete with.
I actually pay more for my cable and I buy bulk.
The Tycab is OK but it’s in a flat but wide shape and is fairly stiff.
The cable I buy is in a tighter smaller form and is very flexible. This makes it very easy to install, particularly in difficult locations, which makes it a lot simpler to work with.
 Posting Permissions
| Search AULRO.com ONLY! |
Search All the Web! |
|---|
|
|
|


Bookmarks