Page 1 of 2 12 LastLast
Results 1 to 10 of 11

Thread: Defender Headlight Wiring

  1. #1
    Theo le Roux Guest

    Defender Headlight Wiring

    Hi Guys,

    I'm in the process of upgrading my headlights on my 1995 Defender 300 TDI and would like to replace the standard wiring and add raly to the wiring. I have found a few post on the net regarding general wirng of headlight and including relays to the design but nothing Defender specific.

    I'm looking for a headlight wiring diagram for a defender that include relays to be able to fit 90/130WATT globes to current headlights. Where is the best point to get direct power from on the Defender or should I run cables directly from the battery to the relay and then to the headlight.

    Any assistance in this regard will be appreciated.

    Cheers

  2. #2
    Join Date
    Jan 1970
    Location
    Queensland
    Posts
    170
    Total Downloaded
    0
    Hey mate.. I made a video exactly on this...
    [ame=http://www.youtube.com/watch?v=TKr9t56tJxg]Land Rover Defender Headlight Relay Upgrade - YouTube[/ame]

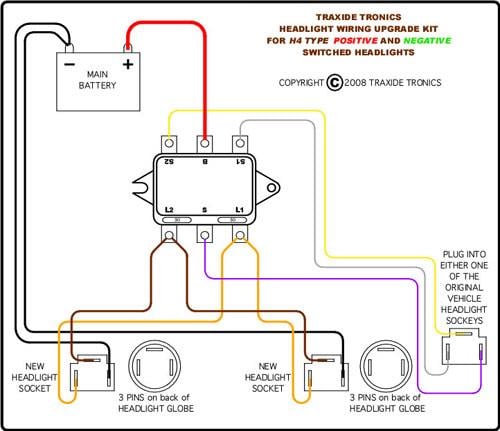
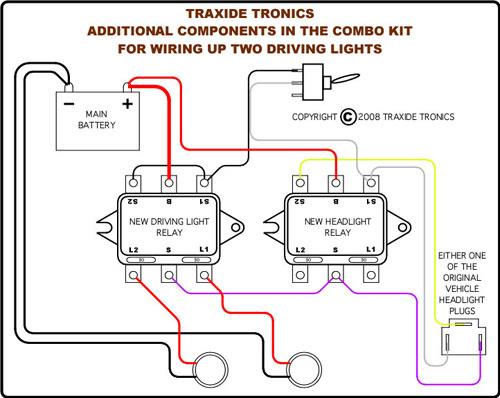
    I ran a 25amp fused cable directly from the battery to 2 relays in the engine bay. From there you can run heavy enough cable to power your higher wattage globes. There is no need to modify the existing harness... just wire in the new wires for the relay/headlights and plug in to your existing harness.

    DIY kits are available as well from drivesafe, one of the members on here.

    Brett

  3. #3
    Join Date
    Feb 2009
    Location
    Chidlow, WA 6556
    Posts
    261
    Total Downloaded
    0
    I used this one when I did mine as I did the driving lights and the headlights at the same time and also used the genuine LR switch.


  4. #4
    Theo le Roux Guest
    Brett thanx for the link. I have followed you advice on the LED dashboard upgrade with much success. When you say plug into the existing harness does that mean linking the dim and bright cables on the light harness to the relay itself to "toggle" between dim and bright.

  5. #5
    Join Date
    Jan 1970
    Location
    Queensland
    Posts
    170
    Total Downloaded
    0
    Quote Originally Posted by Theo le Roux View Post
    Brett thanx for the link. I have followed you advice on the LED dashboard upgrade with much success. When you say plug into the existing harness does that mean linking the dim and bright cables on the light harness to the relay itself to "toggle" between dim and bright.
    Basically you have a male h4 plug from the relays which has one wire connected to the low beam relay, and the other to the high beam relay. This plugs in to either of your original h4 female headlight plugs to provide a low current 12v feed to power the relays. No need to modify any other wiring. :-)

  6. #6
    Join Date
    Jan 1970
    Location
    Queensland
    Posts
    7,904
    Total Downloaded
    0
    Hi Theo and if you follow the link at the bottom, it will take you to two Defender specific kit in the Verandah section.

    Here are two diagrams from these kits.


    Traxide Headlight Kits

  7. #7
    Theo le Roux Guest
    Brett correct me if I'm wrong. You will actually fit new plugs to the headlights which provides new power with thick cables from the relay. Power directly from the battery to the relay and then you use the existing headlight plug and link that to the relay to allow for dim and bright.

    Thanx

  8. #8
    Join Date
    Jan 1970
    Location
    Queensland
    Posts
    170
    Total Downloaded
    0
    Quote Originally Posted by Theo le Roux View Post
    Brett correct me if I'm wrong. You will actually fit new plugs to the headlights which provides new power with thick cables from the relay. Power directly from the battery to the relay and then you use the existing headlight plug and link that to the relay to allow for dim and bright.

    Thanx
    That's correct.

    As you see in my video the relays have their own H4 female connectors (with thicker wire) to connect to the headlights, and the relay has a H4 male connector which plugs into the original female headlight loom to control dim and bright.

    If you're thinking of doing it yourself my vid has a list at the end of what you'll need, otherwise pm drivesafe for his kit... it costs about the same as making it yourself...

    Brett

  9. #9
    Join Date
    Jan 1970
    Location
    Queensland
    Posts
    7,904
    Total Downloaded
    0
    Thanks for that Brett and I like your video, nothing better than seeing how to do it before you start.

    I noticed a few other videos on there with yours.

    If you have the time, PLEASE make one on how to solder cable into Anderson terminals. That prat with the Anderson plug video actually describes how to destroy a solder joint. And considering it’s for high current use, thats a dangerous bit of instruction he gives.

  10. #10
    Join Date
    Nov 2009
    Location
    Lebanon
    Posts
    3,286
    Total Downloaded
    0
    I have started the upgrade on my 110 but I am moving all the relays and fuses to the battery box Where they will accommodated on a small tray that will also be used to install a fuse holder for the fuel pump. I am using 6mm cables all around.

    I believe that it is better to protect the cables by installing the fuses the nearest possible to the battery, I faced once the experience of burning cables in the dashboard that were due to the headlight cables that have been in contact with the firewall.
    On another occasion and while touring the desert of Jordan, the fuel pump cable caught fire on one of my friends 110's, we then discovered that this cable was never protected by a fuse. We had to replace the fuel pump and all the cable till the ignition switch.

    I will be posting pictures of my work.

Page 1 of 2 12 LastLast

Bookmarks

Bookmarks

Posting Permissions

  • You may not post new threads
  • You may not post replies
  • You may not post attachments
  • You may not edit your posts
  •  
Search AULRO.com ONLY!
Search All the Web!