Page 1 of 3 123 LastLast
Results 1 to 10 of 25

Thread: TD5 fuel pump maintence and repair tutorial

  1. #1
    mousie Guest

    TD5 fuel pump maintence and repair tutorial

    Hi all,

    Given some fuel pumps are failing and as our vehicle age, I decided to show how to maintain / replace the pump itself and the filter to prevent premature failure and secondly, should it fail when your in the middle of nowhere this tut may come in handy.

    A cost effective option on how to change out the motor 'pump only' option that I intend to follow in my future travels rather than folk out my first child for the cost of a complete assembly. I've ordered a pump for approx $130 dollars to be used as a spare and more on that when it arrives. I am glad I did this at home given I found that after approx 60K of travel, the pump filter was 20%-30% blocked from debris. So I'm confident these pumps will fail given the suction filter will just increase the load on the pump (and hence relay perhaps). And that's with just highway fuel stops here.

    1. I have a 2000 Disco TD5 auto with 209K (5 seat) and I just had to remove the rear black luggage strip and to my surprise I could lift the carpet up as just under the courtesy bins to get access to the pump cover. Later finding out why with a date stamp on the pump at 6/06 from perhaps the first owner having this changed at around the 150K mark from service records. Back to the carpet, this is not a bad way of putting two hidden cut lines in the carpet if you ever need easy later. Perhaps I didn't need to order that extra pump however I'm glad I did for a spare given always generally towing van in inner country.

    2. (Remove fuel assembly from vehicle tank) Just refer to your manual on how to remove assembly from tank observing a full clean, vacuum and or blower to prevent ingress of contamination.

    3. (Fuel Gauge remove) With the pump assembly out on the bench, the lower section of the assembly body is just a cover with bottom screen (course filter) with a build in simple valve assembly inside it. To remove you have to first look at the fuel gauge card and just finger press on the single top tab thus the card can move downwards on its 4 tracks say 10mm and slides completely free. You can remove completely by disconnecting wires but I didn't as is fairly tight for fingers unless necessary. It stays with the upper section anyway so will not be moving much as we concentrate on the lower removable body here.

    4. (Lower body section) again fingers only is sufficient to lift off the three tabs around the top of the outer body. There is one final tab that is slightly internal and accessed by a small screwdriver and just next to where the fuel gauge tab was. It looks like a slot of about 8mm when looking from top down in the plate. A small blade screwdriver will ensure the disconnect. Remove the cover to expose the pump filter. Its pretty strong plastic so easy as.

    5. (Pump filter) The pump filter just pulls off and have a look at the crap and I wish we had twice the size filter. Clean and replace. This is the problem area and only max 60Klms use here.

    6. (Lower section body valve and screen cleaning). Okay, by hand again you can remove the bottom screen which then slides out a side screen. I then carefully removed what appears to be a simple limiting valve arrangement and I am glad I did given build up of internal crap. It looks like two side tabs however the third thick side is also a locating tab. Just take care as is more fragile. I just used needle nose pliers and a small blade screwdriver again. Just take your time.

    7. If you study the bottom exposed pump and upper plastic housing it is a simple expand and push the motor into the plastic housing and located by its upper tin lip located in the plastic. I didn't need to remove as my other motor has not arrived as yet.

    8. Full resemble and bleed system taking care to be as clean as possible.

    So the upshot is I'm comfortable with now with an emergency repair and I am concerned with the small filter size against the amount of debris and in my view, is one reason why they are failing given the additional loading on the motor.

    9. I had my fuel gauge between the bottom 2 and 3 white lines and I measured the depth of the standard tank at 80mm. Which is just shy of the top tin can section of the motor. So for cooling I'm taking a guess here for me that where possible I will be filling at the second white bar mark given full pump cooling however as we all know out bush this is not possible.

    10. I put a torch into the tank and noted a couple of white floaty bits and generally the tank is acceptably clean.

    When I get the other pump from overseas, I'll rig up a test bed and put a pressure meter on it given its a copy, but then again, I want to see if its actually a VDO or a VDO build in disguise here.

    I trust this might help out. Cheers Geoff
    Attached Images Attached Images

  2. #2
    mousie Guest
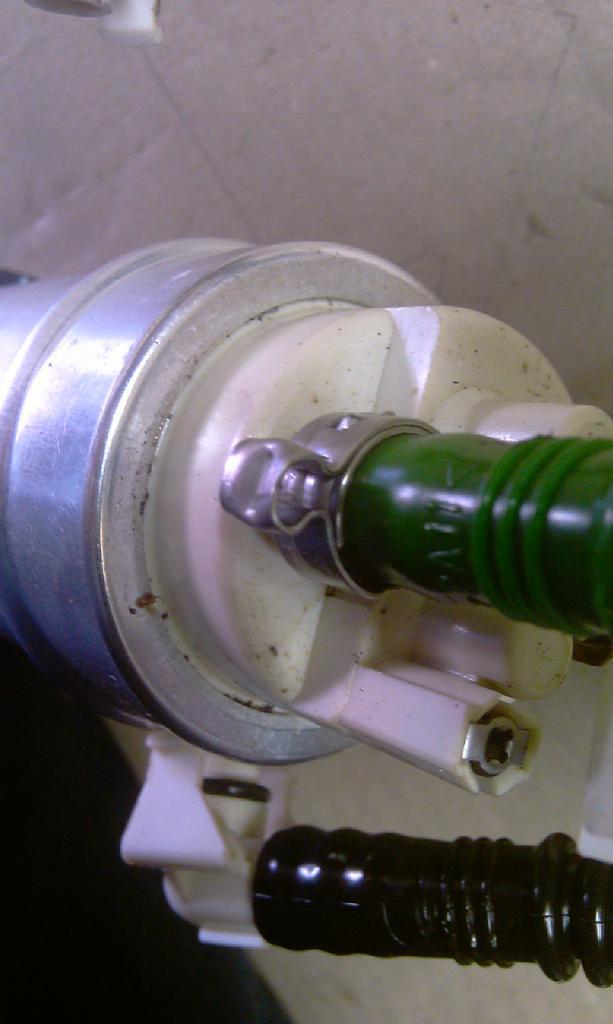
    Sorry but just wanted to add a couple of more pics and I meant to add if you need to replace a pump, the excess cable and piping will make the job easy for connecting. You just need to ensure you have a cable clamp of the size ready for the one green pipe as well so you know you will be on the road again. The pics of the lower section are sufficient to make you just do that extra bit of cleaning and your good to go.

    By the way I just saw that the lower assembly traps a small amount of fuel 1/3 litre so this must ensure some form of priming function or more importantly keeping a small reserve of fuel for when you folk are going hard vertical perhaps. See the one way rubber valve as well as all fuel goes through this rubber after the course screen. So does this mean if you constantly run low on fuel, the crud will ensure you stop in your tracks eh!

    For me if the pump goes enroute, I it will now be a 30-40m job on the fly with an emergency pump installed.

    Also worked out my Spectromatic Pump on order is a rebaged Pierburg fuel pump so I will be happy to replace out permanently.
    Attached Images Attached Images

  3. #3
    Join Date
    May 2009
    Location
    Tatura, Vic
    Posts
    6,336
    Total Downloaded
    0
    I purchased one of these back in January to carry for a spare.

    Fuel Pump Land Rover Discovery TD5 WFX101080 | eBay


    I assume that what you have ordered is the same.

    From what you say these are a quality unit, and it is what I like to hear, but how do you know this?
    Dave.

    I was asked " Is it ignorance or apathy?" I replied "I don't know and I don't care."


    1983 RR gone (wish I kept it)
    1996 TDI ES.
    2003 TD5 HSE
    1987 Isuzu County

  4. #4
    mousie Guest
    My BMW buddies are the ones in the know here especially as their E39 pumps are failing a lot more than we have had hence they are more into these options. Yep, that's the seller a large beemer forum members are pointing to. Mind you I went through the 500+ page specs but failed to find the spec sheet , I didn't find a similar pump like ours with the bottom low pressure addition. Which makes it hard work for another alternative.

  5. #5
    Join Date
    May 2010
    Location
    melbourne
    Posts
    375
    Total Downloaded
    0
    Cheers for this post. I now know why I kept my old pump. This will go the list.

  6. #6
    mousie Guest
    Okay just a short update, I finally realised the one way inlet valve (Red rubber) and the second built in valve assembly on the lower housing work together to provide an internal float of fuel to ensure the pump is cooled. The fuel return line providing the ability to fill higher than the tank level. In other words, even if you tank is near empty the inside float will be the same. However, if those items are compromised with crud, then the result is the float level may fall back to the level of the tank. So if your pump noise is 'loud' then this may be the cause as loud can mean no sufficient cooling at all.

    The upshot of all this, I'd just clean and inspect to save you some grief that is bound to happen.

  7. #7
    Join Date
    Dec 2012
    Location
    Perth, WA
    Posts
    2,043
    Total Downloaded
    0
    Thanks Mousie,

    This is a much better idea than replacing then whole thing. It's quite reasonable to carry just the motor as a spare as well.

    My problem now is there is no chance of it arriving before I'm off to the Gibb River Rd.

    I wish I found this tutorial before now too. I pulled the whole assembly with the intention of cleaning the pickup filter but only went as far as the coarse filter on the bottom. Looks like it will be coming out again before I go.

    Happy Days.

  8. #8
    Join Date
    Jan 1970
    Location
    Melbourne, Australia
    Posts
    738
    Total Downloaded
    0
    Thanks to this great thread I decided to pull apart my spare fuel pump today. The idea is to just carry the pump as a backup rather than the whole assembly.

    All went swimmingly until I got to the hose clamp on the green line. How does one remove this clamp and what kind of clamp does one use in place of it?


    Cheers,

    Franz

  9. #9
    Join Date
    Dec 2012
    Location
    Perth, WA
    Posts
    2,043
    Total Downloaded
    0
    I'd just cut that off, Franz and then use a normal screw type hose clamp.

    Must have been the day for it because I got mine out again and cleaned the fine filter.

    Happy Days.

  10. #10
    mousie Guest
    Folks, just reading the other thread re electricial earth on pump and lower voltages can cause failure of pump as well so worth a check just prior to inspection cover on. One way I use is to place two household pins through the pump wires and after startup when all settled down, measure volts under load at pump and then at battery terminals to check difference. If no load the voltage is always identical so pump must be running.

    Just a final electrical check given you have just overcome two of the main risk areas.

Page 1 of 3 123 LastLast

Tags for this Thread

Bookmarks

Bookmarks

Posting Permissions

  • You may not post new threads
  • You may not post replies
  • You may not post attachments
  • You may not edit your posts
  •  
Search AULRO.com ONLY!
Search All the Web!