Attached are several photos of our TD5. The storage system we have, has been well proven and was previously in my 300TDi. We have removed the seats to accommodate our dog Tess, she's a Newfoundland and need the space. The gray storage in that location will hold 4 10ltr jerrys of water accross it. Underneath is my Tirfor and spare filters. On the opposite side is the compressor.
The rear is set up with a box to put odd bits and on the right of the picture the cuboard houses our Lamps. Below that we store 2 x 10ltr jerries of fuel.
The left side at the bottom of the box houses my Thumper which I use to run the fridge, This then feeds off the dual battery system.
My storage in the floor area is, on the left our little kitchen. This hold basic foods such as spices and biscuits, pasta etc it also houses cuttlery plates cups and cooking utensils. The drawer on the right is for recovery gear.
Their are also 2 lids hidden on the right which also hold my tool kit.
We are quite organsied and have lived out of our car for 5 weeks. The packing is systematic and we have developed set spots for everything.
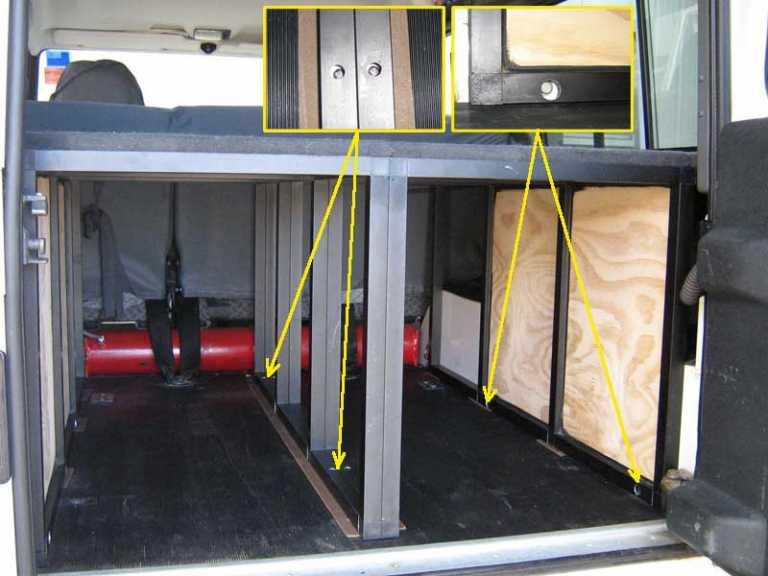
Well I've got the drawer guides from Hafele, I got the 1mtr long ones and they look good and strong. Inspite of this I will be designing the drawer with V blocks on the sides at the rear which will engage with other blocks on the frame and the drawer front will be a snug fit in the frame so that the weight is taken off the drawer guides so they don't wear and so they don't rattle. Now I just have to get the rails from Capral. The problem with the rails is that being 6.5mtr long it is next to impossible to find a courier that will carry them and then the chance of getting them to Orange unbent, but Capral will cut them in half for me.
Steve.
Just back from trip to Simpson Desert. The construction still alive despite corrugations etc. We had 6 plastic boxes on LHS, 2 jerry cans with spare diesel and 2 with water + 1 box with "quick" staff on RHS. Compartments above wheel arches loaded with something too
Total cost is about $150. Weight less 15 kg including 12mm plywood on top. Each side independed and can be removed in 5 minutes (undo 6 bolts). At the moment can't see any disadvantages.
Thought I'd resurrect an old thread since drivesafe's project for this thread was the inspiration for the platform I built for my D3. BIG THANK YOU to drivesafe for this posting! The goals for my platform were:
(1) Had to be light weight (the D3 already weighs a lot, especially with the ARB bumper, Rover Specialties Sliders, roof rack, etc)
(2) Had to be easily removable...think under 5 mins.
(3) Had to have an OEM look/feel too it
(4) Had to be modular enough to allow for the platform to be expanded for when the 2nd row of seats is folded flat to be used as a sleeping platform (this bit is still left on the to-do list).
(5) Had to be strong enough to support a fridge and slide plus the weight of two people (for sleeping platform when needed).
Qubeloks aren't available in the US, so after some searching I found a company call eztube (Aluminum Framing Systems | Boltless Construction System | EZTube | Modular Framing | EZ Tube - International Designs). The big advantage eztube has over others like Qubelok is that they offer connectors with a steel core verse glass filled nylon. Why are the steel core important? Because they will be a heck of a lot stronger and won't ever break. The only down side is they are about double the cost of the glass filled nylon connectors. I'm sure the glass filled nylon would have been up to the task, but I opted to over build it for piece of mind.
With that said, on to the build.
The first step was just to put a quick frame design on paper:
The next step was to semi mock up the frame with PVC pipe and joints. Why did I do this? Two reasons (1) to ensure I get all the right measurements, etc for a perfect fit and (2) PVC piping is ultra cheap compared to the tubing cost, so best to make all the mistakes with the PVC before cutting the expensive tubing.
Next was to cut the aluminum tubing and build the frame:
Then add the plywood. Note I split the plywood in half width wise to allow me to remove half in case I wanted the fridge on one side but thenhad some tall items to carry on the other side:
Next step was to attach the frame to the D3's tie-down d-rings with some turn buckles. I used nut rivets to mount the eye bolts on the frame to keep the "nut" internal to the tubing:
Final step was to carpet the plywood and then mount the plywood to the frame (with fanged elevator bolts) and the fridge slide to the plywood:
Overall I'm really happy with how it turned out. I can remove the platform in well under 5 mins...about 3 and a half to be exact. The frame itself is only 11.7 lbs. I used 1/2 plywood (Russian Birch) to keep the plywood light as well vs going with 3/4. Haven't weighed the frame with the wood attached yet, but I can easily lift it out on my own. I little heavy with the ARB fridge slide attached, but expected given that the ARB fridge slide is very heavy and stout. If you wanted to, you could easily add draw slides and drawers to the lower frame. I'm opting not to to keep it light and will just use totes underneath.
Next will be to add a similar frame and platform for when the 2nd row of seats are folded down, but that is a bit on the back burner for now.
I ended up taking a gamble on a Travall cargo barrier (http://www.travall.us/land-rover/tra...arrier-tdg1299) and got lucky....an absolute perfect fit with my platform and frame. Couldn't have asked for a better fit:


 Reply With Quote


")


Bookmarks