


")

 Reply With Quote
Start out by removing the propshaft. the instructions are up there ^.
Assuming youve planned ahead you should ,by now be laying under the vehicle and have at hand the following additional tools
a pair of combination (bullnosed) pliers
a pair of 45 degree offset needle nose pliers
a pair of needle nose pliers
a small flat head screwdriver
a can of wd40 or similar
an Impact driver with a large pozidrive head (yes phillips will work you butcher)
a hammer.
a 17mm 3/8th inch drive socket
A 3/8th inch drive ratchet
money for the swear jar, you are going to need it.
and be looking at
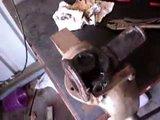
The parkbrake drum set the impact driver to undo and unscrew that machine screw if your lucky it just unscrews. Once its out pull the drum, clean and inspect as required, if thats all your changing lucky you. otherwise you should now be looking at this.
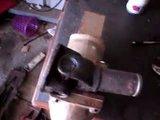
naturally it wont have speech bubbles identifying bits.
remove all the following
- the space plate retaining spring (pull the u bend backwards and down with needle nose piers
- the left side (the speech bubbled one) shoe retainter (reach behind the backing plate and press the back of the pin with your finger, grab the spring plate with a pair of bull nose pliers push it inwards then turn it 90 degrees)
- The retracting spring (grab the center with a pair of bull nose pliers and pull it towards the right shoe then outwards)
and you should wind up with something like this
now reach in behind the right shoe with the 45 degree needle nose pliers and pull the locating pin towards the shoe with the pliers then repeat the bull nose pliers trick on the second shoe locating pin. (when you're reassembling this bit will lead to swearwords)
now that you have both shoes free rotate them around so you can see the cable retaining end grab the spring with the 45 degree pliers then pull it away from the actuating arm and twist it out of the retainer.
now with both pair of needle nose pliers rotate the cable retainer untill you can see the split in it, pry at and tear it off then pull the cable out of the backing plate.
Now head up into the cab and remove the plug that retains the handbrake cover unbend the split pin remove it and then pull the clevis pin out
ratchet the hand brake to full up then identify the cable gromit, with the screwdriver pry the gromit away from the edge of the seat box and give it some wd40. do that to the top and bottom of the grommit and then reach under the car and yank the cable out.
Replacing the cable is some what more swear word inducing. First install the cable into the backing plate
Wedge the actuator arm away from the right hand shoe then pull the spring partway back on the cable, stick the cap of the terminatorinto the slot and hold it with your thumb, you should then be able to pull the spring all the way back, bend the cable under the hook of the retainer, let the spring go so it seats on the retainer and then reposition the terminator so its in the correct position. Sounds fun, wait till you try it. But its still not the worst bit.
now replace the shoes onto the backing plate and then attach the spacer plate retaining spring, the left hand shoe locating pin and spring
If they have fallen out put the expander wedges back in the shoe adjuster at the bottom of the backing plate
and replace the retracting spring
At this point you can install the shoe retainer on the right hand shoe. (have the money handy)
When youve got that done put the drum back on and wind the screw back in, tighten it up Dont loctite it. Stick the nose of the cable through the hole in the seat box.
with one pair of pliers pull the nose of the terminator out and sneak under it with the needle nose pliers pull the cable though as much as you can.
release the handbrake lever to the lowest position you can get it to, align the terminator with the holes in the handle
and insert the clevis pin and then split pin it.
Duck under the vehicle and adjust up the shoe position adjuster untill the shoes juuust touch the drum.
If needed you can now also adjust the handbrake adjuster under the seat box 17+15mm open end spanners but I have never had to adjust the cable on replacement.
If thats all your doing, reattach the prop shaft and take the vehicle for a test drive.
Next Re UJ'ing A propshaft.


 [/ame]

 [/ame]
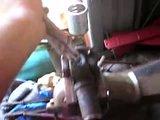 [/ame]


Bookmarks