-
13th November 2014, 09:31 PM
#381
Lookng good
Looking very good.
Dennis
-
14th November 2014, 05:16 PM
#382
My day was put into dis-array today, short staffed at work so off to work @ 0540hrs, finished @ 1230hrs then to a work colleagues funeral @ 1300hrs, very sad way too young to die @ 54yrs.
Anyway after a cup of tea at home, I fired up the compressor, mixed the Silver paint to apply to various items

then clean the gun and do the same with some DBG

you get the idea, Silver on the side that goes with the Galv finish and DBG elsewhere, I also did some Black & DBG as well, I still had some DBG over and I had found these 2 Pyrene fire ext/brackets so a quick grit blast etch prime and paint them in DBG

now I just need to dis-assemble the gun and clean it out, cheers Dennis
-
15th November 2014, 01:59 PM
#383
Another short day of play, car club meeting this afternoon @ 1700. I did manage to get through what I had planned to do though.
Mick Jagger has come to Cessnock, but I told him I was too busy to meet him LOL.
This morning I re-assembled the choke cable mechanism

to put it back together the big hex/nut has to be slid along as the cable goes through, then screwed up so far, until the pin on the warning light bar lines up with the hole in cable body, when it does you can then re-crimp the bar into it's sockets

then attach the electrical switch to the body of the mechanism, it's way too fiddly to try and fit it in-situ, here it is all connected up

The bonnet was the next item for today, it has been resting on the bonnet of 113-372 for the past few weeks, so into the box with all the nuts/bolts etc to get the bolts that have been painted for the job, fit the hinges, then I dragged out these new rubber buffers that I purchased from Dunsfold last year

you can see the undersides of the washers are painted flat black just to help against electrolysis (they were also etch primed beforehand) now all fitted, bonnet in place

anyway that's been my day, cheers Dennis
-
16th November 2014, 08:06 AM
#384
Thank you Dennis, for the close-up of the choke / switch, way better than any drawings from manuals which I have seen. Also thanks the many of other items you have gone to the trouble of documenting so that others like myself, following will have a heads up start.
I am on a steep Series 1 learning curve and your detailed account of your build is excellent. This is still a long way off, but am trying to get my head around as much as I can will limit the surprises later on. Some months ago when I first read about the 'Mixture control light' I thought what the heck are they talking about. Things are slowly falling into place.
Erich
-
16th November 2014, 08:36 AM
#385
Many thanks Erich, but mate I'm still learning as well LOL cheers Dennis
-
21st November 2014, 06:23 PM
#386
I have been busy doing other things Land Rover, getting ready for rego day tomorrow, but in the meantime I tracked this item down at a mates place

and the good part about it tis free.
While I was there I managed to get the missing windscreen alloy angle supports for the glass, I was missing 3 of them

they have now been grit blasted and painted in DBG
the 37 screws that hold them were a tad ordinary and again I was missing about 15 of them, so I checked and they are the same size as the screws in S2/2A, here they are all lined to up n grit blasted

and again painted in DBG,

well that's been my very HOT day 40c, cheers Dennis
ps thank you Tony & the other 2 Ozzie forum members who answered my question in the UK Series 1 site, cheers,,.
-
22nd November 2014, 12:24 PM
#387
I'm attempting to right the wrongs of a few weeks ago

I'm just having lunch then I will mask up the inside of the tub & etch prime it, cheers Dennis
ps here it is all masked up n etch primed, now to rub it back in the morning and maybe if I get the courage to splash about some DBG

-
23rd November 2014, 05:32 PM
#388
A scorcher of a day here, topping @ 43.2c, but as always the job goes on.
I have sprayed the 2 doors for their first coat of paint

a light rub back about mid week and recoat them, the tubs sides coat another coat of DBG as well, at least no runs this time as I used my Iwata gun.
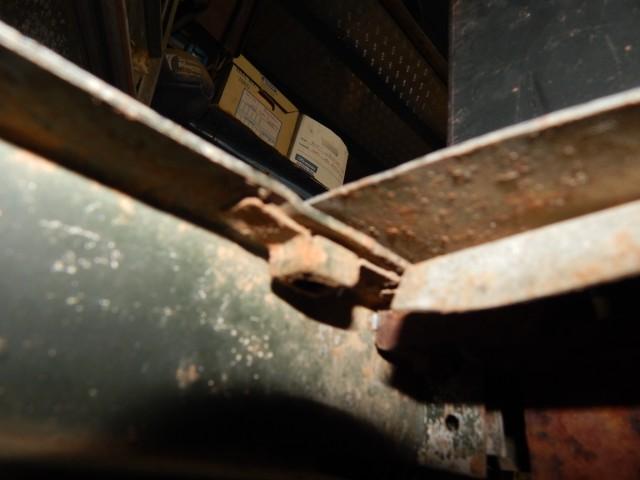
I had an early lunch and then fitted the 2 sill rails LHS first, then RHS, then after fitting 5 speed nuts to the base of the seatbox, I lifted it into place

it is held in situ by 6 bolts ATM, this is when I discovered that the footwell replacements made & welded in by the prev/owner, are incorrect, as it doesn't allow the sill rail to sit up against the base of the seatbox and the footwell plates

the image I really wanted people to look at is so bloody small that you can't see it )(*^%$$, anyway I think that the 90 deg bend at the bottom of the footwell plate must have to be recessed to allow the sill rail to sit up close, can anyone confirm that for me.
Now isn't this a tad looney maybe the heat got to me, but all screw slots will be vertical in this vehicle

later I found that I didn't have any screws to secure the seatbox base to the sill rail, so into the shed and found enough screws washers etc to do the job, all washers etc were grit blasted etch primed n painted DBG n Silver

anyway that's been my day, it's raining here atm cheers Dennis
-
25th November 2014, 03:46 PM
#389
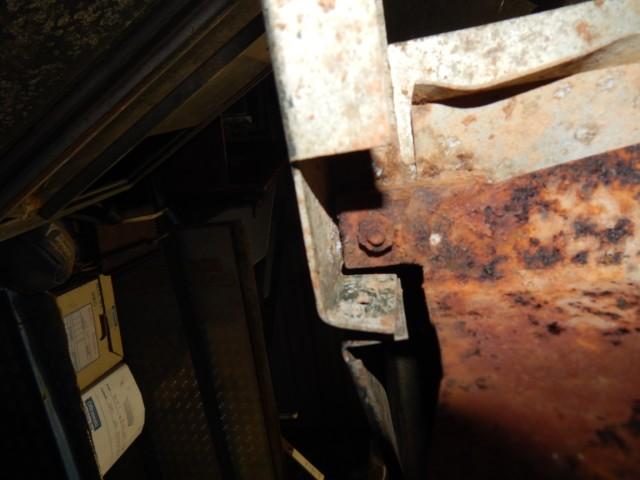
Hopefully this image will come up at the correct size

what I need to know is the edge of the fold on the footwell relieved, so to allow the sill rail to sit up higher??, anyone got an image of same, cheers Dennis
ps Thanks Matty G for the images that you emailed.
-
25th November 2014, 09:27 PM
#390
Is this what you want. The opposite side though from an un-restored 53 I have in the workshop, The front edge on this is a bit bent,
Erich
 Posting Permissions
- You may not post new threads
- You may not post replies
- You may not post attachments
- You may not edit your posts
-
Forum Rules
Search AULRO.com ONLY!
|
Search All the Web!
|


 Reply With Quote
Bookmarks