-
18th March 2012, 07:38 PM
#1
Panel beating a 2A roof
On my S3 project I decided to have a truck cab, so that the car could become a useful utility; the only problem being that both cab roofs I owned were severely beaten about by years of negligence.
I should point out at this stage that I am not a panel-beater by trade and what I know is bugger-all; however; I was taught the rudiments by a dear friend now deceased, who spent several years of his youth in a panel shop in Melbourne just after WW2. What he didn’t know about panel-beating cars of that era and fabricating new panels wasn’t worth knowing. Mind you he used to tell me he knew nothing compared to his mate, who once made a pair of front wings for a Ford 10 car in 3 days from flat sheet, if my memory serves me correctly.
Hopefully; anyone in the trade who reads this, can point out the error of my ways and tell me the proper way to do things.
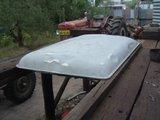
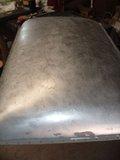
Here is the before shot. First step when beating any panel is to make sure that it is securely held by something so that the pressure exerted on the dolly doesn’t push the panel away. In this case my car ramp was the perfect size and height; I secured two pieces of 90 x 45 pine to the roof base using angle brackets, tek screws and the original mounting bolts between the roof and the cab back.
At this point my son arrived with his cobbers and the apprentice panel-beater amongst them, told me that I couldn’t beat aluminium – his boss said so! Having beaten the front wing on my 80”, I knew this to be bulldust, so I kept quiet while at the same time lamenting the state of apprentice training in this country!
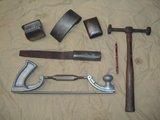
Tools for the job: top to bottom dollies; slapping file; body file; hammer . The dollies were an el-cheapo set I bought when I was young and they were poorly finished, so I filed and sanded the working face so that it was no longer flat but instead slightly convex. Dollies: left-to-right: used for most of the roof top; used for the front edge above the windscreen; used for the sides and back edges.
The slapping file is made from an old 10” or 12” bastard file and bent to shape when hot and with the tang cut off; there is no need to heat treat it afterwards; a bit of plastic hose makes a comfortable handle.
The body file has a dreadnought tooth and is the best way to file soft metals and plastic filler; it is used to lower very slight high spots and to help find areas of the panel which are too high and have to be shrunk, or low spots, which need more stretching.
The hammer was my Dad’s, it is beautifully light and well-balanced. Shop around for a similar one; the cheap ones are usually far too heavy to be comfortable for continuous use. The best thing is to go to the shop and feel it; the rubbish in auto-stores and on ebay isn’t worth considering. Sykes Pickavant make nice tools but there must be heaps more out there.
PREPARATION
Most books on the subject say to get all of the paint off first but I have found that this is not always necessary, especially with the older types of paints. Acrylics are a bit too tough and need to be removed first. The back of the panel needs to be cleaned of dirt; underseal; etc.
If there is a very deep dent then it needs to be bumped upwards, by gently thumping it with the appropriate dolly; start at the edges and bump your way around the outside of the circle until you reach the middle in a spiral path. It is most important to take it easy and not try to achieve a good level; vigorous bumping might stretch the panel too much and leave it with an ugly and hard to fix high-spot.
Low spots that are about 2-3mm deep will probably respond to a hammer and dolly without prior bumping.
Finding a low spot can be rather tricky when it is not very deep so the first skill to master is to feel for a low, or high, with the palm of the hand, not the finger tips. When you are learning, circle what you think is a low with a pencil and then test it by using light strokes of the body file in two directions. The file will find high spots by cutting the metal or paint. Better still get someone to teach you who knows what they are talking about.

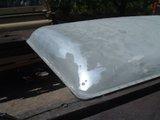
Here I have started on the end of the roof; the low spots are still painted.
It will be impossible in this article, to describe how to panel beat to someone who has never done it before but some general hints and steps may prove useful. The dolly used must fit the curve of the panel as closely as possible. Whilst upward pressure is exerted on the edge of the low spot with the dolly, the other hand strikes the place where the dolly is pressing with either the planishing-hammer, or the slapping file. I use the slapping file because it seems far easier for me to hit the right spot and the worn-out teeth on the file leave useful marks on the paint, or metal, to let me know if I got it right. As with bumping, start on the edge and work your way slowly around the edge, spiraling into the centre. For your first try, pick on a dent about the size of a 20 or 50 cent piece. Don’t rush things and check your work frequently during the spiral with the body file, to see if the metal is coming up. If the panel doesn’t respond, try again using more pressure on the dolly.
This aluminium roof was very easy to stretch compared to the steel bonnet on my Bedford and required moderate pressure.

Several days later I have beaten my way around the roof leaving the enormous and deep low in the middle; so this is consistent with the principle above – to beat the edges up first.
Once you have beaten up an edge, it is time to run the body file along the panel – previously I had been filing at 90 degrees to the gutter, towards the centre of the roof – this will reveal a rather depressing succession of lows. In other words, the lovely looking edge is rather wavy along its length. This is normal and nothing to be alarmed at; I circle the lows I discover with a pencil and start beating them up same as I did before.
Time to pause and talk about filing. The body file must be sharp and feather-light hand-pressure is all that is required. Heavy pressure will damage the panel badly, or write-it-off by putting a hole in it. Remember the file is used to locate high spots not to remove them. Mine is an adjustable file and for this exercise I set the blade to be straight.
Several more days of hard-yakka and the low spot has shrunk a bit; however my arms were not long enough to reach the middle, so I had to modify the timber support so that I could gain some vital millimetres.
Time to talk about high spots that need shrinking. Sometime in the process you will unintentionally create a high spot; this can be a mini-disaster but it is possible to fix them.
On a steel panel, the high can be heated with an oxy torch to create a red spot about the size of a 5c piece. Whilst the helper does this, the beater has to draw the metal into the centre of the spot using glancing blows with a hammer, while supporting the metal with the dolly, As soon as the redness goes he drops his hammer and quenches the spot with a wet rag, which aids the metal to shrink back into place. I have only achieved this successfully once, but my cobber used to take several attempts at the same spot until he was satisfied.
On aluminium I can offer little useful advice, except on high spots, which are not too high. The Rover roof was very forgiving and where I made highs in 3 places, I was able to knock them down by using the slapping file and dollying-off. Dollying-off, is when the dolly is placed just to one side of the high and the metal is bumped down gently, with checks after each blow. Sometimes I have found it to work well, by holding the dolly under the high but not quite touching the metal. The Rover roof is easy to do!
The end is in sight, or so it seemed, but I had come to an impasse because by myself I couldn’t put enough pressure on the dolly to lift the middle bit. Fortunately, my daughter and her boyfriend arrived for Xmas and I pressed the poor lad into service. He sat under the roof in the shade and I reached under and touched where I wanted him to press the dolly. When I saw the panel lift, I whacked it with the slapping file and it worked extremely well. Over about two days we got rid of 90% of the large low spot in the photo.
It is important to point out, that right to the end, I was still bumping up the deep lows with the dolly and then beating them up, using the methods described earlier. There are no shortcuts in this game.
For a bit of light relief and to rest the aching joints in my elbows, I went back to the edges and did all of the bits there and then I went over the whole roof again; starting down low and working my way around and up, until I was happy that the basic shape was as good as I could get it. I used extremely light strokes of the file in two directions to help identify the lows; when the file marks became too numerous and confusing I sanded the roof with an orbital sander and then checked again.
How easy it was to say that but it took me days to accomplish it!
Finally, I had it how I wanted it, with about 75% of the surfaced marked by the body file and no unmarked area greater than about the size of a 5c piece. I tested how deep the low spots were with a straight edge and feeler gauges and found them to be between 0,05 – 0.09mm deep.
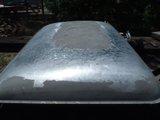
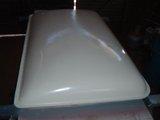
This photo shows the lid un-riveted from the base, just before I glued it back on with Sikaflex seam sealer and new pop-rivets. Unfortunately the Sikaflex went off along the front gutter before I could wipe the excess off, so it looks a bit messy.
I decide to experiment when painting it by not using body filler, except on one or two spots where the dolly wouldn’t fit; the experiment being to see if spray-putty alone could fill the depressions.
So the order of the day went like this: final sand and Prepwash; filling as above; etch primer; spray-putty; spot-putty; primer-surfacer; three coats of acrylic ivory with sanding and prepwash between each operation of course.
Unfortunately the spray-putty alone wasn’t enough to get a perfect finish, so the roof has plenty of dimples but it is an accurate representation of my best effort at panel beating.
What the exercise has taught me is that even a very poor roof can be restored relatively easily.
My next project is to make a tropical roof out of the other roof I have, but I will book myself into a course where I can be taught to use the English wheel, which hopefully will be much quicker and less painful.
And remember – you can’t panel beat aluminium!
Cheers Charlie
-
20th March 2012, 08:46 PM
#2
Another Inspiration
Thanks Charlie for another awesome post, you really help with how you explain and show what to do. Thanks for taking your time to put things together in a post that is so helpful.
I will definitely come and have a chat with you one day but it always seems to be late at night when I come through Narrogin.
It would be nice to have a break from funerals, I have had so many including my dads last week and now 2 more in the next few days. It has been good to come on here and read about something I enjoy (Did I say that) and be distracted from all the sadness. Thanks Everyone for what they contribute on here.
Cheers Konrad
 Posting Permissions
- You may not post new threads
- You may not post replies
- You may not post attachments
- You may not edit your posts
-
Forum Rules
Search AULRO.com ONLY!
|
Search All the Web!
|

 YarnMaster


 Reply With Quote
Bookmarks