

 Reply With Quote
Looks like a couple of good projects there
Pleased to meet you both at the Expo, helps to put faces to names.
Keith

 ChatterBox
Well, we have "joined" the Series restoration club. There are no doubt many projects in various stages of completion and many others waiting for a start in all corners of Australia. Ours will be a slow and careful restoration.
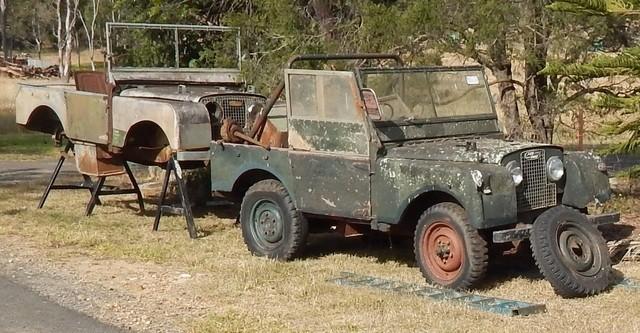
About 2 months ago, we purchased two Series 1’s.... a '51 (no running gear) and an incomplete 1.6 engine. The second was a '53 (almost complete) with a Holden engine, but missing brake components. Both vehicles are 80 inch. The plan is to restore them both, overhaul all mechanical parts back to good working order (not necessarily new), replace bushes, seals,… but keep the appearance in their ‘USED’ state.
We will start with the '51 model first.
Our first priority was to get the vehicles under cover and make the '51 mobile (so I plonked it onto a D2 rolling chassis because I had a spare one) as it came without running gear. Then to set up a working space, shelving, storage area, molasses tank, tools, …… Also on a steep learning curve here. I will be asking heaps of questions, but not without prior research
The 51 model on a D2 chassis
Both the Land Rovers had been sitting under a tree for many years, the spare tyre recess was completely filled with composted leaf litter as was the tub. Having said that, it is amazing how well the car is preserved, The firewall is rust free as far as I can see, and I have yet to find any rust holes in the chassis.
Our first purchase was a spare parts manual and James Taylor’s guide
Erich
YarnMaster
SupporterLooks like a couple of good projects there
Pleased to meet you both at the Expo, helps to put faces to names.
Keith
ChatterBox
Keith, it was nice to meet you and your wife as well.
This restoration will be the biggest rebuild we have done so far. Anyhow, we are not in a hurry. A very new learning curve for me, but something I hope will give me great satisfaction in the long run.
Cheers Erich
TOriginally Posted by Bundalene

wo great minds at work here
")
Swaggie
Hmmm, I like your thinking here Erich!
Cheers
Slunnie
~ Discovery II Td5 ~ Discovery 3dr V8 ~ Series IIa 6cyl ute ~ Series II V8 ute ~
Wizard
Have to agree, d2 running gear (with CDL) and S1 body. Classic but modern.")
Wizard
SubscriberI think it may need some flares on those guards though.
'51 Series 1 80"
'12 Defender 90
ChatterBox
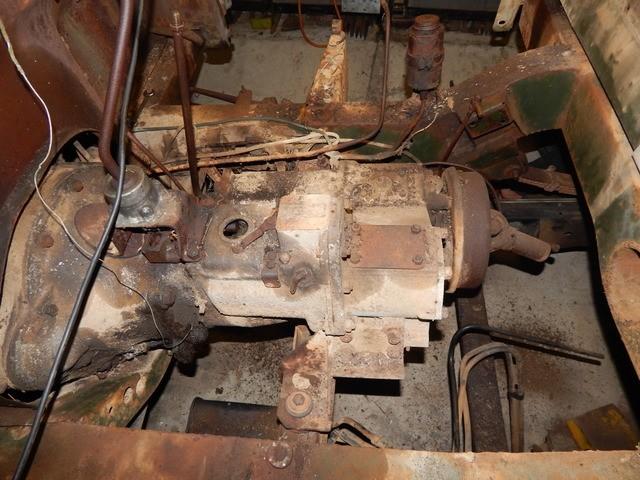
We have spent many hours stripping the 51 Series1 with little to show. I have been spraying WD40 on every visible bolt for the past few weeks, not sure if it has helped that much. We are trying to remove and save every original bolt possible and not damage anything in the process and avoid drilling and tapping too many holes down the track. This is an extremely slow process, yesterday it took me 2 hours to remove the last screw on the instrument panel, but what satisfaction when it finally undid
We lifted the drivers floor anxiously but were pleased to find all brake components appear in original condition and hopefully restorable. Interesting to figure out how it all works, including the likes of the brake pressure switch for the brake light.
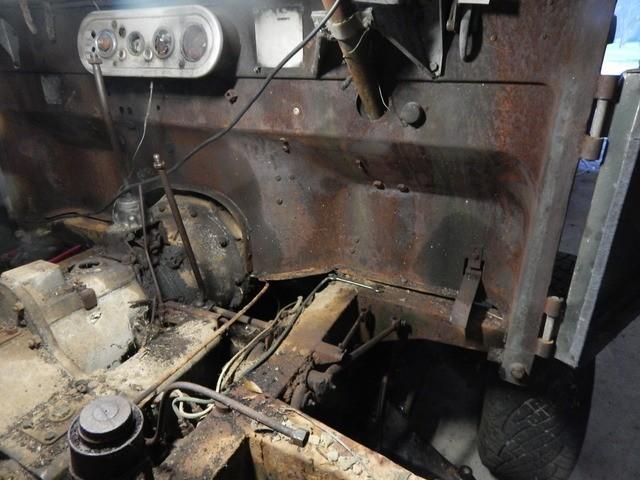
The shifter was completely seized but with coaxing for some time it came good. The seat box was a pain to remove as it had been installed with 13 non original and completely rusty gutter screws holding it to the rear tub. These took hours to grinding away the heads of the screws as not to damage the seat box or rear tub
Gutter screws. 13 of these took about 4 hours to remove as not to damage the seat box / hinges nor rear tub.
All labeled to be re-installed at a later date
Erich
ChatterBox
I thought you would get a kick out of that - and mounted back to front at that.Still with the ACE controller visible on the chassis rails.
Erich
YarnMaster
Nice find Erich!
You are probably doing this already but I have found the following very useful to help put it all back together;
1. Takes heaps of photos - close-ups and distance.
2. Create a Word document with interesting points, under sub-headings, such as paint colour; numbers; businesses that can supply parts; people; etc.
3.Collect plastic screw-top containers such as pill-boxes; fruit jars; etc. Label the lid with a felt-pen and keep as many of the parts from a sub-assembly in it, ready for reassembly, or restoration. they can be re-used for the next time and if they fall over, the parts don't get lost.
4. Use a molasses bath to de-rust things gently and completely. For the first two years when I had no money, my S1 always had something de-rusting; being painted; or being stowed away for the big day when it could be put back on.
Have fun - so far your approach has been very sensible and thorough!
Cheers Charlie
 Posting Permissions
| Search AULRO.com ONLY! |
Search All the Web! |
|---|
|
|
|


Bookmarks