

 Reply With Quote
They are on mine. Over the door, in fact there is still a short webbing CR strap hanging on there now.( but I can't see any on the D1)
Have another shufti.

 ChatterBox
I too bought a second hand Milford cargo barrier for $120 and then the quote to fit it was $320 from ARB---so it is still sitting in the garage. They told me there is quite a bit of work in removing trim etc. hence the cost. ( or maybe they just don't like Landrovers
)
If you want to fit it yourself you will need the re-fitting kit ( I think it is just some rivnuts and some plastic panels to mount the top of the barrier) you can get one from Milford ...(about $75 I think.)
I think I'll take another look at british4wd's idea of using the child restraint mounting point ( but I can't see any on the D1)
Cynical Moi?
They are on mine. Over the door, in fact there is still a short webbing CR strap hanging on there now.( but I can't see any on the D1)
Have another shufti.
ChatterBox
Oh yeah I see em nowOriginally Posted by 4bee

Wizard
I've also emailed Milford... but not holding my breathfor them.
WOW ! ! !
My E-mail enquiry to milford was forwarded to
Kentone Distributors
1/12 windsor rd croydon
Greg has replied and will fax the instructions to me tommorrow. Price for fitting $110.00... plus long brackets for front mounting... plus whatever I'm missing ???
(note * waynep... might be a possible for you ... or PM me a fax no and I'll forward the fax to you too)
Good service (so far)
Stevo
Wizard
G'Day again
I got my instructions by fax as promised (very impressed and with thanx to the local distributer)
I'm missing a couple of mounting plates, but have decided to make my own for through the floor. They'll also be a bit more substantial than the ones in the kit and I'll make them waterproof as well. I need to make 4 x so I'll have the option of either mounting position.
I've scanned the instructions and put them into a .pdf so if anyone wants them emailed (waynep??) send me a pm. with your address..............or maybe they could go on the downloads section on this site (2.77mb)
here goes.... wish me luck
photos of one installed would still be great if anyone can help, especially with the top mount and extensions (dimensions too)for mounting infront of the second row of seats.
Thanx all
Stevo
SysAdmin (Owner)
feel free to meail me a copy thanks :P and i will place it in the downloads section
dave@davecandoit.com
2007 Discovery 3 SE7 TDV6 2.7
2012 SZ Territory TX 2.7 TDCi
"Make the lie big, make it simple, keep saying it, and eventually they will believe it." -- a warning from Adolf Hitler
"If you don't have a sense of humour, you probably don't have any sense at all!" -- a wise observation by someone else
'If everyone colludes in believing that war is the norm, nobody will recognize the imperative of peace." -- Anne Deveson
“What you leave behind is not what is engraved in stone monuments, but what is woven into the lives of others.” - Pericles
"We can ignore reality, but we cannot ignore the consequences of ignoring reality.” – Ayn Rand
"The happiness of your life depends upon the quality of your thoughts." Marcus Aurelius
Cynical Moi?
I'll see what I can do with some images when SWAMBO comes home later on today.
By now, you may have worked out that the 'Front' position uses the barrier bottom tabs screwed to the front floor mounting points & the top is where the extensions are used to allow the barrier to move forward to the new position but still using the rear top points.
Moderator
Email Milford Industries, they will send you a copy of the fitting instructions. They did for my Fender. The Disco is a little harder than the Fender but should only take you a day if you plan it. When I bought my Disco in 97 ARB supplied the barrier and quoted $50 to fit it at their Kalgoorlie agent. Took 2 blokes all day to fit it, and were they ****ed that they were only going to be paid $50. This is were the Disco fitting price went up. Neatest job I have seen though, absolute minimum cut out of trim. The hardest part is the internal trim has to come off and according to the guy that fitted it the top arched windows had to come out. Do not really see why. I fitted mine to my Defender in about 5 hours. measuring up, marking the trim, removing trim and cutting with a jigsaw, mounting brackets on the roof rail and installing. Took about 1 1/2 days to fit the cargo barrier and drawer system, taking it easy.
2011 Discovery 4 TDV6
2009 DRZ400E Suzuki
1956 & 1961 P4 Rover (project)
1976 SS Torana (project - all cash donations or parts accepted)
2003 WK Holden Statesman
Departed
2000 Defender Extreme: Shrek (but only to son)
84 RR (Gone) 97 Tdi Disco (Gone)
98 Ducati 900SS Gone & Missed
Facta Non Verba
Cynical Moi?
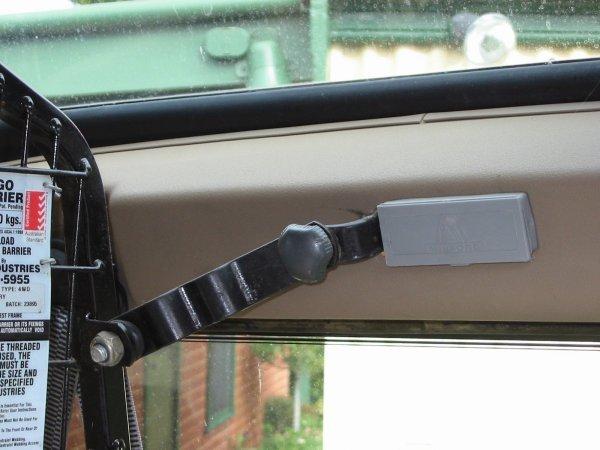
Two images. I don't know if they'll be much help though.
Extension is 50 cm long.
Wizard
RHS Top mount in
I've been on this forum enough to know it's nothing without a photo
looks just like yours now 4bee. thanx for the photos
Q. how does the 50cm extension bar attach to the mount and bracket?
I didn't realise that the forward mounting position was still behind the back seats, only that they're folded up when using the barrier there.
Well let me say..... it's a fiddly job, sore knees and back from being crouched over in the back....... but it's acheivable so far.
The steel bar I bought this morning is a little too wide to fit in the ribs of the floor and because I want it to be watertight I might have to leave the two sets of floor mounts till next weekend.
continuing with the LHS now
 Posting Permissions
| Search AULRO.com ONLY! |
Search All the Web! |
|---|
|
|
|
")


Bookmarks