

 Reply With Quote
you know me baz, would not let a drop of beer touch my lips with this body of a temple i have got going here.
will have to get someone else to be the guinea pig.
i may or may not be telling a little porky in the above....

 Master
Sounds good to me! My grandfather was born and bred in Murgon but has lived in Brisbane since just after WWII. He used to take me up that way lots when I was younger and we still have a few relatives in the area, stretching up to Goomeri/Cinnabar/Kilkivan way. He's too old to drive himself that far now but still loves visiting, so it sounds like I need to organise a week end away with him to drop in on a few peopleOriginally Posted by bell1975

.
Wizard
you know me baz, would not let a drop of beer touch my lips with this body of a temple i have got going here.
will have to get someone else to be the guinea pig.
i may or may not be telling a little porky in the above....
Master
Here is the temperature controller that I mentioned in my other post. To wire it up just needs a couple of plugs and whatever length of wire you need to locate the controller where you want it in relation to the power source. And of course a box to put it all in. I used a project box like this. I can't recall the brand but the price was about $15. If you want to get fancy and make it weatherproof you'd need a few of these cable glands. I can't recall the brand I had at hand - leftovers from some other project but they're available from most hardware stores or electrical suppliers.
The Brew-in-a-bag method is outlined here. Convert your gallons to litres and it's a great reference with pictures.
Master
Also good tip is go to the local beer shop and get yourself a second fermentor , once your beer has stopped fermenting syphon it out and into a second fermentor leaving all the sediment in the bottom of the first one,
this gives you minimal sediment in your bottles. and alows you to get every last drop of beer out
Also have a read of Bulk priming, google it , it's much easier to do rather than adding carbon drops to every bottle and gives for a much more consistant carbonation.
Try here for some recipes once you've got the hang of it
TastyBrew.com | Recipes
Can/Kit Recipes - Australian Beer Forums | Beer Guide to Australia
also a good book to read which i found very helpfull is "How To Bew" by John Palmer
best of all don't stress while your doing it, follow instructions and SANITISE everything.
Wizard
Supportermy 2 bob's worth. Some thoughts after 10 years of brewing and many failures.
I reiterate the sanitation principle. Rinse your bottle(s) the night of drinking and spray it with a hydrogen peroxide solution (mixed with water at 1 cap to 1 ltr of water) and leave upside down to drain. The peroxide solution will kill and (subject to storage) leave a residual in the bottle to fight off wild yeast, mold and bacteria. Store your bottles upside down so dust and air borne yeast & bacteria don't drop into it during storage. The peroxide solution can be bought at most home brew stores. Two squirts from a atomiser bottle should do it.
A bench top capper is a must. It should avoid the broken neck problem, the not sealed properly problem and most important the whacked thumb/hand problem.
I concur with the syphoning practice. Make sure you sanitise the second fermenter. At the same time mix 2 tea spoons of gelatine in a small amount of water and drizzle evenly over the brew in the second fermenter before you seal it. The gelatine acts as a clearing agent to pull solids out of solution as it drops to the bottom of the fermenter. Home brew stores will try to sell you "something" moss which is a more expensive product that does the same thing.
I concur with the comment about brewing at the lower end of reco temp range for that yeast. Slower fermentation results in a better beer. Also means that the yeast has more time to eat the sugars which reduces the risk of explosion. When priming, err on the conservative side of dosage if the hydrometer is showing residual solids (sugars). Reduction of risk of explosion during storage. I have beer stains up the pantry wall as a lesson learned the hard way. Nothing puts the willy's up you more than being fast asleep and in the dead of night a bottle or two going off in the house. After a few explosions you will know the noise and just roll over rather than jump out of bed with bat in hand looking for the intruder.
If your patience permits, brew your dark beers (ie stout, old or porter) in summer because they like warmer temps and your light beers (pilsner, lager) in winter because they like cooler temps. The alternate is the heater/temp controller that Bell 1975 spoke about. An alternate to that system is a thermometer that is sold at pets stores to regulate the heat in fish tanks. The better units have a temp controller inbuilt and are accurate. Drill a hole in the lid, install with a rubber grommet and bob's your uncle. So long as the probe is submerged at the required depth stated by the manufacturer, it works a treat. That said, that system doesn't overcome ambient temps higher than the desired temp. I've known people to brew their lagers and pilsners in an old fridge regulated at about 8-10 deg C. Takes space to be that sophisticated. The end product is well worth it.
I'm a fan of kegs. The recycled 19 ltr coca cola kegs are a treat and 2 fit neatly into a small (not bar) fridge. They sell for about $90 each from a home brew store and on Ebay. That said, some homebrew stores like Dave's homebrew in North Sydney (NSW) sell squatted kegs that fit in a bar fridge.
I was set up (still am set up but unloved) with 2 kegs in the spare fridge with a gas line to a 6 kg CO2 keg external to the fridge for pressurising. Two beer lines ran to two beer taps mounted on the outside of the fridge. Pulling beer was no different to that at the pub. I brewed a dark for one keg and a light for the other. The set up with a second hand fridge is about $450/500. One 19 ltr keg is about one brew in a standard fermenter. As an aside, go the larger size fermenter. The extra head room means you can brew slightly large batches and in summer when the fermentation is vigorous, the pressure valve doesn't gunk up with the brew that froths up. If the brew gets into the pressure valve liquid it gets attacked by wild yeast. If the temp drops and the vacuum sucks some liquid out of the valve into the brew it will spoil your batch with wild yeast. While on the pressure valve topic, use the hydrogen peroxide solution from your atomiser not plain water. It will ensure any wild yeast are killed and kept outside the fermenter.
I like kegs because, as you will soon learn, cleaning bottles for an hour or two before bottling is a pain in the rear. With the kegs while it is pressurised with CO2 it is sterilised. When the keg is out, rinse it with the hose, a little pink powder and water swished around to kill off the nasties and strip the old beer from the keg. Flush with water, then some hydrogen peroxide solution sprayed in the keg and fill with next batch. Cleaning and filling is less than 10 min.
The beer lines and tap heads need regular cleaning as tea leaves as they are affectionately called will grow on the sugars left over on the tap spout. If you drink frequently there is less chance of build up. It's a good idea to run a keg full of pink powdered solution through the lines after each keg (or every second keg if a prolific drinker) to ensure your lines are clean and the beer flavours are untainted.
Moving to the beer. After you get a system and you think you have nailed the brewing process without any (and there will be some) further F ups try the home brew wet packs from the likes of The Country Brewer. They are a mid way between the fully processed can of wort you buy at Coles/Woolies and a scratch batch which involves a day to do end to end. They are a superior product and with a little experimentation you can completely alter the character of the beer. They are more expensive than the woolies cr@p. But not prohibitive (about $40/45 for a batch) and are good value compared to commercial beer. A batch that yields 2 cases will cost less than a case of commercial beer from the off licence.
closing words. Coopers stamp their bottles with "best after" not best before. Aged beer, like aged red wine, is a better product. Show patience and let it sit for at least 6 months to allow the malts and flavours to mellow. The kegging process (for reasons unknown to me) expedites the maturation process. Thus 2 weeks in the keg is normally enough maturation.
All that said and my pearls of wisdom exhausted, you have inspired my to pull my finger out and sell off my kit. I'm no longer drinking enough beer to justify the effort and space it takes up. Look out for it on ebay soon. I'll post a heads up in the market place when listed.
Happy brewing, happy drinking.
cheers MLD
Master
What a wealth of knowledge! It's a shame that you're giving up MLD.
To newcomers, don't be daunted by the above information. MLD would be making some serious, serious quality beer.
The simplest brew in my opinion, and therefore a good place to start, is a basic ginger beer. Grab a Coopers (preferably) or Brigalow can from Woolworths/KMart/etc, one kilogram of raw sugar, and dissolve in hot (not boiling) water in the fermenter and then top up to the volume at the temperature stated in the instructions on the can. $12 - $13 will give you just over two cartons of mid strength ginger beer. This is cheapest, simplest, and one of the most popular brew I make.
James.
Swaggie
SubscriberMy advice would be this, once you get the hang of brewing, move away from bottles and go to a keg setup, it is so much easier and a lot less washing involved, basically you only have ONE bottle to wash (or two if you have two kegs) I have 5 kegs, one 10lt, 3 19lt and one 45lt keg, I have 2 fridges, my daughter brews ginger beer and I brew beer and distill whiskeys.
My setup is in the what's your setup section at the top in this forum, if you want to have a look.
http://www.aulro.com/afvb/tap/122525...bar-setup.html
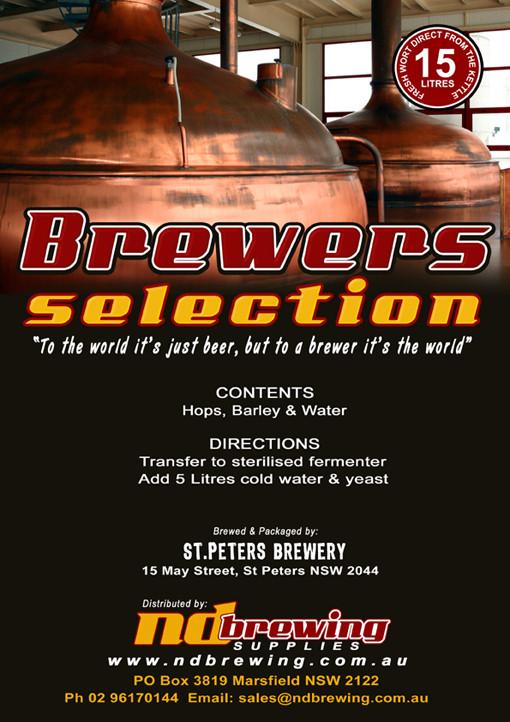
In my opinion the easiest brew to do is the brewers selection worts, from the St Peters brewery in Sydney, these only require adding the correct amount of water and yeast.
The direction are on the front, you can't get any easier than these, and they are extremely good tasting beer.
I always get one of these, and have never had one fail yet.
A link to the selection of beers they do
http://www.ndbrewing.com.au/index.ph...selection-kits
Baz.
Cheers Baz.
2011 Discovery 4 SE 2.7L
1990 Perentie FFR EX Aust Army
1967 Series IIa 109 (Farm Truck)
2007 BMW R1200GS
1979 BMW R80/7
1983 BMW R100TIC Ex ACT Police
1994 Yamaha XT225 Serow
Wizard
Wow, it does seem really involved, is there any Aulro members that live in the south east of melb and wouldn't mind showing me how it all works next time they do a brew
Cheers matt
Swaggie
SubscriberHi Matt, in the Coopers start up kit is a video, it shows you how to get your first brew going.
But your best bet is to go to your local brew shop, they will show you how to do it, it is easy, it's just the cleaning procees that can be a pain.
What I do when I bottle is I put the bottles and stirring spoon in the fermenter and clean both at the same time, then I rince everything thoroughly, let them drain and then your ready to go.
Use a good quality yeast, Safele 04, 05 are good ones, follow the basic direction on the pic above if doing that beer and you can't go wrong, it's that easy, it's like making a cup of coffee
Baz.
Cheers Baz.
2011 Discovery 4 SE 2.7L
1990 Perentie FFR EX Aust Army
1967 Series IIa 109 (Farm Truck)
2007 BMW R1200GS
1979 BMW R80/7
1983 BMW R100TIC Ex ACT Police
1994 Yamaha XT225 Serow
 Posting Permissions
| Search AULRO.com ONLY! |
Search All the Web! |
|---|
|
|
|

")
Bookmarks