


 Reply With Quote
If you have enough bending to make the trip up to the Hills worthwhile, I have a metal brake to bend sheet metal up to 2mm thick, up to 1200mm wide. I think it does aluminium up to 2.5mm thick.
You are most welcome to use it.

 Master
I used to have a dash mounted compass for years in my car at homeOriginally Posted by Sleepy

It's a great solution I think, and far more solid than the original lining. I'll post more photos once I have it lined with marine carpet, but I think it's going to look pretty good.Love the mdf solution for the roof lining - I may try this myself.
Tools and equipment, that's what it comes down toI would have thought with your skills you could manufacture an access door to replace those back windows. (A couple of struts, lock, sheet of ally.....)I have limited metalworking gear available to me, and trying to make up a panel out of sheet metal, complete with a lip, rubber seals etc, that actually seals against the elements properly is not easy with a cheapo Bunnings arc welder and nothing to fold sheet other than a lump hammer. Plus, I have never welded ally, and it's not something you pick up overnight.
Swaggie
SubscriberIf you have enough bending to make the trip up to the Hills worthwhile, I have a metal brake to bend sheet metal up to 2mm thick, up to 1200mm wide. I think it does aluminium up to 2.5mm thick.
You are most welcome to use it.
Master
I used to have a similar consul in a nissan i had, it had foam around the edge under the carpet to make it padded so you would not hurt yourself if you went forward and hit it when off road.
Master
I'd like to do something like that. I'm just not sure how sticking carpet to foam to timber would hold up. Don't the manufacturers use a special foam backed lining??
Master
Hi Mike, they use a special thin carpet, your local motor trimmers would be able to put you on the right track, it moulds easily over the corners and foam, it's a nylon and is more like a material. Had some in the garage but cant find it, was going to post up a pic, There used to be a company advertising on the 4wd action magazine 3 or 4 years ago roof consuls with the fabric on them, i think ARB stores sell them, same material.
worth a try.
Master
Apologies for the lack of updates this past couple of days - real life had to take over for a bit. Anyhow, despite appearances, I have been working away in the background, getting some of the crappier jobs out of the way.
The biggest job has been preparation - I've wire brushed back the front bullbar, spare carrier, roofrack, and anythign else that is up for spraying. Weather conditions haven't really been suitable here though - too hot, too windy, too wet, so it's a waiting game now.
Another job that worked out better than expected was a winch rebuild. I picked up a non working Warn M10,000 for next to nothing a couple of months ago, and it's been sitting in the shed since. Seeing as I had a few hours to spare, I decided to strip it down and see if it was salvageable. Five years of dried grease peeled off (literally) to reveal a pristine gearbox, and other than a seized set of brushes, the motor was fine. Two new solenoids, and it'll be as good as new. It's a bloody big winch though, and I'm not sure if it will fit, so it might makes it's way onto eBay, the funds being put towards something else.
Major Part of the Heart and Soul of AULRO
SubscriberGreat thread mate - you HAVE been busy !
It's not broken. It's "Carbon Neutral".
gone
1993 Defender 110 ute "Doris"
1994 Range Rover Vogue LSE "The Luxo-Barge"
1994 Defender 130 HCPU "Rolly"
1996 Discovery 1
current
1995 Defender 130 HCPU and Suzuki GSX1400
Master
They say "what goes around, comes around", and today, for me at least has taken quite a turn when it comes to highlighting that. Amongst other things, I work installing security systems, and a couple of weeks ago I fitted an alarm for a guy just outside of Adelaide. Seeing as he was a decent bloke, I did some work on his home computer system, set up wifi and such, had a few beers with him while I was at it, and generally sorted out, over the course of a couple of days, a few additional things. Chatted about the trip, chatted about the Land Rover and the work that was going on, so on and so forth. He wanted to pay me, I saw it as doing a favour for a nice guy, and left it at that. If I wanted to just make money, I'd still be sitting in an office at home.
A voucher arrived during the week, in return for all the work I did for him. I was shocked, to say the least, and still am. A multitude of emotions later, guilt, shock, gratitude to name but a few, plus profuse thanks, I ordered one of these:
http://www.dolium.com.au/view/page/120/item/LRGD.html
It was waiting for me today, so I got around to installing it.
INSTALLING GULLWING DOORS ON A DEFENDER
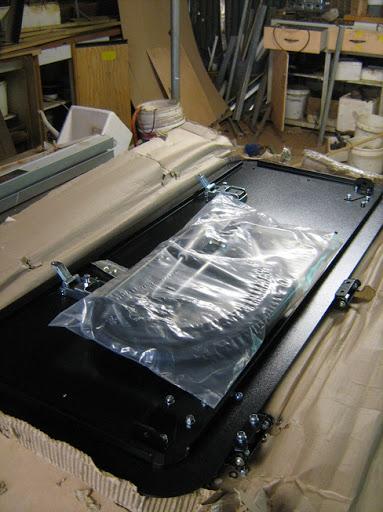
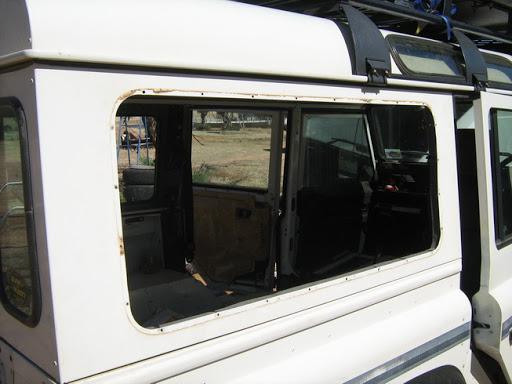
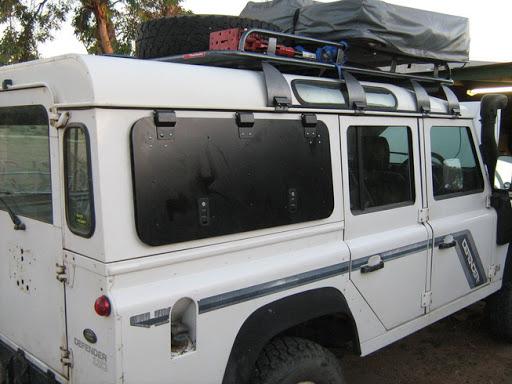
Nope, not the kind of gullwing doors that the DeLorean on "Back To The Future" has (which admittedly was my first thought when I first read about them), but rather, a replacement for the sliding windows at the back of a 110. At just shy of $600 each, they certainly aren't cheap, but you do get your moneys worth in materials - they are solid.
Picking up the package allayed my first fear, that they would be too flimsy to (a) seal properly against the wind, and (b) be secure. They're solid. VERY solid. To be precise they are made up of two 3mm steel plates riveted back to back, and lifting one was oddly reminiscent of the stove top back home. In fact, a potential thief would probably be better off cutting through the aluminium to the left or right of it.
The packaging and instructions left a bit to be desired though, with nuts and bolts floating around the place inside the cardboard wrapping, resulting in me spending 20 minutes on my hands and knees on the floor trying to track them down. Instructions looked like they'd been hand drawn in charcoal by a five year old, and were as about as informative. A better copy can be downloaded in pdf format though.
I'm none too fond of instructions where Step 1 is "Break The Glass" - this is their preferred window removal technique. Pulling off the weatherstripping and drilling out the window rivets took all of 5 minutes, and makes many of the later steps far easier.
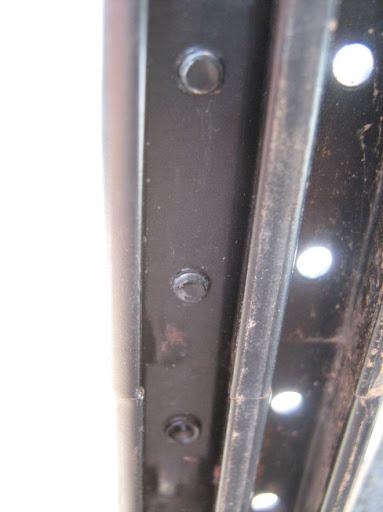
The frame consists of an upper and lower section. To remove the glas, simply unscrew the frame join and split it.
Take out the glass, and reassemble.
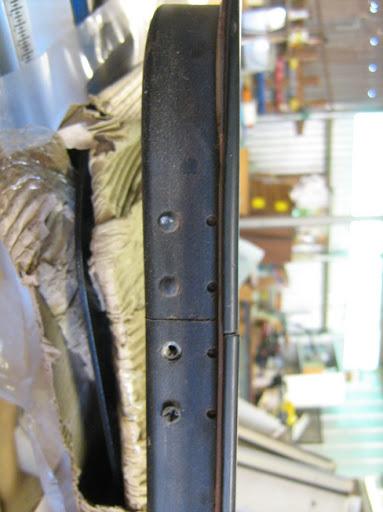
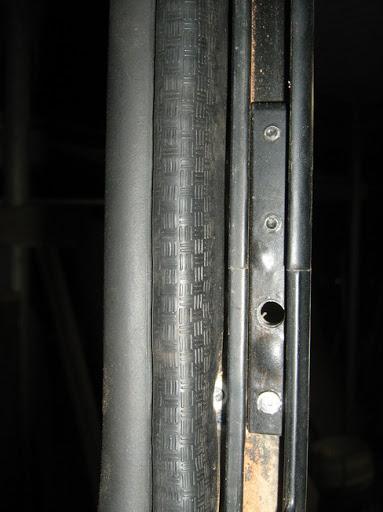
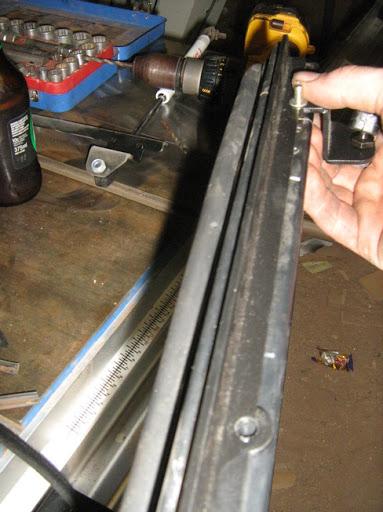
Next, fit the supplied P-seal, to the outside of the window, starting in the middle on the bottom sill. Working my way up the left hand side, I met my first problem. The frame join on this side is on the outside runner, to accommodate the sliding glass on the inner one, and stops the P-seal from bedding in properly. While this isn't a huge problem, and could probably be solved by cutting the rubber, while I had the frame out, I relocated the frame join to the inner runner.
Before...
After...
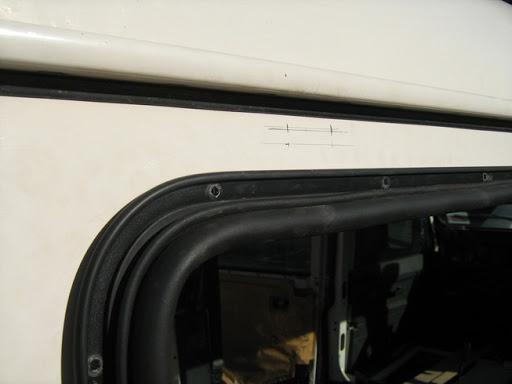
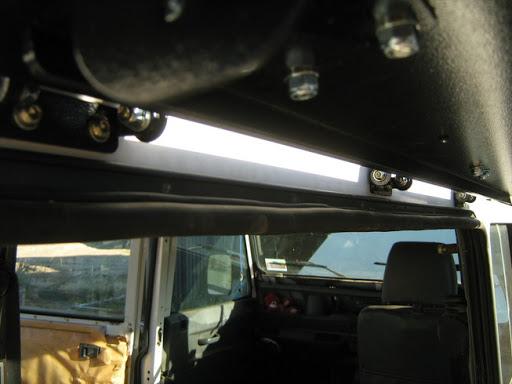
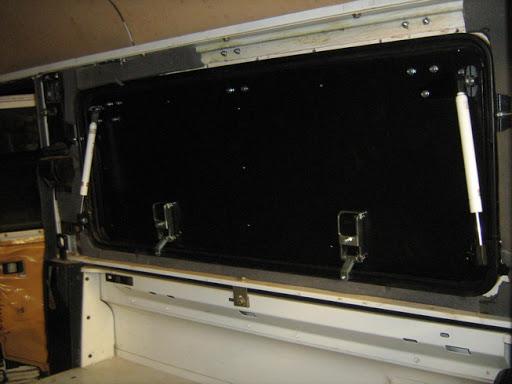
Rubber seal fully installed:
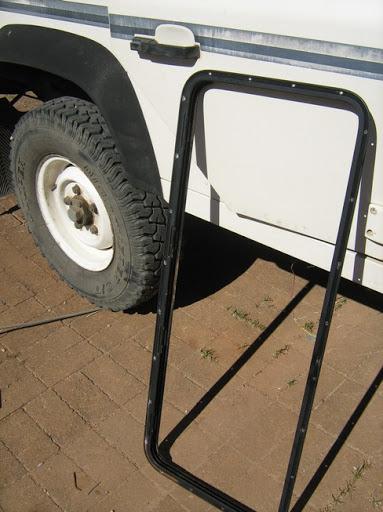
Now, time to put more holes in the Defender
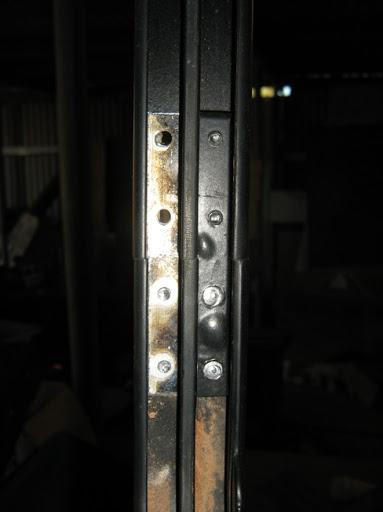
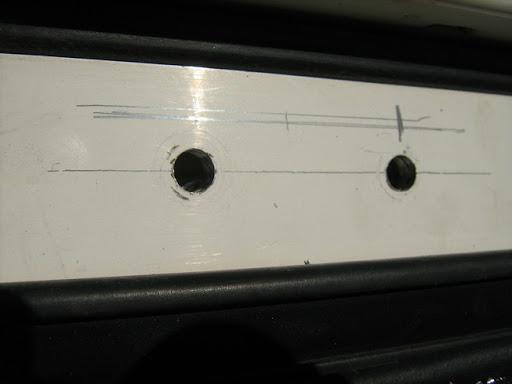
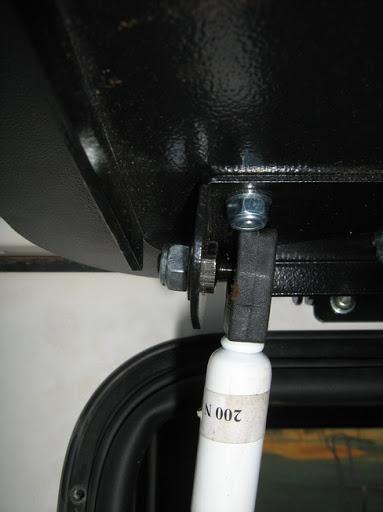
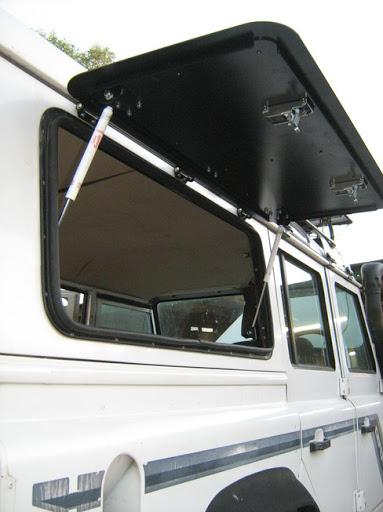
Once the position is good and it's bolted solid, it's time to install the gas jets. This is pretty straightforward on the older 110's - the third rivet down on the frame joining strip is drilled out, and becomes the point from which all other measurements are made.
The instructions give you a list of measurements at this stage, but this is where taking out the window frame earlier comes in handy. Instead, take the frame back out, locate the hole on the gas strut bracket with the hole on the frame, and using it as a guide, drill out the remainder of the holes.
Once it's all drilled out, replace teh frame in the side of the Defender, and bolt up the strut bracket.
The struts themselves follow an "outside on the bottom, inside on the top" pattern which isn't mentioned in the instructions, and I nearly ended up snapping a strut when I closed up the door.
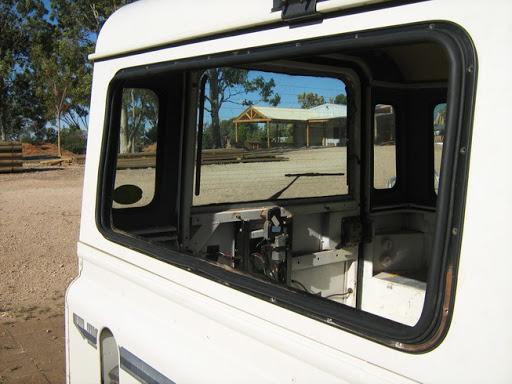
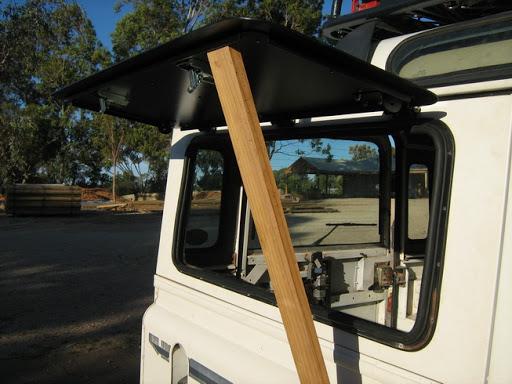
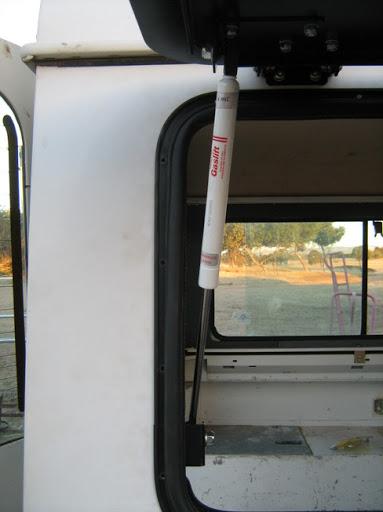
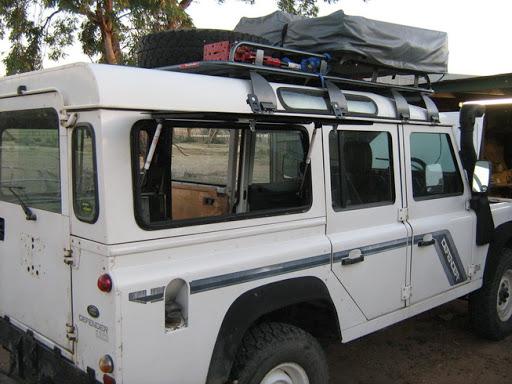
All done! It does look good, the pictures don't do it justice. The locks are solid and secure, far more so than the sliding windows were. The truly paranoid could easily add a hasp and padlock, and nothing short of a bulldozer would get through it.
From the outside...
...and the inside...
I'm pretty pleased with it, I have to admit. Some netting and velcro, and I'll be able to sleep in the back of the Landy and let some air in. The cooking gear will be under the window so I can bring stuff in and out easily. Could you manufacture one yourself? Probably - bending a lip in 3mm steel would be the only tricky part. But add up the cost of material, then decent locks, hinges, powdercoating, plus the time taken for all of this, and it adds up. Building ten of them and selling them on would make more sense.
Or, you could try being a decent person, and get one given to you
TopicToaster
Good work on both counts.
Major Part of the Heart and Soul of AULRO
Subscribertip top !!!!
It's not broken. It's "Carbon Neutral".
gone
1993 Defender 110 ute "Doris"
1994 Range Rover Vogue LSE "The Luxo-Barge"
1994 Defender 130 HCPU "Rolly"
1996 Discovery 1
current
1995 Defender 130 HCPU and Suzuki GSX1400
 Posting Permissions
| Search AULRO.com ONLY! |
Search All the Web! |
|---|
|
|
|


Bookmarks