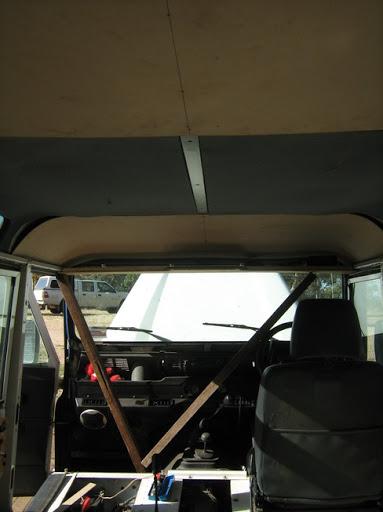
Page 7 of 23 FirstFirst ... 5678917 ... LastLast
Results 61 to 70 of 226

Thread: Expedition Home-build - AU to IE

  1. #61
    Join Date
    Jan 1970
    Location
    Invermay Tasmania
    Posts
    1,732
    Total Downloaded
    0
    NIce job there Mike

    If that laser cutter bloke does not help you then give me a call as I manage a laser company


    Adam

  2. #62
    Join Date
    Jan 2009
    Location
    On the road around Australia
    Posts
    900
    Total Downloaded
    0
    It never ceases to amaze me how many people are willing to help someone out here.

    Quote Originally Posted by spudboy View Post
    Re the welder: you can use my Mig if you like. It will do thin sheet metal quite ok, especially if you use the pulse feature, and I also have some .6 wire as well as the standard .9 wire for thinner stuff. Might be best if you do the welding yourself as I weld like a farmer
    Ah, I see that we went to the same school of welding then!! As I tell people, I can join two bits of metal together, but I can't weld. Thank you very mcuh for the offer, though I might hold off until I have a bunch of stuff ready to weld, and then give you a call.

    Quote Originally Posted by agrojnr View Post
    If that laser cutter bloke does not help you then give me a call as I manage a laser company
    Interesting - mind if I ask where you are located?

  3. #63
    Join Date
    Jan 1970
    Location
    Adelaide Hills - SA
    Posts
    12,486
    Total Downloaded
    0
    No worries - Just PM me when you are ready and I'll send you a map of how to get here. We are at Balhannah, about 30 mins from the GPO (Hahndorf is the nearest big place to here that you'll likely have heard of - about 5Kms away)

  4. #64
    Join Date
    Aug 2006
    Location
    WA
    Posts
    13,786
    Total Downloaded
    0
    Looking great!

    You might want to replace the plastic drain plug in the filter with a stainless socket head cap screw.

  5. #65
    Join Date
    Jan 2009
    Location
    On the road around Australia
    Posts
    900
    Total Downloaded
    0
    Quote Originally Posted by isuzurover View Post
    Looking great!

    You might want to replace the plastic drain plug in the filter with a stainless socket head cap screw.
    Did just that yesterday

    Anyhow, was kept busy all day Saturday, but managed to gat back to the tools yesterday, and finish off my rooc console. I figure that there is no point in posting measurements and such, as (a) each Defender is measured up in the factory with a rubber ruler, and (b) everyone will have different requirements, but I will post a general methodology for people to follow. IF anyone wants the actual measurements, feel free to ask.

    First, I got my new roof panels in position, to give me a frame of reference for measurement. I'm pretty happy with how these turned out. It took a few days of bending them to shape, but it was worth it.


    The basic cutout held temporarily in position - measurements can now be taken from here.


    Once I had my height from shelf to roofliner, I cut out the required piece from 1/4" ply. Same was done for the front of the centre console. My roof console is pitched at an angle of 25 degrees, so if you are doing the same, be sure to take that into account when measuring.


    The curvature on each side was got by making up a template from 3mm MDF, resizing it until it fitted the roof corners, and then transferring it across to the ply.


    Glued and assembled:


    This part is up to personal preference - me, if I'm building something, I like to make it look as good as possible. If you remember fom earlier, I measured out radii at the corners because I wanted the centre nacelle to blend in with the main console? To do this I needed to curve some timber to fit. This, by the way, is the only time you'll see me with an iron in my hands

    First, take a piece of ply larger than required, and with the table saw blade lowered, cut slots into the timber about 3/4 way through. This allows thicker timber to bend.


    Get a steam iron, and steam both sides of the area you wish to bend, for at least five minutes. This rehydrates and softens the fibres in the timber, which allows them to bend rather than break.


    Once the timber has been softened, it will now take the raduis that you are trying to follow. While it is still soft, clamp it into position and leave it to take shape.


    Once the timber has taken shape, you can then cut off the excess. I also tapered down one side to a point, to make it flow seamlessly into the adjoining piece of ply.


    Again, optional. I felt that the ply was a bit flaky where the cuts were, so I have it a skim of filler to fill the joins and reinforce the cuts, and to stabilise the timber so that the lining would have something to adhere to later.


    Almost loos like a bought one... almost I made it solid, and will cut out slots later for radios, gauges, etc.


    Finally, I rounded the edges off with the belt sander. The pencil marks is where the passenger lighting will be located.


    ....and passenger lighting in place. I decided to upgrade the lighting a bit, and grabbed a bigger fixture, with map lights, from the nearest wreckers yard.


    And that's pretty much it! I'll fit my instruments later, and line it in the same material that I'll be covering the roof panels with, but that's about it. As I said, this design can be altered a thousand different ways to suit whatever your requirements are, but the methodology should be more or less the same.

  6. #66
    Join Date
    Feb 2009
    Location
    Padbury
    Posts
    818
    Total Downloaded
    0
    This is a great thread and i am always waiting for you to post again.

    Keep up the great work.

  7. #67
    Join Date
    Jan 2009
    Location
    On the road around Australia
    Posts
    900
    Total Downloaded
    0
    Quote Originally Posted by Sparksdisco View Post
    This is a great thread and i am always waiting for you to post again.

    Keep up the great work.
    I appreciate it. Comments like that make posting my progress here worthwhile.

    Anyhow, I had a few hours to spare today, so I knocked this together...


    ...folded some sides around it...


    ...put a back on it, sanded it, and ended up with this:


    So... what's it for? Well, I had this lying around out in the shed:


    It's a land meter and altimeter from a Toyota something-or-other, and lets face it, putting it in a Defender is probably its only chance of going properly offroad... It was originally a dash mount, and the sides are angled outwards and downwards, not what I wanted. But with some careful mounting.....


    Temporarily installed in the Defender:


    "Now he's just showing off!!" I hear you say Fair enough, and I have to admit that it is a little more in my field of vision than I would like, and for this reason there is a good chance that I won't use it in this position. But the same kind of pod could be built for a car stereo, UHF, HF, gauges, etc etc....

  8. #68
    slug_burner is offline TopicToaster Gold Subscriber
    Join Date
    Jul 2007
    Location
    Melbourne
    Posts
    4,024
    Total Downloaded
    0
    Doing great. Are you a closet chippy cabimet maker?

  9. #69
    Join Date
    Jan 2009
    Location
    On the road around Australia
    Posts
    900
    Total Downloaded
    0
    Quote Originally Posted by slug_burner View Post
    Doing great. Are you a closet chippy cabimet maker?
    No mate, not professionally at least. I've just been lucky enough that in my thirty years on the planet, I've had the opportunity to turn my hand to pretty much every job and trade out there. Some to put myself through Uni, others just to learn something new.

    Officially I'm an engineer who abandoned a career three years ago to travel the world. In other words I'm a bum

  10. #70
    Join Date
    Mar 2008
    Location
    Melb. Vic.
    Posts
    6,045
    Total Downloaded
    0
    Great thread Mike - just read it all the way through. Very detailed and interesting to read/view

    Looking forward to your adventure.

    Agree that console hangs down a bit - perhaps the tilt-o-meter is unnecessary. I have a marine compass on the dash and this doubles as a tilt-o-meter too. Takes about a 3rd of the space. I would recommend a compass - GPS is good but....

    Love the mdf solution for the roof lining - I may try this myself.

    I would have thought with your skills you could manufacture an access door to replace those back windows. (A couple of struts, lock, sheet of ally.....)

Page 7 of 23 FirstFirst ... 5678917 ... LastLast

Bookmarks

Bookmarks

Posting Permissions

  • You may not post new threads
  • You may not post replies
  • You may not post attachments
  • You may not edit your posts
  •  
Search AULRO.com ONLY!
Search All the Web!