Page 2 of 5 FirstFirst 1234 ... LastLast
Results 11 to 20 of 44

Thread: Water Filter Trap

  1. #11
    Join Date
    Jan 1970
    Location
    Brisbane, Queensland
    Posts
    5,778
    Total Downloaded
    0
    I replaced the sedimentor with a Racor assembly (screw on filter and water trap). The Racor housing and Lucas sedimentor housing connects to the fuel hose differently. Racor filter connects with a screw in barb and hosed held by clamp. Lucas sedimentor seals against a seat in the housing which is better IMO. I havent been able to find an adapter to screw into the Racor housing as yet.
    L322 tdv8 poverty pack - wow
    Perentie 110 wagon ARN 49-107 (probably selling) turbo, p/steer, RFSV front axle/trutrack, HF, gullwing windows, double jerrys etc.
    Perentie 110 wagon ARN 48-699 another project
    Track Trailer ARN 200-117
    REMLR # 137

  2. #12
    Join Date
    Jul 2011
    Location
    Scotland
    Posts
    191
    Total Downloaded
    0
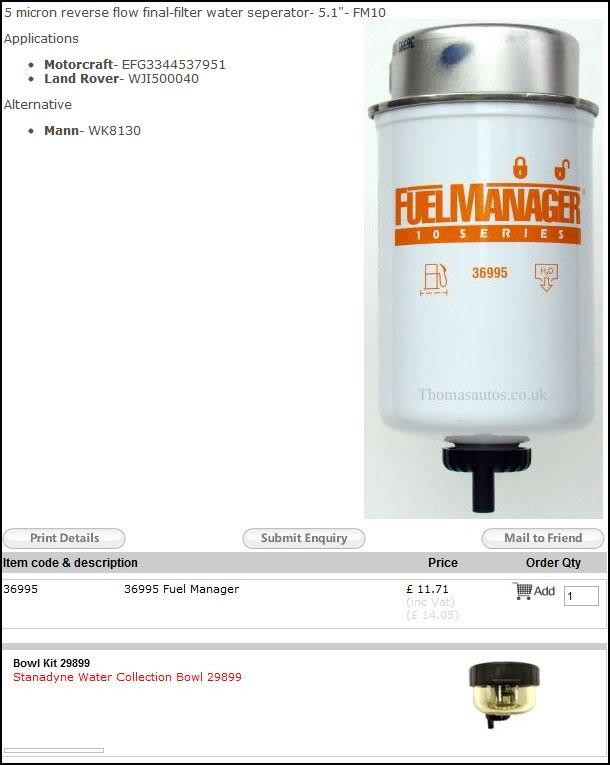
    Just found this for the Pumas OEM filter:
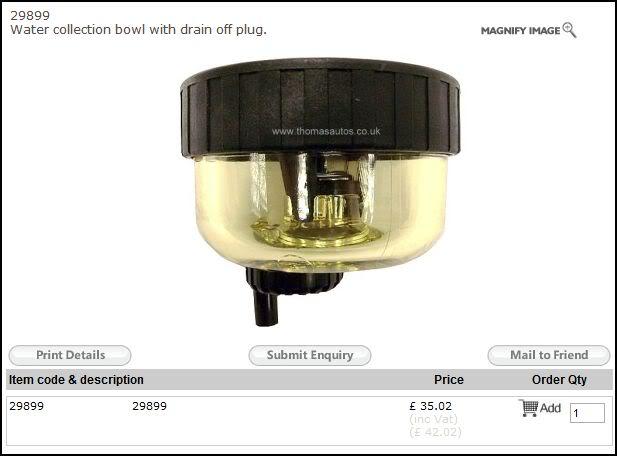
    This is the fuel filter with LR part number. The interesting bit is the bowl kit at the bottom!!


    36995 stanadyne fuel filter

    I phoned to check and the glass bowl fits onto the bottom of an OEM filter by way of the drain screw and a metal rod which goes up into the filter.


    Stanadyne Water Collection Bowl 29899

    I am just going to order a new filter and bowl and see if it does enough to warrant not fitting the Raccor system and cutting into the tank feed.

    Brian.

  3. #13
    Join Date
    Jul 2011
    Location
    Scotland
    Posts
    191
    Total Downloaded
    0
    Here is the link to buy the fuel line bleeding tool:

    SPX Catalog - Hand Pressure Pump with Adapter Kit Hand Pressure Pump with Adapter Kit 310-110A

    Looking at the price though you could always make one as per this post:

    Defender2 - View topic - Puma fuel bleeding pump


    Brian.

  4. #14
    Join Date
    Mar 2010
    Location
    South Africa
    Posts
    867
    Total Downloaded
    0
    Some of the Southern African Nissan Pathfinders and Hardbodies came with a very nice combination water-trap and fuel filter setup. Pic attached.

    Basically a side-by-side setup: the diesel goes through the water trap first then through the filter and then to the mechanical pump.

    The filter mounting had a primer plunger and bleed screw as well.
    The water trap had a water sensor that was wired to a simple idiot light on the dash console.

    It's worth having a look if any other Jap vehicles came with a similar setup, it should work perfectly for any old school turbo diesel, but I wouldn't know if it will work 100% with an electronic pump motor.
    I know that Toyota has a similar primer and filter assembly housing.

    I can't see why not though?
    Attached Images Attached Images

  5. #15
    Join Date
    Mar 2008
    Location
    Київ
    Posts
    3,042
    Total Downloaded
    0
    Does that fuel manager bowl have a water warning light? alarm which might be useful?

  6. #16
    Join Date
    Mar 2008
    Location
    Perth, WA
    Posts
    1,947
    Total Downloaded
    0
    Firstly, thanks very much to Brian for finding this bowl! It looks like it will be able to give a bit of a safety factor with the fuel system.

    I've picked up one of the bowls from a Stanadyne reseller, (Allied Diesel & Turbo in Wangara, WA).

    The bowl adds about 50mm to the length of the filter, unfortunately there is only about 18mm of free space behind the cover.


    I initially thought about just extending the cover, but after a few quick measurements it looks like the trailing arm and the filter may end up occupying the same space, (the trailing arm looks like it needs to be able to move up approx. 65mm at this point for full articultaion).


    It does look like it may be quite easy to move the whole filter assembly up on the chassis about 20mm, this should allow for full articultaion of the rear axle trailing arm. I'll take a few more accurate measurements on the weekend.

    Cheers,

    Tim

  7. #17
    Join Date
    Jul 2011
    Location
    Scotland
    Posts
    191
    Total Downloaded
    0
    I am still waiting on my one being delivered. I did have a look at the filter housing with the view of mounting it higher or even mounting it on the inside of the chassis and it looks as if it can be done with only having to drill two additional holes in the chassis, but I would look at fabricating a mount that utilizes the original mounting holes first. I would need to remove the filter housing to get a better idea but for now it looks doable with a little fabrication on the shields length. There looks to be enough room to move the original mounting holes in the shield to allow using the original chassis holes so that cuts down on any new holes.

    Tim if you get yours mounted before me let us know what you did to get it to fit.

    Brian.

  8. #18
    Join Date
    Mar 2008
    Location
    Perth, WA
    Posts
    1,947
    Total Downloaded
    0
    Quote Originally Posted by Lorryman100 View Post
    Tim if you get yours mounted before me let us know what you did to get it to fit.

    Brian.
    Will do Brian. I might pop the RH rear spring and shock off and jack the axle up to see how much clearance the trailing arm needs, but I'll aim to remount the filter so the lowest part of the "new assembly' is where the lowest part of the factory one is.

    Cheers,

    Tim

  9. #19
    Join Date
    Mar 2008
    Location
    Perth, WA
    Posts
    1,947
    Total Downloaded
    0
    Finally got time to fit the extended water trap to the filter

    I put the rear axle under full articulation, (with the passenger side wheel hanging down fully), and there is about 23mm of clearance between the trailing arm and the fuel filter cover.


    Filter removed from its mount with the bowl fitted, if you are really careful when fitting the bowl you will still get fuel everywhere :


    Pictures of the mount, (I have taken measurements, but have left them at the workshop, I'll post them later), the new mount moves the factory filter mount up 25mm. I used M8 Counter Sunk Cap Screws, 4 for fixing the new mount to the original chassis points, and 4 tack welded into place for fixing the factory mount to the new one:


    Factory mount:


    New mount fitted:


    Filter back on, there is still plenty of slack in the fuel hoses, so no problems there:


    Cover back on, I have bent the tabs on the bottom of the cover down, but this has left the bowl too exposed for my liking:


    Checking the clearance again:


    I decided to extend the cover to protect the bowl more:


    Modified cover fitted, I also had to trim a bit of the top left hand side of the cover:


    Even though I spilt quite a bit of fuel the engine started without having to be primed.

    Cheers,

    Tim

  10. #20
    Tombie Guest
    Top Job

Page 2 of 5 FirstFirst 1234 ... LastLast

Bookmarks

Bookmarks

Posting Permissions

  • You may not post new threads
  • You may not post replies
  • You may not post attachments
  • You may not edit your posts
  •  
Search AULRO.com ONLY!
Search All the Web!