Page 31 of 69 FirstFirst ... 21293031323341 ... LastLast
Results 301 to 310 of 690

Thread: Meet my 90, and share the adventure.

  1. #301
    cuppabillytea's Avatar
    cuppabillytea is offline Loud Mouthed Rat Bag Gold Subscriber
    Join Date
    Apr 2015
    Location
    Lillyfield NSW
    Posts
    7,824
    Total Downloaded
    0
    Note to myself: Give this area a good scrub before this installation. Thanks Mitch.
    Cheers, Billy.
    Keeping it simple is complicated.

  2. #302
    Join Date
    May 2014
    Location
    Tamworth NSW
    Posts
    4,295
    Total Downloaded
    0

    Filter install 3

    After all the swearing subsided, it was time for the easaiest part- adding the fun parts.

    Filter ready to be installed with all the accoutrements. 3/8" hose was used for the install and was supplied with the kit.


    The factory hoses appear to be the poly tube style hose, which are a bit more difficult to work with. Due to my F up with the connector, I will likely need to renew / replace the connector at some stage. The broken part was easily reinserted into the connector to lock it all down, and it's secure, but something like that will keep me awake at night...

    Here is the filter fully installed. Very easy to view the water trap. There is plenty of room above to actuate the hand priming pump and approx 10mm below the water trap to the cross member, which means it can be unscrewed to drain. Space constraints mean that to remove the filter proper, tho whole assembly will need to be removed from its bracket to remove the bowl, or filter cartridge. No Biggie... I'll just need to buy a 15mm flexy head ratchet spanner and it will be a walk in the park (a socket won't fit past the pump assy on top, so fastening needs to happen from the side, plus normal spanners are so mainstream).


    The bash plate was also supplied in the kit.

    I wasn't sure that I'd need it, but because racecar, I installed it anyway. This area is well protected by the big underbody fuel cooler guard I have. Some pinch seal was added for good measure, as the hoses need to pass thru this opening, and no one likes a diesel leak (even though it is the primal essence of manliness).

    This is what it looks like installed.


    Help needed!
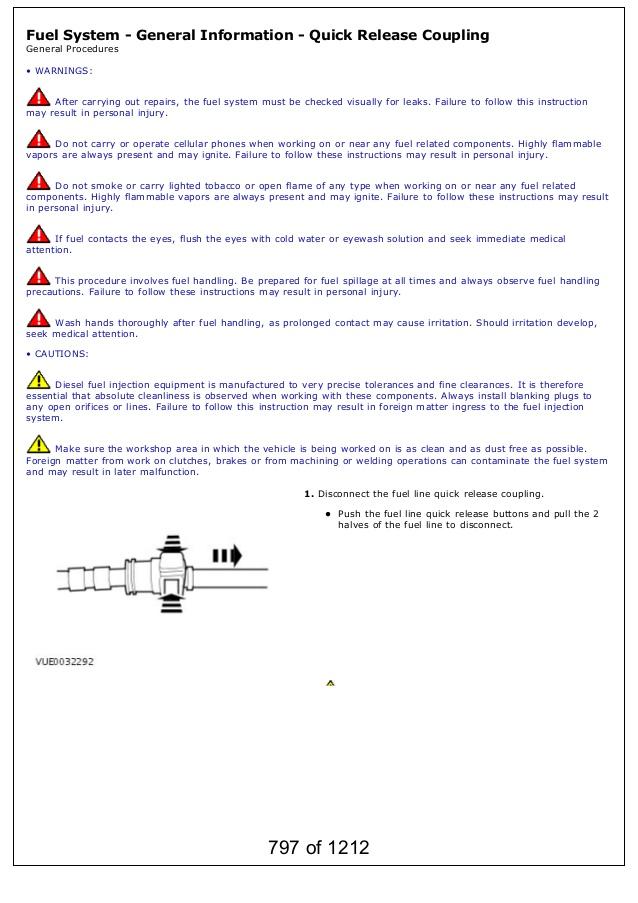
    Help needed to ID the CORRECT way to unclip these fuel connectors..
    If anyone has the details of what the ID of the stock fuel hose is, then please also let me know so I can arrange some new connectors to replace the one which is FUBAR.

    (Pics is upside down. Aulro does this regularly. Deal with it.jpeg)


    Booze revooz

    I'm getting Naked.
    A few months back I joined naked wines, which is essentially crowd funding scheme for small wine makers. I pay a monthy amount, and get some free bottles swung my way, as well as some interesting wines by honest aussie wine makers at good prices. Plus I get the warm and fuzzies knowing that it helping these people makes the wines they want to make.
    Drinking a Butterfly effect shiraz, because nothing says 'I kicked the arse of mechanicing' like drinking a red that punches you in the face sip after sip.
    Attached Images Attached Images
    -Mitch
    'El Burro' 2012 Defender 90.

  3. #303
    Join Date
    May 2014
    Location
    Tamworth NSW
    Posts
    4,295
    Total Downloaded
    0

    On the fuel filter, lift pump, priming etc

    Firing the car back up after the install
    I did some reading about this, and it seems to be an area of common confusion
    After a filter install, the fuel system needs to be primed to give the HP pump enough pressure to do its thing without air locks. On the 2.2 tdci, there is a lift pump in the tank. On the 2.4, there is not, meaning some people have had issues after doing this type of service. Lucky I own a 2.2

    In my instance, I primed the secondary (new) fuel filter using the primer pump on top of the unit, and the air bleed screw. Worked OK, albeit a bit messy.
    After thinking I was good to go, I fired the car up and it ran for all of about 10 seconds, before sputtering to a halt. Bricks were promptly ****, thinking that I'd done something stupid and got an engine full of mud or something.
    After the initial panic, I did the standard bleed procedure- keyed the vehicle to ON, and cycled this on and off about 10 times, each time hearing the lift pump gurgling the diesel and air voids back into the tank. After this process was completed (when no firther gurgling noises are heard) then the vehicle was started and allowed to idle. There were a few misfires and rough operation to start with, but it worked as per normal after that.


    Bum dyno
    After a brief test drive, I can say this has completely changed the vehicle! It's like getting a 1500HP BAS retune running nitrous- the last of the big V8's!
    No, actually I lie.
    Feels the same, if anything I've lost performance from the extra few kilos of weight that is hanging off it now... It's a longevity mod, and I'm cool with that.
    I've written the date and Kilometers on the filter and will put this on a 20,000km service interval, assuming there is no contamination events.
    The factory filter is 5 microns, the secondary is 2 microns.

    Hopefully others have found this interesting.

    Until next time... Cheerio.
    -Mitch
    'El Burro' 2012 Defender 90.

  4. #304
    Join Date
    May 2014
    Location
    Tamworth NSW
    Posts
    4,295
    Total Downloaded
    0
    Dem feels when I work on my defender:

    [ame]http://i.imgur.com/5TLFvBK.webm[/ame]
    -Mitch
    'El Burro' 2012 Defender 90.

  5. #305
    Join Date
    Jan 2011
    Location
    Caroline Springs, Vic.
    Posts
    337
    Total Downloaded
    0
    Thanks for the great write up Mitch, I still haven't got round to putting a secondary filter on mine yet.

    I'm just in the process of making an inline hand primer for my 2.4, and have been looking around for some male and female quick connects.
    Whilst looking I came across these special tools that are used on certain so called quick connectors. They slide over the fuel line and then into the coupling. When pushed fully in they unlock the plastic clip.

    [ame="https://www.amazon.co.uk/Repairing-Fuel-Lines-Quick-Disconnect/dp/B0058SGMB0/ref=pd_bxgy_263_2/280-9947827-6403753?ie=UTF8&refRID=ADQBG9J7MV3ZPK8D00W1"]Car Repairing Fuel Lines Quick Disconnect Tool Set New: Amazon.co.uk: Car & Motorbike[/ame]

    [ame]https://youtu.be/vRTjYAxvaCs[/ame]

  6. #306
    Join Date
    May 2014
    Location
    Tamworth NSW
    Posts
    4,295
    Total Downloaded
    0
    I had a discussion with one of the guys at repco about those disconnect tools. Most people refer to the quick connectors as 'ford style' or 'GM', but in reality there is a number of styles, and I'm not sure which style Land rover has used.

    Below is the connector I will henceforth refer to as the bastard hose. As you can see, it's got a flange on the left (male) side of the fitting that stops any such tool being used by sliding along the male end, and under the catch mechanism on the female side.


    I'm leaning towards it being a button type... but I was having very little luck using it that way. Maybe it would be worth digging some of the mud and grit out of the connections with a pick, brush and some kind of spray lube or soapy water first...

    I guess the take home message for everyone playing along at home is that if you force this kind of stuff, and it breaks, a simple task can become an epic fail of an afternoon.
    -Mitch
    'El Burro' 2012 Defender 90.

  7. #307
    Join Date
    Jan 2011
    Location
    Caroline Springs, Vic.
    Posts
    337
    Total Downloaded
    0
    The workshop manual makes it sound so easy. I guess they don't take into account that after a few years of using your Defender as nature intended, a quick connect can turn into a bastard coupling.

  8. #308
    Join Date
    May 2014
    Location
    Tamworth NSW
    Posts
    4,295
    Total Downloaded
    0
    Some more digging into the craziness that is Quick release fuel connectors...

    One spec that seems common is the SAE J2044 Style, which is all imperial sizes.

    The workshop manual ststes that a damaged connector should not be repaired, so I'll need to look into replacing my damaged one before too long.

    For interest's sake, LR have no specific part for the connector in the areas of the microcat that I've looked at (it could be a part elsewhere though).

    There is a P/N for the intermediate tube (fuel filter to fuel cooler section, highlighted part #2) and the fuel hose which runs from the HP pump back to the fuel cooler (it's a part which has both supply and return hoses as one part # 3).


    Interestingly, It looks like LR has used 3 different 'parts' with changes across the VIN range. The part I'd need is LRO31348


    I wonder if this could this be a change in the connector type, as the hose itself is not something that changes with the wheelbase model...

    As Ozy shows above, the 2-button type connector IS present in my vehicle (it's on my factory fuel filter), along with the single button type which gave me all this grief (on the fuel cooler and part #3).
    If I can ID the hose inside diameter I'll probably go to the most generic fitting that is used by holden or ford, as these will be the most readily available in auto stores / mechanics workshops etc.

    Does anyone know when the VIN on the pumas changed? 9A to BA to CA etc?

    Mine is AUG 2012, CA42XXXX
    Attached Images Attached Images
    -Mitch
    'El Burro' 2012 Defender 90.

  9. #309
    Join Date
    May 2014
    Location
    Tamworth NSW
    Posts
    4,295
    Total Downloaded
    0

    It's time for another...


    TOOL REVIEW


    Wera Joker Wrench


    [ame]https://www.youtube.com/watch?v=Glx-X-JcIRc[/ame]


    I spotted these at my local Bunnings a few months back, and had a bit of a read of the marketing guff, and thought 'it's just another tool gimmick' and didn't think too much of it.
    In my recent wrenching adventures, I'd noticed that I had very little capabilities in the 15mm and 16mm wrenches that I currently have... leaving an annoying hole in the tool set which leads to slow jobs and frustration. Although I've got 3 sets of ratchet spanners in the tool box, most of the sets do not have the 15mm or 16mm sizes which are a bit more common on the landy.

    The irresistable urge to go tool shopping dawned upon me.
    The offerings at bunnings were limited. There was some craftsman wrenches which didn't appeal at all. Then there was the pressed steel ratcheting offset box wrenches which were also only in a set. I thought I'd give the jokers a go as they were sold individually, and a probably a higher level of quality than the Kincrome and Toolex brands that I've been using to date.
    The steel used is chrome molybdenum, with a nickel chrome coating. The tool is german designed and manufactured in europe. I guess it's price point is less than the stahlwillie offerings, but of a quality and innovation level which is competitive as a professional tool.

    Initial thoughts
    Fit/finish
    The tool appears to be a high quality design and finish with a bit more thought put into its design than the average spanner. The material is lightly stonewashed, and provides a bit of grip that I'd need beyond the chrome plating that the other spanners always have. I've found that the smooth chromed wrenches are difficult to handle when covered in oil and fluids, and it becomes a strain to handle my tool when in these situations.
    So I did some bench testing. When used dry, the Joker is clearly grippier than my chromed spanner.
    Using some nitrile rubber coated gloves, grip levels are similar between the two in the dry.
    In a 'wet' test using some food grade grease I had lying around, both gloved and ungloved grip was in favour of the Joker. Funny that (bad joke... crickets chirp).

    The dimensions of the joker are a little larger than the Kincrome offering (about 0.2mm handle thickness and ring width), but given the extra features of the joker are to be expected (finer tooth ratchet, ergo benefits etc- more on this later)

    The 15mm spanner I have tested reads as 15.07mm on the verniers between the jaws of the open end, whereas the opening on a kincrome 14mm spanner comes in at 14.12... Although different size spanners, the variance between nut size and the jaw size seems to show a higher manufacturing tolerance on the joker. Coupled with a good alloy / metallurgy, I'd caution a guess that the Joker would perform better in regards to spreading and rounding off nuts under use / abuse.

    Design / ergonomics
    The handle design on the joker is well thoguht out with plenty of depressed grip points and a bulge in the centre of the wrench to get better purchase. The spanner size indicator makes a good rest point for a thumb when you are choking up on the wrench for detail work, and the centre W logo is a good grip point when your hand is further back for maximum leverage. Throughout use, there is little in the way of rough / sharp endges which may cause issues during long periods of use.

    The Joker is a flat wrench- the open end of the spanner is aligned with the centre axis of the handle, not offset the 22 degrees that some spanners are. Thsi negates the need to flip the spanner to get a different grab on the fastener. This is not a problem, because it works in conjunction with the 12-point notch design within the open end of the spanner, a style that allows some features of the spanner to be exploited (no need to flip the spanner to get a grab on a fastener in tight quarters). The nut locking feature will also prove invaluable for getting a nut into that awkward spot. The spanner swing angle is 30 degrees for the open end, les than a conventional cranked open ender.
    The Joker is also flat along the handle axis- the ratcheting head is not cranked at all unlike my toolex and kincrome spanners- I'm not sure how I feel about this, given that tightening a fastener solid against a surface will leave no room for my meat hooks to grab the spanner... Time will tell on this one. This is however a necessity of the ratchet design- flip the spanner to change the ratchet direction (as opposed to the flip switch on my other spanners).


    Using the tool

    I spent some time earlier this week testing the spanner and using / abusing it around the home and workplace.
    Use is effortless, but requires a bit of 'getting used to' the features which are outlined in the above video. It takes some effort to remember the features of the tool to get the most out of it, but I'm sure it will become second nature over time (you have to think a bit out of the box, as it's such a different design to other spanners).
    The fine (80 count) tooth ratchet mechanism is great to use, with a pivot angle under 5 degrees. Unlike my toolex spanners it's a much tighter tolerance to use, meaning less swing angle and slop between backing off the torque and finding the next tooth. Years of working on my 300zx tells me this will be a good benefit. Effort needed to twist the ratchet mechanism is also slightly less on the Joker. This is good, as I would expect that the kincrome comparison wrench is worn in, and getting looser in the mechanism. What the ratchet twist force benefit means in real world terms is that there is often the time when the torque to turn the ratchet mech is higher than that needed to fasten the nut or bolt- ie the bolt spins instead of the ratchet when you want to back the wrench off to get another power stroke out of the tool (meaning you often end up putting a finger on the bolt to hold it down while the ratchet clicks).

    I have yet to use the spanner in a situation where I've needed to hold a nut captive in the open end of the wrench using the locking feature, but I can see this being valuable in some situations. An example on the fuel filter install was undoing the gearbox cross member bolts. A nut on the inside of the chassis needs to be held fast while a bolt is removed from the outside of the chassis rail. A normal ratchet spanner wouldn't be possible to use, as the open end would slip off, and the ratchet end would be anhilated by the impact gun unscrewing from the other end of the bolt. I used a offset ring spanner in this case, but if it comes down to using less tools for a job, this will save a trip back to the toolbox or a extra set of tools needing to be purchased.

    Hard use testing
    I spent some time beating the hell out of the 16mm wrench yesterday, using the open end and ratchet sides to tighten a nut to failure on a grade 8.8 bolt. I can say that the strength of this tool and the confidence it inspires is far greater than the kincrome and toolex spanners I have. The gripped insert on the open end of the spanner also noticably resisted flexing when compared to the (non ratcheting 16mm) toolex spanner I have.
    I'm looking forward to beating the heck out of this spanner in the future. My only regret is that I don't have more of them... my set only consists of a 15mm and a 16mm so far.
    Stay tuned for the next tool review installment, and possible review of this tool after it gets some more hard use!


    Until next time,
    Watch out for sneks
    Attached Images Attached Images
    -Mitch
    'El Burro' 2012 Defender 90.

  10. #310
    Babs Guest
    Awesome ✅

    Sent from my iPhone using Forum Runner

Page 31 of 69 FirstFirst ... 21293031323341 ... LastLast

Bookmarks

Bookmarks

Posting Permissions

  • You may not post new threads
  • You may not post replies
  • You may not post attachments
  • You may not edit your posts
  •  
Search AULRO.com ONLY!
Search All the Web!