Page 2 of 3 FirstFirst 123 LastLast
Results 11 to 20 of 30

Thread: Removal of Blackout Switch?

  1. #11
    Join Date
    Nov 2015
    Location
    Victoria
    Posts
    363
    Total Downloaded
    0
    I've been told by roadworthy inspector/mechanic that these lights have to go - but may be acceptable if the switch is rendered inoperable and cannot be accidentally switched off.

    I plan to make a removable link so that operations can be restored if ever needed in the future - perhaps I can take some photos and post the procedure here?

  2. #12
    Join Date
    Aug 2006
    Location
    Melbourn(ish)
    Posts
    26,495
    Total Downloaded
    0
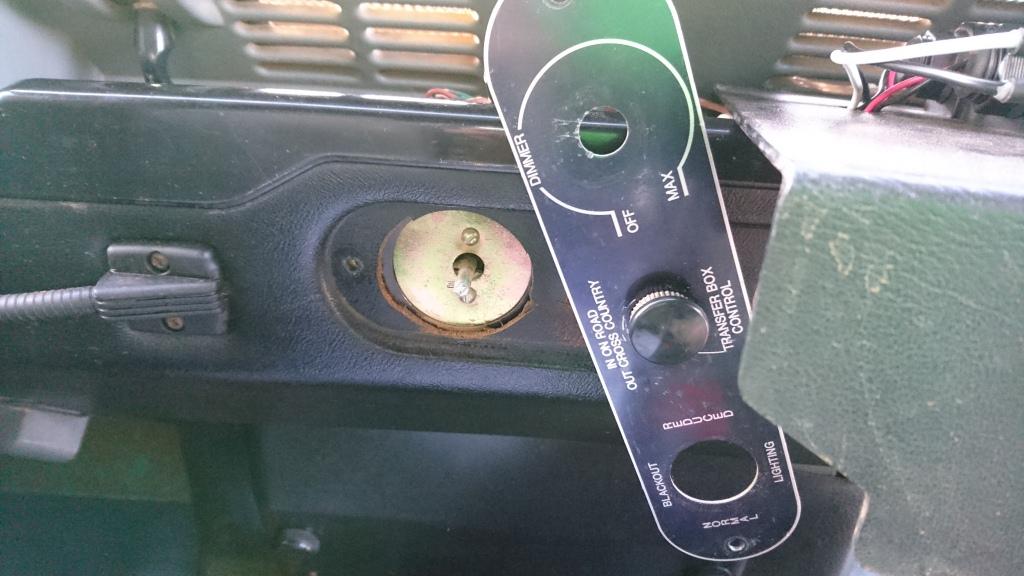
    removing the lights is not a legal requirement. Disabling/removing the switch so the normal lighting circuit can not be bypassed is. interpretation of the written law is one of the key issues that this goes west on.

    you can wire it up so the blackout and reduced lights come on with the park lights and still be legal.
    Dave

    "In a Landrover the other vehicle is your crumple zone."

    For spelling call Rogets, for mechanicing call me.

    Fozzy, 2.25D SIII Ex DCA Ute
    Tdi autoManual d1 (gave it to the Mupion)
    Archaeoptersix 1990 6x6 dual cab(This things staying)


    If you've benefited from one or more of my posts please remember, your taxes paid for my skill sets, I'm just trying to make sure you get your monies worth.
    If you think you're in front on the deal, pay it forwards.

  3. #13
    Join Date
    Nov 2015
    Location
    Victoria
    Posts
    363
    Total Downloaded
    0
    Well, it's done either way.

    Kept the lights attached - but bypassed the blackout switch - with the aid of the diagrams from REMLR and the suggestion of a previous post here to check out the brown wires.

    As I'm the sort to take pictures before I start - I have some images for those wishing to do the same:

    First off I found I could remove the face plate well enough to remo0ve the Santon switch without removing anything else:


    I then removed the dash cover:


    I gently removed the santon switch - as lucas wiring has a reputation with my father (ex auto elec) - I'm told I'm on my own with this - good thing I know my stuff lol.


    I removed, and meter tested the two thickest and brown wires - and bridged them together with a 3mm stainless nut and bolt (with washers).
    I also made sure to secure the vacant screw terminals so they don't vibrate loose later.


    As I had misplaced my heat shrink tubing, I used my emergency roll of "earth" insulation tape - and shoved it back in the hole lucas style.
    I will return post roadworthy to neaten and replace alot of the wiring in here.


    A side note - the blackout switch knob is secured by a small flat blade screw, that only needs a couple of turns to release.

    careful not to damage or kink the vacumn lines to the transfer case lock valve - this could be an expensive mistake.

    This is also why I didn't remove the knob or the valve at all - I didn't want to upset it.

    I hope the pictures clarify things a bit more for anyone else thats tumbles upon this thread.

  4. #14
    Join Date
    Mar 2015
    Location
    Brisbane
    Posts
    570
    Total Downloaded
    0
    You also need to bridge no's 5 and 6 (I think, check your wiring chart) or you will find you have no tail lights. (don't ask me how I know........... )

    <edit> nevermind, you're leaving the rest of the switch attached so it should still work. If you ever remove, you need to bridge those other wires.
    Last edited by Chris078; 22nd February 2016 at 05:51 PM. Reason: I was wrong!

  5. #15
    Join Date
    Nov 2015
    Location
    Victoria
    Posts
    363
    Total Downloaded
    0
    Thanks. I noticed that, hence why I left it in circuit. Should pass roadworthy as is. Will consider reinstating later.

    Sent from my E6653 using AULRO mobile app

  6. #16
    Join Date
    Nov 2015
    Location
    Victoria
    Posts
    363
    Total Downloaded
    0
    sooo... my mechanic/roadworthy inspector called me today - all military lights had to go - so they have been removed, and all bonnet tool holders had to go.

    I checked this and according to vicroads regulations:

    "all lights fitted to the vehicle must be operational, and comply with Australian Design Regulations"

    In other words, lights that are attached, and non-functional are a no-no.
    as are functioning lights that are attached, which do not comply with ADR.

    so they may get some fresh paint and return at some point later on - depending on how much legislation I'm willing to wade through.

    The bonnet tool holders were a a matter of contention - the mechanic had no issues, but he consulted with the vicroads inspector, who said that they were protruding edges and bolts that could cause a hazard to a pedestrian.

    they also will need some restoration, as will the damage to the bonnet after 26 years of neglect - who knows, someone might install a set for me in the night one night, without my knowledge.

  7. #17
    Join Date
    Mar 2015
    Location
    Brisbane
    Posts
    570
    Total Downloaded
    0
    they also will need some restoration, as will the damage to the bonnet after 26 years of neglect

    Remember to look up how to deal with the PPP paint that is on Perenties.
    It will do it's best to kill you if you don't take the proper precautions when sanding/painting etc.

  8. #18
    Join Date
    Nov 2015
    Location
    Victoria
    Posts
    363
    Total Downloaded
    0
    Thanks.
    I don't do things half-assed.
    Always do my homework first.

    I may consult you about that at a later date.

    Just registered it a few minutes ago - now waiting at RACV office.

    And duty tax sucks.

    $922 all up to register. $280 to roadworthy, plus a slab.

    Sent from my E6653 using AULRO mobile app

  9. #19
    Join Date
    Mar 2015
    Location
    Brisbane
    Posts
    570
    Total Downloaded
    0
    Quote Originally Posted by Chris078 View Post
    they also will need some restoration, as will the damage to the bonnet after 26 years of neglect

    Remember to look up how to deal with the PPP paint that is on Perenties.
    It will do it's best to kill you if you don't take the proper precautions when sanding/painting etc.

    That's meant to be PUP (polyurethane polymer)
    decent info here.
    1. Do not mechanically sand it.
    2. Wet sand only by hand (very lightly 300+ grit) wipe off immidiately with a rag and dispose of in black plastic bag.
    3. full safety gear when sanding/painting is required. Suit,respirator, gloves and goggles.

    Treat it like asbestos with the additional that the nasties can be absorbed through your skin and especially your eyes!

  10. #20
    Join Date
    Nov 2015
    Location
    Victoria
    Posts
    363
    Total Downloaded
    0
    Yeah I read up a little on CARC paint last night.

    I'm now looking for a professional to do the job.

    if it worked an image of the bonnet should be attached.

    It will need more than a light sanding.

    Sent from my E6653 using AULRO mobile app
    Attached Images Attached Images

Page 2 of 3 FirstFirst 123 LastLast

Bookmarks

Bookmarks

Posting Permissions

  • You may not post new threads
  • You may not post replies
  • You may not post attachments
  • You may not edit your posts
  •  
Search AULRO.com ONLY!
Search All the Web!