Page 1 of 2 12 LastLast
Results 1 to 10 of 15

Thread: Some urgent assistance with rear prop shaft please!

  1. #1
    Join Date
    Oct 2007
    Location
    Brisbane West
    Posts
    7,372
    Total Downloaded
    0

    Some urgent assistance with rear prop shaft please!

    Hi all,

    Took my rear drive shaft out and sent to Hardy Spicer along with (new) rotoflex rubber coupling. They have just done my front prop shaft.

    They say the spigot that locates the rubber coupling is flogged out but they can find a replacement in the country...

    My question is, as mine has about 50mm of lift, is it worth doing what they recommend and take it back to early D1/Defender with just unis? Also is all I need for that a flange and propshaft from an earlier model (then just new unis, balance and back together - I had the pinion seal replaced a few weeks ago..).

    If not, what are other options and can I get just a spigot?

    Many thanks

    Cheers

  2. #2
    Join Date
    Jun 2009
    Location
    North Central Victoria
    Posts
    2,356
    Total Downloaded
    0
    IMHO they are bull****ting you.

    Roverparts has both the spigot bush and diff centralising pin in stock (just one of a hundred that would) Land Rover Parts - PROPELLOR SHAFTS - DISCOVERY 2

    But if you mean where the bush sits - ie the end of the propshaft is flogged out they may be right.


    So do you mean the rust coloured spigot housing on the left or the new bush in it? Note the buggered bush removed with a cold chisel on the right. In my opinion you should always replace the spigot bush when you put a new donut on. Otherwise the new donut will flog out in no time.

    I have a small lift like yours and find I get good mileage out of the donut. I'm a fan as I think they reduce backlash. If your lift was higher you might get more benefit from a uni joint replacement but just replacing the donut and spigot bush every few years is way cheaper.

    Others have different ideas though. To me, it's about bottom line cost. Keeping it standard is cheaper but if you're off road heaps, the uni joint upgrade might be worth it in the long run. I doubt it though

  3. #3
    Join Date
    Oct 2007
    Location
    Brisbane West
    Posts
    7,372
    Total Downloaded
    0
    Cheers mate.APT have a whole shaft with hd splines and unis balanced.

    I think the part is the $211 part...by the time i add new unis etc and labour to fit and balance a new HD shaft with new HD flange and HD unis instead of stock set up complete is about same price.

    Cheers

  4. #4
    Join Date
    Oct 2007
    Location
    Brisbane West
    Posts
    7,372
    Total Downloaded
    0
    The rubber bush has just been changed - original did 250000....but only last 10000 of that was lifted

  5. #5
    Join Date
    Oct 2007
    Location
    Brisbane West
    Posts
    7,372
    Total Downloaded
    0
    Mate that $211 part in the link...surely that must be housing and bush for that price...did you buy your bush seperately and if so how much and from where?

    Cheers

  6. #6
    Join Date
    Oct 2007
    Location
    Brisbane West
    Posts
    7,372
    Total Downloaded
    0
    Ok just to assist anyone searching or coming across this thread...

    The spigot that sits in the diff flange and the bush that sits in the flange at the diff end of the rear driveshaft (tailshaft) should be changed when flogged out as they will cause vibration and chop out a new rubber drive coupling (donut, rotorflex). The spigot is purchase separately - dont pay at present day over say $25 for this. The bush is typically purchased with a GKN Genuine part coupling kit that includes coupling, 3 new bolts, washer and nuts and the bush. Dont pay more on today's prices than about $110-$120 for this kit. The spigot will be a pain to get out - suggest m10 bolt and slide hammer and heat or otherwise welding a piece on to assist (if you dont have a particular puller that is referred to in RAVE - workshop manual). The bush gets removed by butchering it with a cold chisel.

    The drive shaft should be balanced before replacement. Dont forget if tempted to drive on the front propshaft its not designed for 100% of the torque and it will likely vibrate with all but the mildest throttle AND the rear shaft holds the brake drum on...so nuts required.

    My coupling lasted 250,000k. From what I have seen the kits are for all D1 and D2 (from 94 or so onwards)/

    Hope that assists.

    Cheers

  7. #7
    Join Date
    Oct 2007
    Location
    Brisbane West
    Posts
    7,372
    Total Downloaded
    0
    Ok so all fitted up. That rubber coupling could be replaced easily while offroad which makes it more sensible than a uni joint.

    I still have a vibration. Im confident its front prop shaft. Hardy Spicer balanced it....however its either not properly balanced or the lift combined with 3 degrees of castor correction has set up too much of an angle for the unis. Im going to slip in another shaft or 2 and see what happens.

    Cheers

  8. #8
    Join Date
    Apr 2023
    Location
    Mt Buller
    Posts
    2
    Total Downloaded
    0

    98 disco 1, rear donut cooked

    I'm having this issue now. What is the "RAVE" workshop manual? I got the donut bushing in my kit from "TR spares" but have no idea on how im going to get it out.

    Cheers,

    Colin


    Quote Originally Posted by ozscott View Post
    Ok just to assist anyone searching or coming across this thread...

    The spigot that sits in the diff flange and the bush that sits in the flange at the diff end of the rear driveshaft (tailshaft) should be changed when flogged out as they will cause vibration and chop out a new rubber drive coupling (donut, rotorflex). The spigot is purchase separately - dont pay at present day over say $25 for this. The bush is typically purchased with a GKN Genuine part coupling kit that includes coupling, 3 new bolts, washer and nuts and the bush. Dont pay more on today's prices than about $110-$120 for this kit. The spigot will be a pain to get out - suggest m10 bolt and slide hammer and heat or otherwise welding a piece on to assist (if you dont have a particular puller that is referred to in RAVE - workshop manual). The bush gets removed by butchering it with a cold chisel.

    The drive shaft should be balanced before replacement. Dont forget if tempted to drive on the front propshaft its not designed for 100% of the torque and it will likely vibrate with all but the mildest throttle AND the rear shaft holds the brake drum on...so nuts required.

    My coupling lasted 250,000k. From what I have seen the kits are for all D1 and D2 (from 94 or so onwards)/

    Hope that assists.

    Cheers

  9. #9
    Join Date
    Oct 2007
    Location
    Brisbane West
    Posts
    7,372
    Total Downloaded
    0
    Quote Originally Posted by colintahoe View Post
    I'm having this issue now. What is the "RAVE" workshop manual? I got the donut bushing in my kit from "TR spares" but have no idea on how im going to get it out.

    Cheers,

    Colin
    From memory mate I think Dave who owns this site (Incisor) sells RAVE CD's. In essence it is the factory LR workshop manual on a CD. Cheers

  10. #10
    Join Date
    Apr 2016
    Location
    Melbourne
    Posts
    4,517
    Total Downloaded
    0
    Quote Originally Posted by colintahoe View Post
    I'm having this issue now. What is the "RAVE" workshop manual? I got the donut bushing in my kit from "TR spares" but have no idea on how im going to get it out.

    Cheers,

    Colin
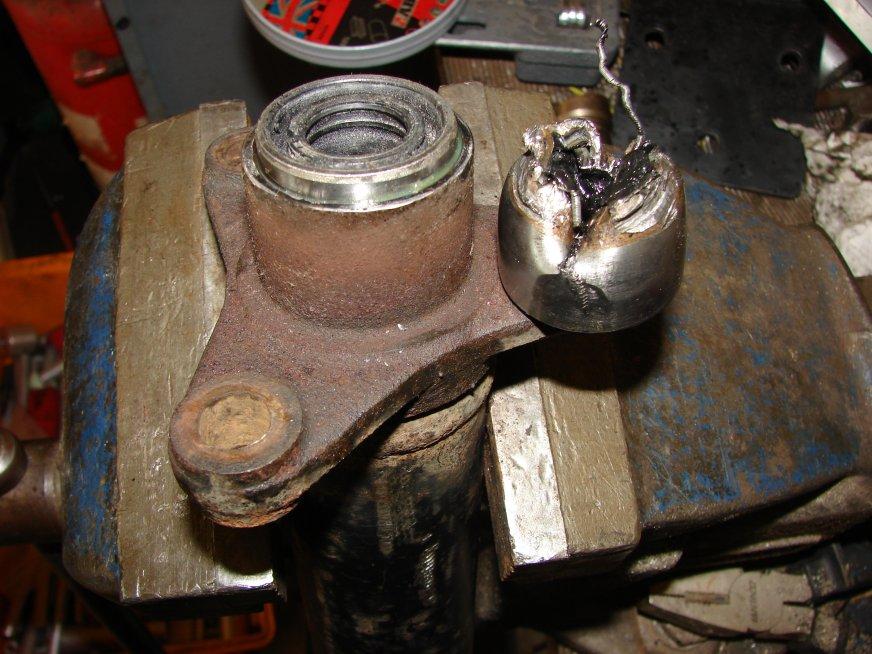
    If you refer to the internal bush in the shaft that locates the pin of the yolk ... the usual way is a cold chisel and hammer and lots of time and swearing and bruises on hands and so forth.
    Eventually you get the outer sheath mangled just enough that you can fold it in on itself and it'll basically pop out.

    IIRC, it took about 30-ish minutes of bashing cursing, bending folding till it basically fell out for me.
    I just sat on a chair in the shed, block of timer on the concrete(don't damage the uni yolk end, or concrete!) ... and attack it with chisel set and hammer.
    I started with smaller chisels first, then as I saw that it started to bit into the outer bearing jacket, then got the next size up.

    Alternatively you could start the standard Landrover owners philosophy and invest in a shedload of tools, and get yourself a bearing puller kit that could do it.
    Arthur.

    All these discos are giving me a heart attack!

    '99 D1 300Tdi Auto ( now sold :( )
    '03 D2 Td5 Auto
    '03 D2a Td5 Auto

Page 1 of 2 12 LastLast

Bookmarks

Bookmarks

Posting Permissions

  • You may not post new threads
  • You may not post replies
  • You may not post attachments
  • You may not edit your posts
  •  
Search AULRO.com ONLY!
Search All the Web!