

 Reply With Quote
Changed oil and filter in auto box, checked dif oils, checked and greased prop shafts, cleaned engine bay

 Swaggie
Oop`sOriginally Posted by Railey


Wizard
Changed oil and filter in auto box, checked dif oils, checked and greased prop shafts, cleaned engine bay
OldBushie
In his defense mate, he did say he thought you were working on your car this weekend,,, Not.
You missed a great day though
Master
SupporterReplaced the other rear sway bar link, removed more redundant LPG stuff in the engine bay, cleaned the purge valve, cleaned the idle control thingy and installed NGK iridium plugs.
Fossicker
Did a bit of this:
Found a lot of this:
Ended up ripping off this:
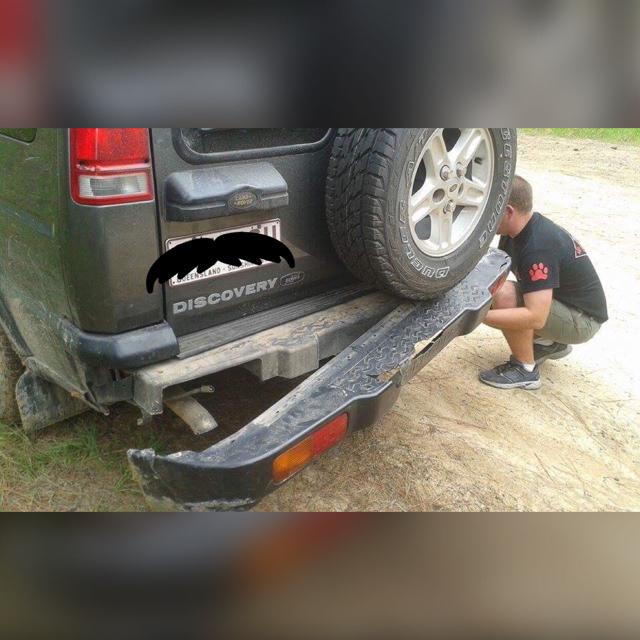
Great day at Glasshouse, puts me a lot closer to replacing the rear bar than planned. Light clusters are intact, so my mate (S2,V8) will be very happy as he needs one!
Wizard
SupporterI fixed my difficult to open driverside door by adjusting the length of the actuating rod that connects the outside handle to the internal lock assembly.
The door now smartly "pops" open like they woulda done in the showroom - no tugging on the handle anymore.......
happy days are here again
LROCV member #131
1999 build D2 TD5 Auto, Mantec snorkel, 2" LRA spring lift, ARB on board air, Ashcroft ATB, CMM air ram CDL shifter, swag & gold pans ....
Wizard
This is what I might need to do to my passenger side door - how difficult of a job is it to do?
Wizard
SupporterNot difficult just a little fussy geting the door trim off and back on. Less fussy is the adjustment itself......however I discovered inadvertently that it's a little simpler (only a little) than what the original poster (cappedup) wrote up. This will make sense after you view the vid but in short you can ignore unclipping the actuator rod at the top and screwing the rod out of the lower connector because this lower connector is in two halves, hinged and clipped closed - you only need open the connector reposition the rod and secure the connector closed. Now close and open the door to test and adjust the actuator rod length as necessary.
Here's the "how to" on removing the door card https://www.youtube.com/watch?v=PiPL1Xp1VD8&sns=em
And here's a vid and how to post for the door handle adjustment
https://www.youtube.com/watch?v=j0XLb6NL6Ns&sns=em
Driver's door hard to open from outside - Land Rover Forums - Land Rover Enthusiast Forum
The 2 pics below that I took showing the lower clip open and closed...
LROCV member #131
1999 build D2 TD5 Auto, Mantec snorkel, 2" LRA spring lift, ARB on board air, Ashcroft ATB, CMM air ram CDL shifter, swag & gold pans ....
Wizard
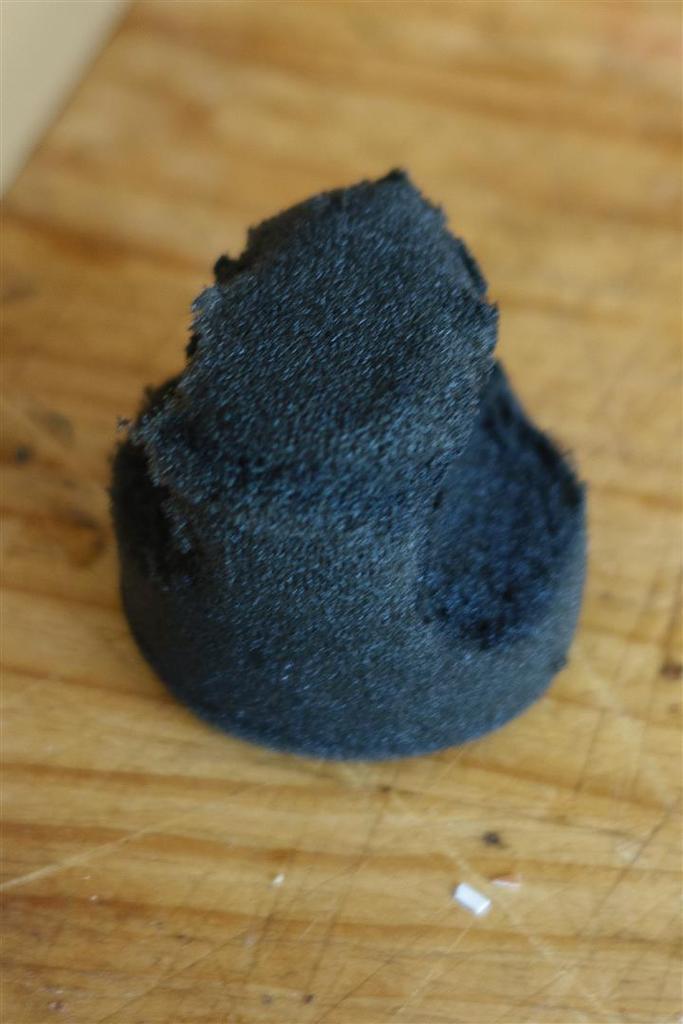
Decided to replace the air suspension filter behind the LH rear tail light today. Pulling the old one apart, the foam looked in pretty good nick after almost 14 years but when I went to wash it it literally fell apart. While I was there I also replaced both upper tail lights with some NOS items from the spares cupboard as the existing ones has a couple of small cracks.
Finally Charlie got his Christmas present early this year.... A nice shiny ARB bar. Clear coat was going on the end caps and black plastic was cracking. Overall it was not a lot more expensive than a new plastic bumper and repainting the end caps.
Cheers
Steve
Swaggie
SubscriberCleaned out the interior and exterior of the intercooler plus exterior of radiator and condenser. Fitted new silicon intercooler hoses.
Whoever designed those little side pieces either side of the grille should be shot hung drawn and quartered. The necessity to get the perfect length screwdriver between the mudguard and trim to remove the hidden from view self tapper was an act of evil genius. Then of course having to remove the horns is logical NOT. Last time I stuck the screws to the screwdriver with duct tape and that caused me lots of drama today as the duct tape covered the screw cross, and it was almost impossible to reach in to pull the tape off the screw. I used long screws this time which I could start by contortioning with a couple of fingers to start them. It will be much easier next time.
I did lots of study on what to use on the inside of the intercooler and eventually did the lot. First with Acetone, then with Phenyl and Kero, then with some degreaser then with CT18 , and then a good rinse and dry with the leaf blower.
Then sprayed CT18 onto the radiator and condenser , leave 15 minutes then rinse many times with a fan spray.
The silicone hoses are thicker than the OEM and I used wide bolted band clamps , which all raised a bit of a problem with clearances , but nothing insurmountable. The thick hose and wide clamp cause the clamp to foul on a bolt on the turbo, but hopefully it will all be OK and it was a bit of a squeeze between the intercooler hoses and radiator end tanks..
Regards Philip A
 Posting Permissions
| Search AULRO.com ONLY! |
Search All the Web! |
|---|
|
|
|


Bookmarks