

 Reply With Quote
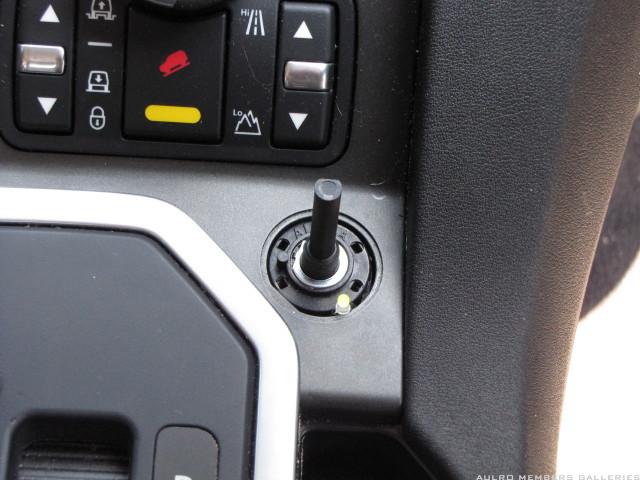
Here's a pic of trying the switch for fit. It was Horto's idea to fit it here originally, and with the washer too.

 ChatterBox
Subscriber
ChatterBox
SubscriberThat's very neat. Is it a straight swap for the cigarette lighter, or does the hole need to be modified?Originally Posted by trif

(Ebony & walnut - excellent choice!)
Cheers,
Jon
Swaggie
Here's a pic of trying the switch for fit. It was Horto's idea to fit it here originally, and with the washer too.
MY21.5 L405 D350 Vogue SE with 19s. Produce LLAMS for LR/RR, Jeep GC/Dodge Ram
VK2HFG and APRS W1 digi, RTK base station using LoRa
Fossicker
Hi Jon,
I needed to enlarge the hole very slightly using a small round file, mainly because the switch casing itself is not completely round (it has from memory 2 or 3 small rounded bits on the side and l simply made some semicircular grooves to accommodate these). Enlarge the hole gradually because a snug fit is what you want. I used 2 small drops of Araldite to hold it in place as the supplied 'lock washer' that l've painted black is used a cover plate to hide the hole and provide a neat looking finish.
Regards Trif.
Swaggie
Mine's held on place with a little dab of clear silicone under the washer.
MY21.5 L405 D350 Vogue SE with 19s. Produce LLAMS for LR/RR, Jeep GC/Dodge Ram
VK2HFG and APRS W1 digi, RTK base station using LoRa
thanks triff, very useful
Master
SubscriberAdmiral,
Just wondered how difficult it was to mount your gauge/switch above the light switch as shown in your pics. Does that whole part of the dash unclip so you can get to the back of it? I started to pull it off but got a worried that I might break something.
Thanks
Jools.
Wizard
SubscriberHi Jools,
You can access this area via the light switch. The light switch module has barb style retainers, but as the panel material is quite soft ( and thick ) should pop out easily with a bit of pressure from a plastic lever. The panel you then have to cut through, is a type of foam, covered with the leatherite plastic. I think I used a small drill to put a pilot hole through, and then carefully enlarged the hole. The outer leatherite will tear easily, so you do need to be careful. The fuel tank gauge will stay put if you keep the hole a snug fit.
Have a bit a feel around behind the panel before locating the gauge to ensure there is enough clearance. From memory, the lower panel will have to come off to assist in routing wires etc. It pulls out from the top, and have a magnet handy, as the spring clips will fly off every time.
D4 2.7litre
Admiral - I am looking for a small fuel gauge for a long range tank I am fitting to a new 2013 Discovery 4, and saw your post showing a small LED gauge above the light switch. Could you please share the make and model of that gauge and if possible, where to buy one? Is there anything special about the tank sender or fitting the gauge?? Thanks!!
Wizard
SubscriberThe LED gauge came with the Longranger tank. Sorry, no idea where you can source one from. Unlikely Longranger are going to be willing to assist, unless you have one of their tanks.
Fossicker
This is same switch used by Longranger for their fuel tanks. Part number is PG200-b made by Apexus.
 Posting Permissions
| Search AULRO.com ONLY! |
Search All the Web! |
|---|
|
|
|
Bookmarks