

 Reply With Quote
Sure have - around Australia then a 2 year around the world trip - SE Asia, China - Russia - Mongolia - Europe - Africa - N & S America.

 ChatterBox
Excellent post, you must be burning the midnight oil.
I have done a little research on sound proofing and heat insullation and there are a lot of products out there to chose from.
I found a couple of Aussie made products from a company Thermotec suited our project needs. There is a bit more info lower on the page in the link below.
http://www.aulro.com/afvb/projects-t...project-9.html
Thanks for sharing your project,
Erich
Master
Sure have - around Australia then a 2 year around the world trip - SE Asia, China - Russia - Mongolia - Europe - Africa - N & S America.
Master
Thank for the advice. Heat and cold are my main problems - heat in the cab and cold in the camper.
I have ceramic coated the exhaust and turbo, heat shields on the inside of the engine bay, then a second layer of foam/foil as well on all areas close to the turbo or exhaust. The whole of the cab has 6-12mm rubberised spray on product on the underside, then on the inside a layer of dynamat ( two layers on the fire wall),. I also have a moulded sound/heat insulation kit for the Unimog - consists of a 15mm soft foam and a 10mm heavy rubber - weighs over 100kg and will cut the noise and heat down in the cab
I have already bought my insulation for the camper box - did a lot of research and went with a polyester fibre bat 50mm thick. It is used in trains and buses, apart from having a good "R" factor, does not retain moisture - which is critical in a steel frame construction, has excellent sound absorption and was locally made as well. I am no as worried about heat insulation as I am about cold insulation - we will most likely be travelling in sub-zero temperatures. From my research there was a lot of "misleading info" on "R" factor - most manufacturers give and "R" factor per 1" or 10mm depending on the country of origin. I almost bought something that had a great "R" factor, but it only comes in 10mm thickness and 50mm of polyester bat beat the insulation property by far when the actual "R" factor for the specific thickness of material is taken into account.
The aluminium is insulated from the steel frame through the Sikaflex, then the composite inner lining will be insulated from the steel frame. This will limit the "thermal bridging" problem. I will also have a 5 or 8kw diesel heater which will keep the engine block and the camper warm - and electric blankets as well - all necessary for when it's -20 degrees.
I saw you section on the cavity wax. When I start running the wiring, I will be drilling through some of the box sections. I will pour in a few litres of cavity wax. I made the lower box section continuous all the way around, so the wax can flow where it needs to, and the main "hoops" as also continuous so I can get the cavity wax into them as well. I'm still thinking about the bracing member, where I drill a hole in each and add the cavity wax. Condensation inside tubular members is a problem in cold weather due to the heat / cold cycle they got through , which leads to rust from the inside.
Originally Posted by Bundalene

Swaggie
SubscriberHi Iain - can I ask a bit more about your insulation please.
I did a search on "polyester fibre bat" and read a few articles, and it seems to be the one to get. What brand are you buying, and where did you get it from? I only want 1" thick wall insulation as that's what the framework on my canopy doors etc is.
Thanks
David
Master
Hi David, I will be using Higgins 50mm polyester batt - HBL3250. It is a combination thermal / acoustic batt. 32kg/m3 Polyester batt. - it is 50mm I'm not sure if they make it in 25mm thickness.
I also plan on a layer of the thin foil insulation in the roof - just because I have a roll lying around.
Master
This week I realised that in a short time, I will be where most people start building their campers, with some sort of a camper box. It has been almost a year since I started building the frame - whilst the last 5 months has more or less been fixing all the mechanical parts on the Mog itself.
The first photo two photos show the new "composting toilet" that arrived this week. First in the "stored" position, then in the "ready for use" position. You have to use your imagination to picture the cupboard around it, and a sliding platform that holds the toilet itself.
This weekend I called in a bit of help to clean off all the blue paint that is on the steel. It took the three of use most of Saturday to get the blue paint off the steel, some of it almost fell off the moment we pointed the power wire brushes at the paint, and other parts would just not come off at all - until we put a bit of thinners on it and then it melted off. After the cleaning came the painting, and there is a lot of area on the inside of the Mog. It took around 2 hours and 4 litres of primer to get the the inside painted with the grey etch primer. I had previously painted the area near the seat with some left over paint from the underside of the of the truck. That corner is done with both the grey etch primer, and then a coat of the epoxy primer which is much tougher than the etch primer, but to do the whole truck interior would be overkill, even for me. When the floor is in, I will paint the underside of the truck with the epoxy primer in addition to the etch primer.
In between waiting for the paint to dry, I decided to fit the aluminium skin to the left storage pod and plates to the bottom of the the battery and heater compartments. After that, back to the painting, and after another 2 hours and 4 litres of paint - the next few photos show what the rear looked like.
I have another litre of the white paint left, and I'll use that for putting another coat of paint on the various parts where the floor attaches. I'll have to buy a bit more paint this week to finish off the inside properly, but all going well, I should be in a position to glue the floor down next weekend. Talking about the floor, it should be ready by next weekend so like I said in the beginning, then I'll be in a position that most people start off from - with a completed camper box ready to start fitting out.
Master
A couple more photos
Swaggie
SubscriberEvery set of photos shows more progress. Any estimates as to how far away from finishing it you are?
The white inside makes it look a lot bigger for some reason (compared to the grey). Are you doing the whole of the inside white eventually?
Cheers
David
Edit: Ha - I recognise that bogger")
Last edited by spudboy; 30th January 2011 at 09:43 PM. Reason: Extra poit
Master
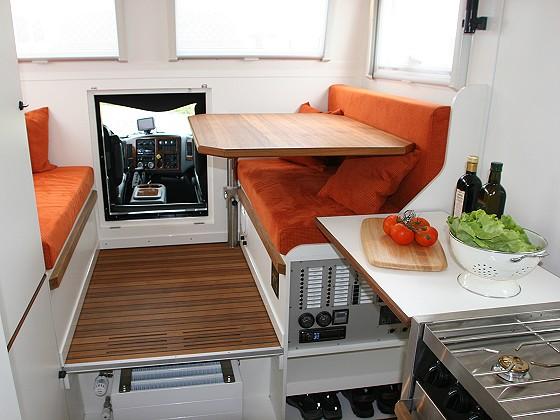
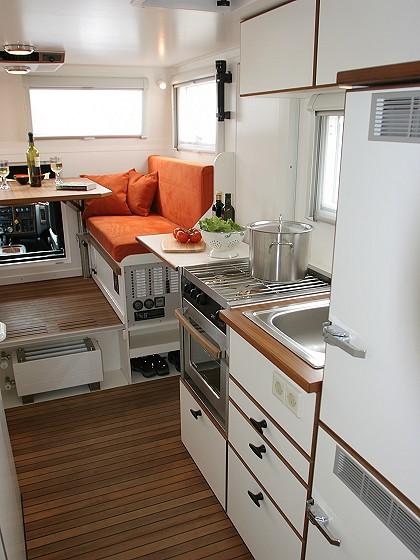
The plan if for a everything to be white, but with a teak floor and timber inserts on the cupboards/furniture.
Something like this:
AS far as a time frame is concerned - I'm now starting to think about a trip in August or September this year.
Master
Been reading this thread and remembered that before Christmas I took a couple of shots of a Unimog heading through Acacia Ridge here in Brisbane
I think it had Alsakan plates and looked sooooo out of place amongst suburbia.2924157070106725807YHDLFa_ph.jpg
Also another larger image at http://thumb7.webshots.net/t/82/182/...7vSEmBE_th.jpg
New :- D3 TDV6 2006 SE
Bullbar, traxide dual battery
General grabber ATs
Mitch hitch
Home made drawer and fridge system
Foldable UHF antenna on roof rail
 Posting Permissions
| Search AULRO.com ONLY! |
Search All the Web! |
|---|
|
|
|

Bookmarks