


 Reply With Quote
Fantastic work, you put so much work and attention to detail. You sure you want to use it later? Im making progress on mine and refer back to your pics also even tho mine will not have the finish you are giving it. Look forward to more pics.
cheers

 Master
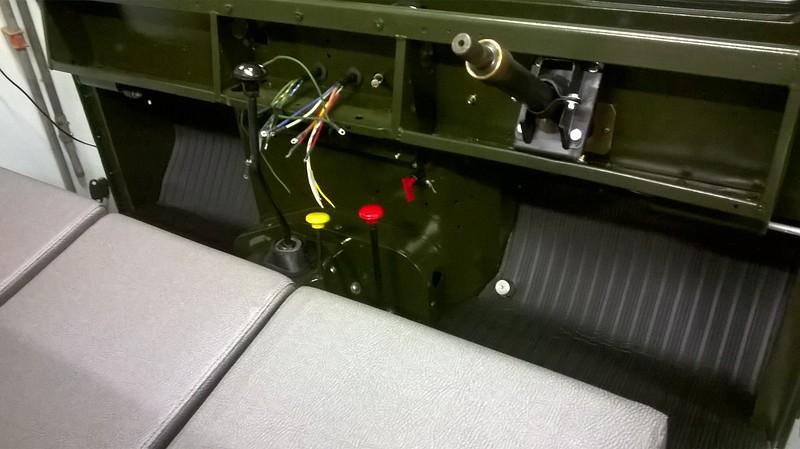
Seems a rather flimsy setup... straps didn’t come with the seats, I guess I’d better get some.
I didn’t get a lot further today - domestic duties and all that. But spent some time finishing off in the cab floor, courtesy of some Bunnings matting.
The cab of course being the bit you spend the most time looking at, I’m pretty happy with how well it’s come up.
YarnMaster
SupporterFantastic work, you put so much work and attention to detail. You sure you want to use it later? Im making progress on mine and refer back to your pics also even tho mine will not have the finish you are giving it. Look forward to more pics.
cheers
Carlos
1994 Land Rover Discovery 300tdi
1963 Land Rover Series 2a 88
Youtube Channel: https://www.youtube.com/channel/UCu3...BtsNIuTyGkAo5w
Instagram: https://instagram.com/rover_tasmania/
Wizard
Looks fantastic. I'm very jealous!
Master
Originally Posted by Cap

Thank you you both for your kind words.
As Ive said before in this thread, for me it’s all about the journey. I enjoy the fiddily bits, and taking my time over the small stuff. I don’t know what I’m going to do with myself when it comes to the inevitable end.
But i intend to fully use it, there is no room here for a garage queen. It won’t be a daily driver, I’ve got the Defender for that, but it will be on full rego and get plenty of use as a weekend getabout and trailer tug. There won’t be any severe off-road, but we’re on acreage here and there’s plenty of paddock work where it will come in very handy.
Carlos, I’ve been watching your build and enjoying your great videos from the start, it is coming along really well. I’m glad you can find some help and inspiration from this thread, as I did from others who were building their projects before me.
Thats what this forum is all about, novices and experts alike helping each other along.
What a great place!
Peter.
Master
I wasn't overly happy with the paint I'd put on the bonnet last weekend, there were some dry areas where I went over it a bit fast, and a big scratch I put there when I was trying to fit the bonnet by myself. I was tempted to leave it, but I still had the doors to do so I decided to paint it again. So I sanded it back to 800grit on Saturday and hung it in the carport ready for repaint.
Up early on Sunday, cold and still morning. Perfect!
Painting went well, and apart from a small run in an unconspicuous area which I could live with, all in all a better job.
then the wind started to rise... to the point that within an hour it was blowing a gale! The bonnet was jumping around like a frog in a sock, and I was afraid it would come off the flimsy bits of wire I had hung it from and crash to the ground and ruin all my work...
So I checked if it was dry enough to bring indoors, a tentative poke with a finger, and then a firmer one showed the paint was good. So I grabbed it on the sides and carried it in. (Is everybody nodding knowingly yet?)
You guessed it... two fat palm prints were left behind! AAARRRG!!!!It would seem it was dry on the outside but underneath the paint was soft enough to move around.
Back to the sandpaper again...
Or maybe a couple of strategically placed stickers...
BTY, the doors which I'd painted at the same time and left in the carport fared just fine, I should have left the bloody thing there with them...
No pics, too embarrassing...
Cheers, Peter.
YarnMaster
SupporterKnow the fealing I painted one guard 6 times & still not happy with it , but every one tells me its OK.
Master
Ok, I need some help please.
I bought some anti-burst latches not realising they would not work with the old bolt style striker plate, I’ve searched around and worked out I need a pin style of plate but I don’t know what to get. Can anybody give me a part number?
Also I will have to drill holes for the key barrels, does someone have a handy template for this?
Or perhaps point me to an appropriate thread?
Peter
RoverLord
Striker 395294 RH side, 395295 LH side. You also need two shims 395078 that go behind the striker.
And, of course, bolts, nuts and washers, but they are the same according to the book.
Can't help with a template, sorry.
John
JDNSW
1986 110 County 3.9 diesel
1970 2a 109 2.25 petrol
Master
This is what a Righthand side one looks like they are handed
image.jpg
Cheers Paul
Master
Thank you gents, bits ordered.
2018-06-19 08_04_57-John Craddock LTD.png
for anyone using those numbers the striker shim is 395078
 Posting Permissions
| Search AULRO.com ONLY! |
Search All the Web! |
|---|
|
|
|


Bookmarks