Results 1 to 9 of 9

Thread: Brake venturi air leak

  1. #1
    Join Date
    Nov 2014
    Location
    Canberra
    Posts
    50
    Total Downloaded
    0

    Brake venturi air leak

    Hi there, this is my very first attempt at writing something here, and I'll try to sound sensible, (a folorn hope...)

    I've had Tallulah, a S3 Diesel wagon for couple of years. She has brake assist with vacuum provided from behind a butterfly venturi on the inlet manifold.

    I was having a gentle fiddle, and I noticed there was a lot of free play between the brass butterfly shaft and the aluminium venturi housing. This worried me, because unfiltered air will be continually sucked into the engine through gaps between the shaft and the housing.

    I looked at getting it bushed, but the metal is sufficiently worn that it would still be difficult to get a good seal. Besides, I didn't know where to go, it would probably cost a bit, and I wanted to fix it for myself.

    This has been a pragmatic bodge job, and if you have any good or bad ideas to make it better, or to stop it getting worse, please share your opinion, this has been a novel experience for me!

    The brass shaft had worn by a bit under a mm on the same side on both ends: I guess the force on the butterfly from the airflow makes it push the the same way; the holes in the aluminium were also very slightly oval.

    I wanted to stop the metal wearing any more: I did this by wrapping plumber's PTFE tape around the shaft until it was a gently tight fit when I put the shaft back into the housing, it had about 12 wraps a side. I then trimmed the tape ends, especially on the inside of the housing. One end of the shaft just stuck out slightly from the housing, and the other end and has a pivot arm attached. I found that a 1/4" grommet is slightly tight over the shaft. I cut one in half and slid it up the shaft to the pivot arm. There is about 3mm of unworn shaft sticking out of the housing, and I hope the grommet has made an airtight seal on the shaft. I used that blue "liquid gasket in a toothpaste tube" to seal the grommet-half onto the aluminium housing, and it isn't rotating (at the moment) on the housing.

    The other end was easier: I used the same blue liquid gasket to glue a large washer onto the housing over the end of the shaft, and then glued a 5 cent piece over the hole in the washer to make an airtight seal.

    On reassembly and test, I 've found that the brakes really work, all of a sudden! I guess the vacuum was largely compromised by those leaks, and I wonder what nasty stuff got into the engine until now.

    It'll be interesting to see how this this home made repair will turn out to be.


    Here is the washer and coin nicely glued on


    And here is the grommet glued in place. The PTFE tape got a haircut with a trimming knife before it all got put back together again.


    I'll keep an eye on it, and fingers crossed.

    Cheers,

    Mike.

  2. #2
    JDNSW's Avatar
    JDNSW is online now RoverLord Silver Subscriber
    Join Date
    Jan 1970
    Location
    Central West NSW
    Posts
    29,521
    Total Downloaded
    0
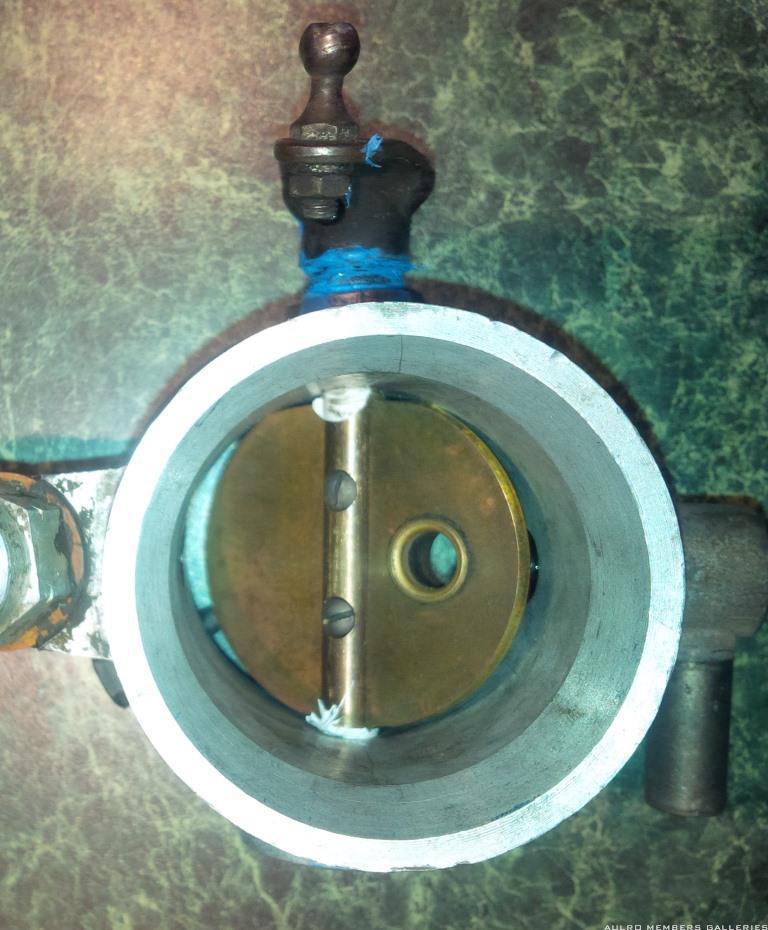
    Looks an ingenious fix. It will be interesting to see how it wears. I suspect the main source of wear on the bushes and shaft is due to the butterfly fluttering. And it is likely that the loss of vacuum is mainly due to the fact that play on the shaft stops the butterfly from closing completely. (although maybe I may not appreciating how big the gap between the shaft and the bush was!)

    John
    John

    JDNSW
    1986 110 County 3.9 diesel
    1970 2a 109 2.25 petrol

  3. #3
    Join Date
    Nov 2014
    Location
    Canberra
    Posts
    50
    Total Downloaded
    0
    Yes, it was about 0.4mm wobble one way, and about double that if you wobble it the other way, which shows how oval the shaft is.

    I don't think the butterfly has to shut completely: you can see the big hole built into it, so the engine won't stop when you're foot's off the throttle.

    She' driving much more nicely now too.

    I took the whole venturi off for a couple of weeks while I played with it. The brakes were 'normally heavy', but I hadn't done anything clever with the oil breather which normally also plugs into the venturi. I now have an oily puddle to clean off the of of the cylinder head: there are worse things in life to deal with.

    Mike

  4. #4
    Homestar's Avatar
    Homestar is offline Super Moderator & CA manager Subscriber
    Join Date
    Aug 2010
    Location
    Sunbury, VIC
    Posts
    20,105
    Total Downloaded
    0
    Long term, if your fix (which I like) doesn't last, do you have an issue with going for something non original? There are a few options - a belt driven vacuum pump, an alternator off a more modern diesel - with built in vac pump, or a small vac reservoir and electric vac pump (I've even got one of these you can have for the price of postage).

    Just a few thoughts.
    If you need to contact me please email homestarrunnerau@gmail.com - thanks - Gav.

  5. #5
    JDNSW's Avatar
    JDNSW is online now RoverLord Silver Subscriber
    Join Date
    Jan 1970
    Location
    Central West NSW
    Posts
    29,521
    Total Downloaded
    0
    Quote Originally Posted by Cerise View Post
    .......
    I don't think the butterfly has to shut completely: you can see the big hole built into it, so the engine won't stop when you're foot's off the throttle.
    .....

    Mike
    It is designed to have the butterfly shut completely, otherwise it would not have the hole you point out. If you have both the hole and the butterfly not closing, you lose vacuum.

    The linkage is designed so that the butterfly is full open except when the throttle is closed, and I suspect it is easy for this to get out adjustment.

    John
    John

    JDNSW
    1986 110 County 3.9 diesel
    1970 2a 109 2.25 petrol

  6. #6
    Join Date
    Nov 2014
    Location
    Canberra
    Posts
    50
    Total Downloaded
    0
    Thanks JD, that's a good point.

    I'll undo the flexible hose this weekend and peer down the hole to see how shut the butterfly really is.
    The way the butterfly is attached to the shaft doesn't look adjustable, and the the pivot arm is connected to the shaft by a (loose) pin. I've wrapped the connection between the venturi and the manifold with silver carpet tape for an airtight seal. The 'proper' seal is done by an O ring, held in place by 3 bolts, but like everything else it's a bit rattly and I don't trust that seal either, (hence the carpet tape).

    I think the only sensible adjustment would be to adjust the length of the pushrod from the throttle linkage to the pivot arm. I'll let you know how I go.

    Homestar, what a kind offer, thank you! I'll PM you. About 30 years ago I lived in a few less-developed African countries, and you often had to be pragmatically inventive to keep trucks moving. Most of the fun comes from making older, worn out things work again or last a little bit longer. This fix took me back to my youth and making do with what little you have available!

    Mike.

  7. #7
    C00P Guest
    I wonder if the same PTFE tape would work in reducing the free play in the butterfly shaft on a petrol 2.25? Anyone got any idea whether PTFE would withstand petrol and whether the tape is sufficiently slippery to permit the butterfly to open and close smoothly?

    Regards

    C00P

  8. #8
    JDNSW's Avatar
    JDNSW is online now RoverLord Silver Subscriber
    Join Date
    Jan 1970
    Location
    Central West NSW
    Posts
    29,521
    Total Downloaded
    0
    PTFE is unaffected by petrol (and almost anything else!) and is slippery - this is what non-stick frypans use. The problem I can see with a throttle on a carburettor is that it is fairly soft and malleable and not very strong. Could be a problem to get it to stay in place.

    John
    John

    JDNSW
    1986 110 County 3.9 diesel
    1970 2a 109 2.25 petrol

  9. #9
    Join Date
    Nov 2014
    Location
    Canberra
    Posts
    50
    Total Downloaded
    0

    pTFE as a tool

    I agree with John, I did quite a few test wraps before I got what I hope to be the right amount of tape in the right place. Tape tension wasn't a problem , and I counted the number of wraps on one end, ad then tested each end by inserting the shaft and simply felt for free play versus freedom of movement. When it started to get tight, the tape slipped up the shaft a bit, which is why you can see it in the bore, a sharp knife and tweezers were used to remove most of the excess.

    I ended up with 12 wraps on one side, and 16 on the other. I used white tape, and I know you can get different colours for different types, thicknesses maybe??

    I'm a bit worried about what will happen if any tape breaks loose. It is soft, so it shouldn't damage any downstream metal, I've never put this tape into a gas flame to see what really happens to it when it gets hot, I'll do that tonight!

    A carby has more sticky-out bits downstream of the butterfly. What would happen if a bit of tape let go and covered a nipple or an orifice, or one of those annular shaped airflow management bits? There must be quite a breeze down the throat. I would treat this as more of an interesting experiment than a solution, and I will be very interested in your results!

    Mike

Tags for this Thread

Bookmarks

Bookmarks

Posting Permissions

  • You may not post new threads
  • You may not post replies
  • You may not post attachments
  • You may not edit your posts
  •  
Search AULRO.com ONLY!
Search All the Web!