Page 7 of 11 FirstFirst ... 56789 ... LastLast
Results 61 to 70 of 105

Thread: Parabolic leaf springs

  1. #61
    Join Date
    Dec 2008
    Location
    dunedin new zealand
    Posts
    53
    Total Downloaded
    0
    I've got british springs parabolics in my swb (3 leaf rear high and like a load). different vehicle to std springs great to drive on ad off road and igot an extra 100 points on ramp travel.
    im just using std shocks at the moment.
    mine were over
    nz$1000 with new bushes and all new bolts.

    friend bought cheap ones for a truck I wont name they rolled up on load off road. buy quality ones!

  2. #62
    Join Date
    Jan 1970
    Posts
    10
    Total Downloaded
    0
    Hi, could anyone tell me were you can buy quality Para's from in Aus?

  3. #63
    Join Date
    Aug 2006
    Location
    WA
    Posts
    13,786
    Total Downloaded
    0
    Quote Originally Posted by JJH View Post
    Hi, could anyone tell me were you can buy quality Para's from in Aus?
    Including your location would help.

    I believe FWD Motors, at Fairfield Rd Yeerongilly QLD are still the Australian agents for RM parabolics.

  4. #64
    Join Date
    Jan 1970
    Posts
    10
    Total Downloaded
    0
    Quote Originally Posted by isuzurover View Post
    Including your location would help.

    I believe FWD Motors, at Fairfield Rd Yeerongilly QLD are still the Australian agents for RM parabolics.
    Thanks for your reply. I am in Tassie, so It will be with freight regardless.

  5. #65
    Join Date
    Dec 2008
    Location
    dunedin new zealand
    Posts
    53
    Total Downloaded
    0
    there you go that's the twist with std shackles ans std shocks limiting the movement on British spring company parabolics.
    Attached Images Attached Images

  6. #66
    Join Date
    Dec 2006
    Location
    Narrogin WA
    Posts
    3,092
    Total Downloaded
    0
    Well I decided to modify the standard leafs after seeking Isuzu Rover's help and I can't thank Ben enough for the advice he has given

    Here is a pic of both of the rear sets reassembled.
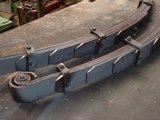


    No before shots; they didn't look too bad but when I stripped them there were wear-steps on all but the bottom one and the upper main leaf, which shows that keeping springs dry and rusty doesn't prevent wear.

    The only tools I needed were:
    1. My cobber's oxy-set to unbend the clamps.
    2. A heavy hammer and an anvil to straighten the ripples in the unbent shackles.
    3. A 4" angle grinder with: cutting discs (4 off); a coarse flap wheel and one grinding disc.
    4. Marking tools and a hand drill to drill the holes for the keeper-bolts on the clamps.
    5. Paint brush.
    6. Spanners.
    7. Vice.

    Materials:
    1. A can of dry-lubricant spray 1off
    2. 5/16" x 4" UNF high-tensile bolts 8 off
    3. About 200ml of Penetrol
    4. 1/2" to 5/8" dia. light tube (I used an old folding-chair frame)

    Method:
    1. Sand the springs to remove loose scale.
    2. Carefully grind the wear-steps to remove the obvious ridges.
    3. Sand the grinding to make it smooth; ignore any blemishes if they don't feel deep.
    4. Mark out and cut the tapered ends 25mm x 12mm with the cutting disc.
    5. Sand a radius on the top edge of the taper so it doesn't dig into the spring above when in use. Make the radius about 3mm.
    6. Sand any sharp edges to make them safe.
    7. Mark-out and drill the holes in the clamps.
    8. Penetrol the leaves following the manufacturer's instructions to arrest corrosion.
    9. Paint the springs if desired (I didn't).
    10. Coat the inter-leaves with lubricant. I used Molybond 122L by ITW Polymers and Fluids (Australia). On the front springs I will use molybond grease to see if there is any noticeable difference.
    11.Assemble the springs with a new centre bolt if necessary.
    12. Assemble the clamp bolts and crush tubes into the saddles.

    I should add that I decided to remove the 3rd spring after Ben told me how much the standard pack could carry.

    Hurry up and wait until you can road test them (could be years in my case)

    Cheers Charlie

  7. #67
    Join Date
    Jan 2009
    Location
    Bibra Lake, WA
    Posts
    599
    Total Downloaded
    0
    Chazza, you might just have to help me do mine on of these days hahah
    Ofcourse, it would be part of the beer economy

    They look great.

  8. #68
    Join Date
    Aug 2006
    Location
    WA
    Posts
    13,786
    Total Downloaded
    0
    Quote Originally Posted by chazza View Post
    Well I decided to modify the standard leafs after seeking Isuzu Rover's help and I can't thank Ben enough for the advice he has given

    Here is a pic of both of the rear sets reassembled.


    No before shots; they didn't look too bad but when I stripped them there were wear-steps on all but the bottom one and the upper main leaf, which shows that keeping springs dry and rusty doesn't prevent wear.

    The only tools I needed were:
    1. My cobber's oxy-set to unbend the clamps.
    2. A heavy hammer and an anvil to straighten the ripples in the unbent shackles.
    3. A 4" angle grinder with: cutting discs (4 off); a coarse flap wheel and one grinding disc.
    4. Marking tools and a hand drill to drill the holes for the keeper-bolts on the clamps.
    5. Paint brush.
    6. Spanners.
    7. Vice.

    Materials:
    1. A can of dry-lubricant spray 1off
    2. 5/16" x 4" UNF high-tensile bolts 8 off
    3. About 200ml of Penetrol
    4. 1/2" to 5/8" dia. light tube (I used an old folding-chair frame)

    Method:
    1. Sand the springs to remove loose scale.
    2. Carefully grind the wear-steps to remove the obvious ridges.
    3. Sand the grinding to make it smooth; ignore any blemishes if they don't feel deep.
    4. Mark out and cut the tapered ends 25mm x 12mm with the cutting disc.
    5. Sand a radius on the top edge of the taper so it doesn't dig into the spring above when in use. Make the radius about 3mm.
    6. Sand any sharp edges to make them safe.
    7. Mark-out and drill the holes in the clamps.
    8. Penetrol the leaves following the manufacturer's instructions to arrest corrosion.
    9. Paint the springs if desired (I didn't).
    10. Coat the inter-leaves with lubricant. I used Molybond 122L by ITW Polymers and Fluids (Australia). On the front springs I will use molybond grease to see if there is any noticeable difference.
    11.Assemble the springs with a new centre bolt if necessary.
    12. Assemble the clamp bolts and crush tubes into the saddles.

    I should add that I decided to remove the 3rd spring after Ben told me how much the standard pack could carry.

    Hurry up and wait until you can road test them (could be years in my case)

    Cheers Charlie
    Great work! They look better than mine!

    Have you reset them yet? They look a bit on the flat side...

  9. #69
    Join Date
    Dec 2006
    Location
    Narrogin WA
    Posts
    3,092
    Total Downloaded
    0
    Quote Originally Posted by isuzurover View Post
    Great work! They look better than mine!

    Have you reset them yet? They look a bit on the flat side...
    No I haven't I thought I would give them a try on the machine first; the ride may still be too harsh and I might want to remove another leaf.

    Thanks for your advice Ben,

    Cheers Charlie

  10. #70
    Join Date
    Aug 2006
    Location
    WA
    Posts
    13,786
    Total Downloaded
    0
    Quote Originally Posted by chazza View Post
    No I haven't I thought I would give them a try on the machine first; the ride may still be too harsh and I might want to remove another leaf.

    Thanks for your advice Ben,

    Cheers Charlie
    One last comment, you may also want to remove the bolts from the outer clamps to get better down-travel.

Page 7 of 11 FirstFirst ... 56789 ... LastLast

Bookmarks

Bookmarks

Posting Permissions

  • You may not post new threads
  • You may not post replies
  • You may not post attachments
  • You may not edit your posts
  •  
Search AULRO.com ONLY!
Search All the Web!